Pool Party Week - Day 3

July 31, 2019


Hello there!

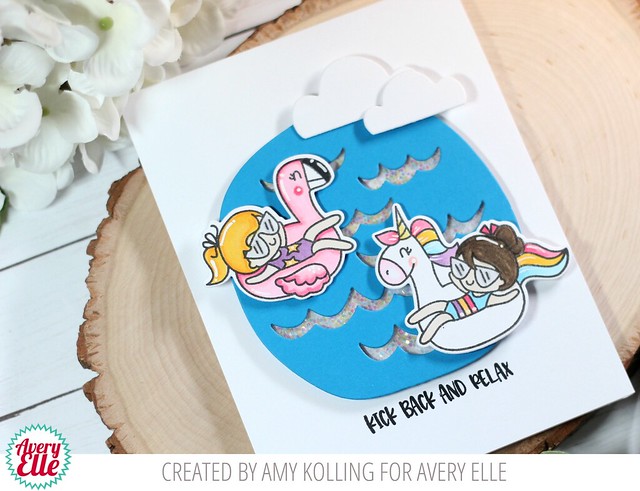
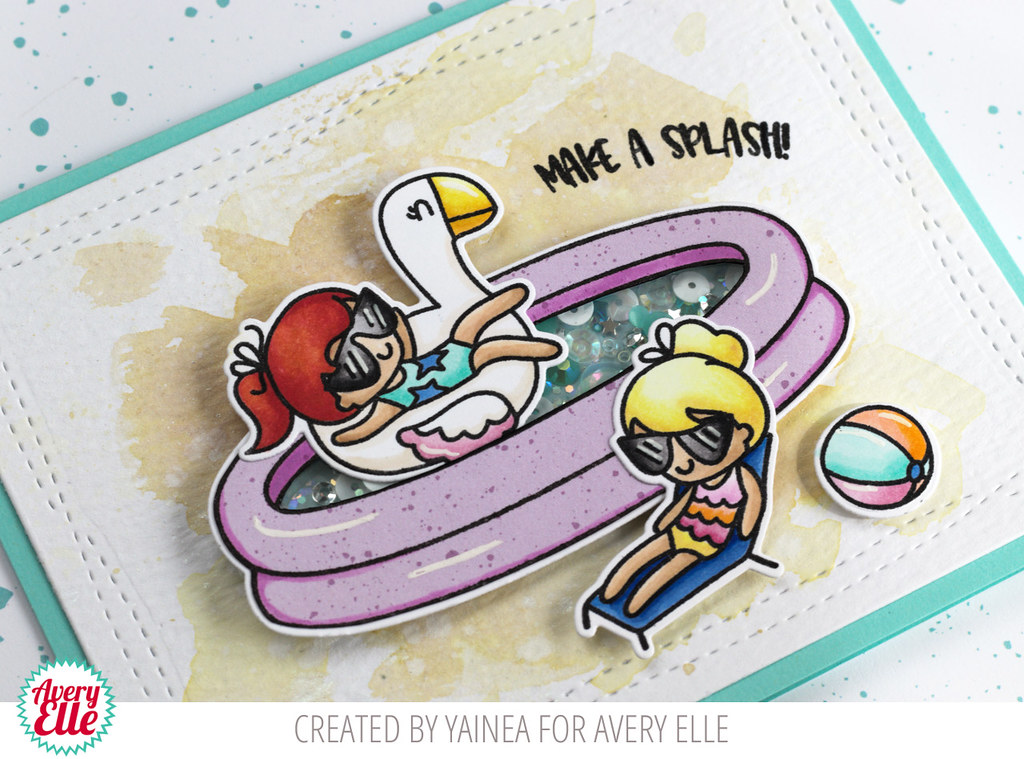
It's Yainea here today sharing a summery and refreshing card that features the cute Pool Party set.

Inspired by the sparkling sun over a pool surface, I had to transform the little pool on a shaker full of sparkling elements! I love the sweet drawings on this set, those girls are you to cute and really fun to color!


To create the card, I started by adding a quick watercolor background on a sand color over watercolor paper that I previously die cut with the Wonky Stitched border die.

Then I stamped and colored all the images with Copic markers (except for the pool, that was stamped on colored paper). Then I mounted the shaker and put all the elements together using Ae adhesive and foam adhesive.


I hope this card brings a smile to you on this beautiful day! Thanks so much for stopping by!


Supply list:


Pool Party Week - Day 2


Hi everyone! It's Melania Deasy hereToday I want to share my card for Avery Elle featuring Pool Party. Love this set because it's full of cute images and they are ready for summer!


Avery Elle supplies that I'm using :
Pool Party Clear Stamps for the sentiment and images
Pool Party Elle-ments to die cut the images
Splash Elle-ments to die cut the pool for the shaker card

I stamp the images, color it using COPIC then die cut it. The background is from Dye Ink Pad with blending tool then splash with a brush. The sentiment is from white embossing powder.

Thank you so much for stopping by and happy crafting!

Hugs,


Melania Deasy


******************************


Hello!  Amy here with a shaker card using Avery Elle's Sea Scene Elle-ments for a fun shaker!  

Pool Party 

The adorable little girl images on pool floaties were Copic colored and die cut.  I created my shaker card using the Sea Scene Elle-ments, backed it with acetate, and added Avery Elle Coarse Glitter.  I added my shaker to the card, added some die cut clouds from Grand Photo Mat Elle-ments, Copic colored pool images, and stamped my sentiment in black ink.  


Pool Party2 

Supplies:
Coarse Glitter

Pool Party Week - Day 1


Hi there!

Elena here, with a pastel-colored Pool Party card:


I created an aperture by cutting into the white cardstock layer with the Pierced Hexagon die. It allowed me to create this ocean scene with the 2 girls on their floaties.


I splattered the pink sky with a darker pink ink, added some white dots, and cut out layers of waves using the Summer Scene die set. I also set a few clouds into the sky, to break up all of that pink, using dies from the Grand Photo Mat die set.

I'm pretty sure that drink will be floating away but I wish I was there right now!

I hope you like it! Thanks for stopping by!

♥.

Supplies:


For The Record Week - Day 5

July 26, 2019


Hi Everyone!

Today I'm sharing For the Record. I love the retro vibe! It's so fun!


To start my card I stamped the "for the record" sentiment and die cut it. Then I did the same with the record. I stamped the inside of the record again and trimmed it out. I love how you can choose the end of the sentiment on the record. It makes this set so versatile!

 Next, I used distress ink to create the rainbow background and adhered all of my stamped pieces. I die cut an extra sentiment piece so that I could create the pink shadow.

Thanks for stopping by!

Supplies:


For The Record Week - Day 4

July 25, 2019


Hey there!

Elena here, with a fun card featuring For The Record:


I think this makes such a cute card, especially for a guy! The kids gave this card to their daddy for Father's Day back in June and he loved it! I started out by stamping the record layer in a crisp black ink. I then took a light grey copic marker and colored over the whole thing, to make it look more like a vinyl record.

I stamped the record image again onto a sheet of red cardstock, and stamped the sentiment into the center before using scissors to snip it out. I added some extra red ink to the edges for extra interest.


For the pocket, I used a very thin sheet of paper. It's almost vellum, but more opaque than vellum. It's from a drawing pad that I keep around the house. I used the highlighter edge of a red copic marker to make the stripes, and then stamped the sentiment over top of them. I love the font on that sentiment! It's so retro!


The record fits into the sleeve, and you're done! The kid wrote their messages on the back of the record.

I hope you like it! Thanks for stopping by!

♥.

Supplies:

For The Record Week - Day 3

July 24, 2019


Hi everyone,

Katie here with a Video to share of how I made a quick and colorful card featuring the For the Record stamp set and the Plus Frame Elle-ments die.


I used some simple techniques like heat embossing and ink blending to add color and texture to the record image.  For the sentiment, I die cut and off-set stacked the sentiment to create a colorful marquee.


Avery Elle's liquid glue adhesive was perfect for securing all the layers together.  I love how the swoosh in "Record" looks like a record player arm!

I hope you'll take a peek at how it all came together!


Supplies: 

Thanks for stopping by!
Katie

For The Record Week - Day 2

July 23, 2019


Hello everyone!  I hope that you are having a great week.  I am popping in today with this fun For The Record Card that I created.  I love how retro the font is and that record sleeve!!  

Supplies:
For The Record Clear Stamps & Dies
Rich Gold Embossing Powder
New Moon Dye Ink


Thanks for stopping by to take a peek. Have a great day!

For The Record Week - Day 1

July 22, 2019


Hey there!  It's Caryn here today starting off the week with a card featuring the fantastic For The Record stamp and die collection.  This is such a unique design and it was perfect for a card for my husband's birthday which happens to be TODAY!!  The only thing he asked for (because what do you get the guy who has EVERYTHING?) was some vinyl records for his collection so this set could not have been more perfect!


I stamped the record in New Moon pigment ink and then heat embossed it in clear embossing powder - it makes it look just like vinyl!  I die cut it and coloured the centre with a Copic marker.

I then made the sleeve using the dies and cut it from some red acetate I've had in my stash forever.  I thought this would be the perfect project to use it for.


To finish I stamped and die cut the "For The Record" sentiment and adhered it to the sleeve and added some shading in grey to give it a bit of a more aged, retro effect.


Supplies:

Layered Rose Week - Day 4

July 19, 2019


Hey all! It's Heather Campbell here. I'm back with a card using the new the Layered Rose stamps and dies.

To create my card, I stamped and layered the ink on the roses. They were so easy to line up it, I was so impressed! Then I stamped the leaves and die cut them. 

To assemble my card, I ink blended my card base and added a Wonky Scallop frame. Then I added my flowers, sequins and sentiment. 

Thanks so much for stopping by and sharing part of your day with me!
Thanks!
Heather 

Layered Rose Week - Day 3

July 18, 2019


Hi Everyone! Ashley here today to share the very pretty Layered Rose stamps. This was my first time using a layered stamp set and I have to say that I'm a big fan! It was so fun!


To create my card I started by stamping the top three layers of the rose in different shades of pink. Next, I die cut the rose. I love how it turned out!

Next, I wanted to add more flowers to the card so I stamped and die cut the large stamp from Blooming. I layered the images on some patterned paper and then die cut the sentiment from the Dotted Frame dies. 


I love how this card turned out! Thanks for stopping by!

Supplies:

Layered Rose Week - Day 2

July 17, 2019


Hello!  Amy here sharing a Congratulations card using the Layered Rose stamp set.  I absolutely love these types of stamps and I thought I would share my spin on adding some detail.

Layered Rose2 

While there are four layers to this rose, I only used the last three layers to create my roses omitting the solid first layer.  So for reference, I have marked 1, 2, 3 on the stamps.

Layered Rose 

I stamped layer 1 with my lightest ink and then used the next darkest ink for layer 2.  While layer 2 was still in place, I lightly added watermark ink (Versamark) to the edges,  added some Rich Gold Embossing Powder, and heated with my heat tool.  Layer 3 was stamped in Versamark ink and also gold heat embossed.  Looking at my roses, you can see the stray gold heat embossing and this was exactly the look I was going for!  I wanted the color of layer 2 to still show through but add depth with the gold embossing!  I did the same technique with the leaves and layer 2.  

Layered Rose 

My hexagon note card was die cut using the Pierced Hexagon Elle-ments.  I don't know about anyone else, but I love a shaped card!  The roses were arranged so that some extended over the edge of the hexagon note card.  This card will still fit in a standard A2 envelope for reference.  As finishing touches, I added a gold embossed sentiment strip (done using the Simple Sentiments Elle-ments) and some gold gems.

Layered Rose3 

Supplies:
Layered Rose Clear Stamps


Layered Rose Week - Day 1

July 15, 2019


Hello! I am popping in today with a cute card using our new Layered Rose Clear Stamps.  I LOVE how easy the layers are to line up and the fantastic results you can get.

Classic Flags Dies
Layered Rose Clear Stamps & Dies
Pure White Embossing Powder
Pixie Pigment Ink
Fizz Pigment Ink
Papaya Pigment Ink
Jungle Pigment Ink
Celery Pigment Ink


Thanks for stopping by to take a peek. Have a great day!

Peek-A-Boo Scary Week - Day 5

July 12, 2019


Hi Everyone! Today I'm sharing another great Peek a Boo set, the scary (not so scary) monsters!

Let's take a look...


To create my card I started by stamping, die cutting and coloring a few monsters from Peek a Boo Scary. Next I inked and die cut a hill, inked a background and stamped the mountains from Starry Scene

I placed all of my pieces inside of the new Grand Photo Mat Die with a few clouds. Then I finished the card with a sentiment from Peek a Boo Scary and a die cut from Pierced Hexagon Dies.


Thanks for stopping by!

Supplies:

Peek-A-Boo Scary Week - Day 4

July 11, 2019


Hi everyone! It's Deasy here. Today I want to share my card for Avery Elle featuring Peek A Boo Scary Pals. It's full of fun cute monsters and they are ready for a Birthday!


Avery Elle supplies that I'm using :
Peek A Boo Scary Pals Clear Stamps for the sentiment and images
Peek A Boo Scary Pals Elle-ments to die cut the images
Wonky Scalloped Frames Elle-ments to die cut the frame on white card stock and white foam then glue them all together

I stamp the images, color it using COPIC then die cut it. The background is from Dye Ink Pad with blending tool then splash water and watercolor with a brush. I add some tiny gold stars for the embellishment. 

Thank you so much for stopping by and happy crafting!

Hugs,


Melania Deasy

Hello!

It's Yainea here today sharing a set of cards using the fun Peek A Boo Scary Pals. 


I followed the same design for my three cards, starting by stamping a colorful background using the Starry Scene background stamp and adding some elements on top. These cards are great for all occasions, just change the sentiment or add a birthday hat if you are up to! ;)


I colored the monsters with Copic markers and die cut the clouds, grass and snow using different Avery Elle dies. Then, I stamped the same sentiment on the three cards, using black ink and another one that matched the card color scheme. Finally I tied some twine under the sentiment and added several white sequins.


I hope you feel inspired to create some monster cards! Thank you so much for visiting and have a nice day!!


Yainea


Supply list:


• Peek-A-Boo Scary Pals Clear Stamps
• Peek-A-Boo Scary Pals Elle-ments
• Starry Scene Clear Stamps
• Starry Scene Elle-ments
• Liquid Glue Adhesive

Peek-A-Boo Scary Week - Day 3

July 10, 2019


Hello!  Amy here sharing a card using the Peek-A-Boo Scary Pals from Avery Elle.  

I started my background with die cutting the Dotted Frame Elle-ments out of white cardstock.  With the center rectangle, Distress Inks Seedless Preserves, Salty Ocean, and Peacock Feather was ink blended.  The panel was then spritzed with water and flicks of white acrylic paint was added.

Scary Pals

My critters were Copic colored and die cut.  My frame was added with foam adhesive as well as my critters for dimension.  As final touches, I added tiny dots to the sky as stars and also added some to my images.  

Scary Pals2

Supplies


Peek-A-Boo Scary Week - Day 2

July 9, 2019


Hi there!

Elena here, with a not-so-scary card featuring the monsters from the Peek-A-Boo Scary stamp set.


I love these adorable monsters! I colored all of them, and some of them twice, to make a cute little tower of monsters.


The one on the top has one paw on his buddy's head and another paw holding up the sentiment sign.  I added a few balloons to make sure you know it's a party and backed the colorful monsters with a layer of black patterned paper (it's a sheet of grid paper that Avery Elle used to make! I want it back!) to make sure they popped.


To finish off, I framed the whole thing out with the Plus Frame die.

I hope you like it! Thanks for stopping by!

♥.

Supplies:


Hello!  Katie also here with more not-so-scary Peek-A-Boo inspiration. Now the Peek-A-Boo Scary Pals have taken their Monster Wishes into the water for a summer pool party bash! 


I stamped, colored and die cut the monsters, sign and party hats. I placed them onto a background I created using the Summer Scene Elle-ments die.  The Scary Pals borrowed a floaty from their Summer Pals for the occasion.


The Summer Scene Elle-ments die is perfect for tucking our Scary Pals between the waves. The pals look like they're having a blast bobbing and floating in the water. 

Supplies:


Thanks for stopping by!
Katie


Peek-A-Boo Scary Week - Day 1

July 8, 2019


Hey there!  Nicky back with you today sharing a new card I have made using Peek-A-Boo Scary and the Plus Frame Die.


To begin, I ink blended a panel of cardstock using Distress Ink in Wilted Violet.  I mixed a little Faded Jeans with water and splattered this liberally over the entire panel.  I ink blended two grassy hill die-cuts using Distress Oxide in Blueprint Sketch and applied those with foam tape and finally I die cut the Plus Frame from white cardstock, backed it with foam tape and adhered it down.


The 'Scary' characters and their sign were stamped onto Bristol Smooth cardstock using Ranger Archival Ink in Potting Soil.  They were watercolour painted using Kuretake Zigs in Pink, Cobalt Blue, Light Violet, Gray Brown and Haze Blue. the sentiment was stamped on the sign and I die cut the images and backed them with foam tape and applied.


I adhered the panel to the white cardstock based and the final touch was the addition of several sparkling sequins of various sizes for accents.


So happy you came by to read about this card, thank you!  See you next time.


Nicky x


Products Used:-


Peek-A-Boo Scary Stamps

Peek-A-Boo Scary Dies
Plus Frame

Caryn here too with another card using the Peek-A-Boo Scary Pals stamp set. I've paired this adorable bat monster (my favourite one) with the new Classic Flags Elle-ments - such a useful set to have in your collection.  I took some watercolour cardstock and blended some liquid watercolour  (Cherry and Sugar Plum) with water onto the paper.  Once dry I die cut the banner shape from the Classic Flags die collection.  I die cut it a second time from vellum for a layered look and then adhered them to a pale pink card base.


I die cut the rounded tag die from the Classic Flags Elle-ments in white and threaded some Raspberry Hemp Twine through the hole.  On a separate piece of card I stamped the bat using New Moon dye ink and coloured him with Copics.  


To finish I die cut the small banner from the Classic Flags set and doubled it up stamping the sentiment on the lower one (so it wouldn't be obscured by the bat's little feet) and then added some Clear Shimmer to the feet and horn.


Supplie:

Liquid Watercolours (Cherry and Sugar Plum)


site design by designer blogs