A Very Cute Stuck On You Card by Caryn

December 31, 2018


Hello! I am popping in today with a very cute card by Caryn!  Isn't it fun?!


Supplies:


Thanks for stopping by to take a peek. Have a great day!

Peek A Boo Pals with Ashley

December 28, 2018


Hi Everyone! Ashley here! It's my last post of 2018, can you believe it?! I can't wait to see what's in store for Avery Elle in 2019 but first let's look back at some of my favorites from 2018.

Last week I shared part one of my 2018 favorites HERE. As promised, I'm back to share more favorites this week!


This card features many animals from Peek a Boo Pals. I stamped so many I had to make my card extra tall! I picked two water loving animals for the bottom, two forest loving animals for the middle and two tree loving animals for the top! This was a fun way to mix Peek a Boo Pals and Polar Peek a Boo Pals.


I framed the animals with Photo Mat Dies and added sentiment banners from Party Pals. I blended Distress Ink in each frame and then did a light water color wash on the entire background. The light water color background helps the frames pop.


I adore these animals and love how this card turned out! See you in 2019!

Supplies:

An Adorable Tons Of Hearts Card by Heather

December 27, 2018


Hey all! Heather Campbell here. I hope you had a wonderful holiday.

I'm ready to break out the Valentine's stamps and play!  Woot!

To create my card, I first stamped, colored and die cut the images from Party Pals

Then, I die cut the Tons of Heart panel and mounted it on a square card base.  Finally, I adhered everything together and finished the card. 

Thanks so much for stopping by and sharing part of your day with me. 
XOXO,
Heather 

Peacock With Katie

December 26, 2018


Hello friends,

Katie here.  Valentine's Day is just around the corner, and I have a cute card to share with you today featuring the Peacock stamp set and the Tons of Hearts Frame Elle-ments die.


I die cut a white panel of card stock using the Tons of Hearts Frame Elle-ments die.  In the center, I stamped and heat embossed the Peacock and the sentiment with Veramark ink and embossed the images using Avery Elle's fine-detail embossing powder in Rose Gold.


I colored the Peacock in shades of pink and red with Copic markers and adhered the frame panel to an ink-blended piece of card stock.  I love how the background colors peek through the heart openings!

Supplies:

Thanks for stopping by!
Katie

Simple Sentiments With Amy

December 25, 2018


Merry Christmas!  
Amy here and I know it's Christmas but I have a birthday card to share using one of the very versatile (and must have) stamps sets.......Simple Sentiments.

Simple Sentiments

I had the idea to white heat emboss the balloon from Party Pals so I could add color inside.  I did this by using some beauty brushes, Distress Inks, and a very light touch.  Of course, I did them in rainbow color.  After blending the colors, I buffed the balloons with a paper towel.  The balloon panel was die cut using the Wonky Stitches Elle-ments.  

For the sentiment, I used several sentiments stamped onto Simple Sentiments Elle-ments.  I added them with foam adhesive at varying heights.  As a finishing touch, a few clear sequins were added in.

Simple Sentiments2 

Supplies:

Some Bunny With Nicky

December 24, 2018


Hi, this is Nicky with you on Christmas Eve and I'd like to wish you all a very happy holidays!  Today I'm sharing a card made using the new Some Bunny stamp set from the latest release.


My card started with an A2 panel of white cardstock that I softly ink blended using a Clarity Stencil Brush.  I used Distress Ink in Tumbled Glass and faded it to an ombré affect.  I die cut this panel to give it the simple faux stitched edge and used one of the tiny images from this mini stamp set to add some interest to the background.   I did this with Distress Oxide Ink in Tumbled Glass but stamped it off once for a second generation stamping where the pale blue is deepest and where it fades to white I used a 3rd generation stamp.


I then die cut the largest frame from Wonky Scalloped Frames Die, backed it with dimensional foam tape and applied it to the panel which in turn I applied to a 110lb white cardstock card base.

On Bristol Smooth cardstock I used Ranger Archival Ink in Potting Soil to stamp my bunny, balloon and hearts.  I watercolour painted these images using Kuretake Zigs and then die cut them and stamped the sentiment on the balloon.  Everything was added with more foam tape.


Had to share this close up of the ridiculously cute bunny .... I mean come on!!!?

The finishing touch was a simple dot of silver gel pen into the centre of each 'star' shape so there is a sweet twinkle when the card is handled.

I love this stamp set so much I couldn't resist making a second card using it!


Thanks for coming by to read about the card today, I hope to see you next time.  Happy crafting!

Nicky

Products Used:-

Some Bunny Clear Stamps
Wonky Scalloped Frames Elle-ments

Ashley's Favorite Avery Elle Products of 2018

December 20, 2018


Hi Friends! It's Ashley here today sharing some of my favorite products from 2018! 


Oh how I love the Magnolia stamp set from last spring. I knew I wanted to start with this set. Let me show you how I water colored it!


First, I heat embossed the magnolia flower on water color paper.  Next I did a super light color wash with Mimosa liquid water color.  


I like to let the base color dry and then I add my shading. Paint the lines with a damp (not super wet) brush, then blend them in. 


Once the lines are blend let it dry again and repeat the process. I found that by letting the project dry between layers of paint that I can control the color better.


After I made my flower with Mimosa water color paint I decided to make another with Cherry Next I added a few more of my favorite products. The sentiment is from Grateful and the gorgeous background is my all time favorite Chevron Mat.

Thanks for stopping by! What are some of your favorite Avery Elle products from 2018? I'll be back to share more next week!

Supplies:

A Fun Party Fox Card by Amy

December 19, 2018


Hello!  Amy here to party with you and this adorable fox from Party Fox!  I am always in need of masculine birthday cards and this set is perfect!  

Party  Fox

I colored my fox in with traditional colors and added a blue party hat and bow tie.  The images were die cut with the coordinating Party Fox Elle-ments.  I added my fox to a Tumbled Glass ink blended background and surrounded it with the Burst Elle-ments.  I stamped some confetti in the same Tumbled Glass.  To finish, I added white heat embossed sentiments onto black sentiment strips from Simple Sentiments Elle-ments.

Party  Fox2

Supplies:

An Adorable Party Fox Card By Melania

December 18, 2018


Hi everyone! It's Deasy here. Today I want to share my card for Avery Elle featuring Party Fox. I love this stamp set because it's so versatile and super cute so I made a fun shaker card.


Avery Elle supplies that I'm using :
Party Fox Clear Stamps for the images and sentiment
Party Fox Elle-ments to die cut the images
Embellished Heart Elle-ments to die cut the heart frame
 
I stamp the images, color it using Copic then die cut it. The sentiment is from gold embossing powder.

Thank you so much for stopping by and happy crafting!

Hugs,

Melania Deasy

Simple Sentiments With Caryn

December 17, 2018


Hi, Caryn here today with a card showing a way to use the Simple Sentiments stamp set.  I decided to use the "Thank You" related sentiments in the set together to create a tone on tone background for a subtle way to include a sentiment without the need for a strip or open space.


I started with a bright green piece of card and stamped the sentiments in Celery pigment ink to cover the panel.  I then used a piece of Celery striped paper from the Jewel Paper Pad and adhered it to the lower section and then die cut it using Double Pierced Rectangles to create the mat.  I added some silver sparkle washi tape along the join.


I used the Wonky Scalloped Circle Frame for more interest in the background and then stamped and coloured (using Zig Clean Colour Markers) the Floral Bouquet image before die cutting and adding to the card front.  To finish I added some glitter to the flower centres.

Supplies:

Stuck On You Week - Day 5

December 14, 2018


Hi Everyone! Today I'm sharing Stuck on You along with And Then sentiment stamps.

I made some small love notes that are so sweet! Let's take a look!


First, I cut white card stock in 3 x 4 inch pieces and rounded the corners. Next, I heat embossed sentiments from And Then on to each card and blended Distress Ink on the entire card. 

Next, I stamped the large cactus several times from Stuck on You and colored them with Copics. I added one cactus to each card and they were complete!


These will be so fun to tuck in to lunches or give with small gifts for Valentines day! So fun!

Supplies:

Stuck On You Week - Day 4

December 13, 2018


Hey all!  Heather here.
Today I'm back with a card using the adorable mini, Stuck On You!


To create my card, I thought it would be fun to use the adorable cacti to create a background pattern and use them to frame a sentiment.

First I stamped a sentiment, from the new And Then stamp set.  Once that was stamped, I stamped all of the cacti and hearts and colored it all in.

Thanks for stopping by and sharing part of your day with me!  Have a great one!

Stuck On You Week - Day 3

December 12, 2018


Hello friends!

Katie here with a video to share with you today featuring the Stuck on You clear stamps and coordinating Elle-ments dies.  I also incorporated the Tons of Hearts Frame Elle-ments die for a fun background technique using Embossing Paste and Avery Elle's Liquid Watercolors.  I hope you'll take a peek to see how it all came together!


Supplies:


Thanks for stopping by!
Katie

Stuck On You Week - Day 2

December 11, 2018


Hi there!  Elena here, with a card featuring the super cute cactus pair from Stuck On You:


I started out by stamping, coloring and die-cutting the cacti. I love that the faces are included as separate stamps, so that you can stamp them in afterwards. I stamped the small round one so it looks like she's staring up at her talk, dark, handsome drink of water. ha.


I used the Oval Burst die to frame out the images, and even draped a LOVE banner (from Party Pals) in the corner. I thought that added a sweet touch!

Within the frame, I ink-blended a light purple background, and splattered some white paint on top before adding the focal images. As a final touch, I added some ground beneath their pots using a warm grey copic marker (W1) and then stamped the sentiment.

I hope you like it! Thanks for stopping by!

Stuck On You Week - Day 1

December 10, 2018


Hello friends!

It's Yainea here today with a celebration card featuring my favorite set from this release. These cacti are too cute!!! I love that the set includes smiley faces in separate stamps so you can include them or not depending on your card.


I enjoyed a lot making this card, I used several techniques and had a lot of fun. I started with a kraft card base, stamping the cacti randomly using white ink.
Then I cut a piece of Bristol white cardstock smaller than my base and colored it with Avery Elle liquid watercolors.


The cacti where stamped on Bristol paper too and colored with Tombow markers. I cut the sentiment "Hooray" twice for more dimensi. Finally I put everything together and added some details like the twine and enamel drops.
The final result just makes me giggle, the "free hugs" sentiment is definitely my favorite!!

I hope you like my project or today, thanks for stopping by and have a great day!

Supply list:

Peacock Week - Day 5

December 7, 2018


Hello! I am popping in today with a quick card that I created using our adorable new Peacock Stamp Set.  I love how easy it is to color this little guy! Isn't he cute?!


 Supplies:
Three Hearts Dies
Peacock Clear Stamps & Dies
Pure White Embossing Powder
New Moon Dye Ink 


Thanks for stopping by to take a peek. Have a great weekend!

Peacock Week - Day 4

December 6, 2018


Hi Everyone! Ashley here on the blog today to share the Peacock stamp set!


I love this adorable small stamp set! The peacock is so sweet! To create my card I started by stamping and die cutting the peacock. I was inspired by real peacock colors to color my stamped image. 

I cut a heart out for his wing from glitter card stock. I love the added sparkle!

I wanted the peacock to have all of the attention on this card so I added a soft background, stamped the sentiment and then added a trim piece.


Thanks for stopping by!

Supplies:

Peacock Week - Day 3

December 5, 2018


Hello!  Amy here sharing a cute little number for the next holiday.....Valentine's Day!  With this being one of my favorite holidays to craft for, this mini stamp set that is SO easy to color will be a quick go-to set this season.

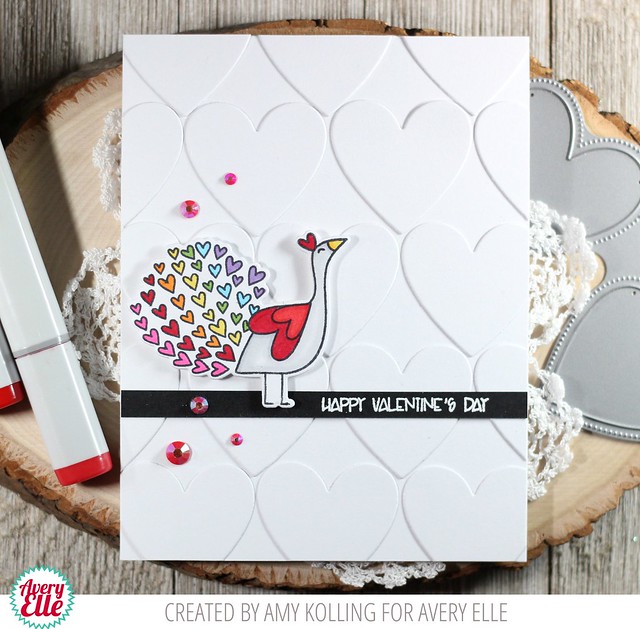
To create my background, I used the Three Hearts Elle-ments to cut out lots of hearts.  Using these hearts, I created a faux embossed panel using die cuts!  I kept adding hearts until my card front was filled and then just trimmed off all the excess with my scissors.

Peacock

To keep this clean and simple, I Copic colored my Peacock in rainbow colors (why not, right?) and die cut using the Peacock Elle-ments.  A simple white heat embossed 'Happy Valentine's Day' was done on a black cardstock strip.  A few red gems were added as a final touch!

Peacock2
Supplies:

Peacock Week - Day 2

December 4, 2018


Hey all!
It's Heather Campbell here!  Today I've got a card using the new Peacock stamp set.


To start I ink blended a background and die cut a panel using the new Embellished Heart die

Then, I stamped the peacock with Avery Elle New Moon ink and die cut it out.  I adhered everything together and then finally added a sentiment coated heavily in glossy accents.  Lastly, I added some color coordinating gems. 

Thanks for stopping by and have a great day!
XOXO, 
Heather 

Peacock Week - Day 1

December 3, 2018


Hi there, it's Caryn here today with a short video showing how I created this card using the Peacock Stamp set and die along with a couple other Avery Elle products.


I was playing around with alcohol inks a few weeks ago and created a few different panels that I've been hoarding ever since.  I decided that this piece in particular was a perfect choice to start off this card as the colours scream Peacock to me!


I stamped and die cut the peacock image and then coloured it with Copics to match the scheme of blues and greens.  To build a layered look I cut a panel of vellum and added some gold detail using Avery Elle gold embossing powder.  I die cut a few other elements - the Wonky Circle Fame and a heart from the Embellished Heart die set.  


I added everything to the card front with adhesive on the vellum and ciecle frame and foam tape on the peacock and heart to add some depth and dimension.  To finish off I added detail with diamond glaze and a few sequins.

Supplies:

 
site design by designer blogs