Merry Merry Week - Day 5

September 28, 2018


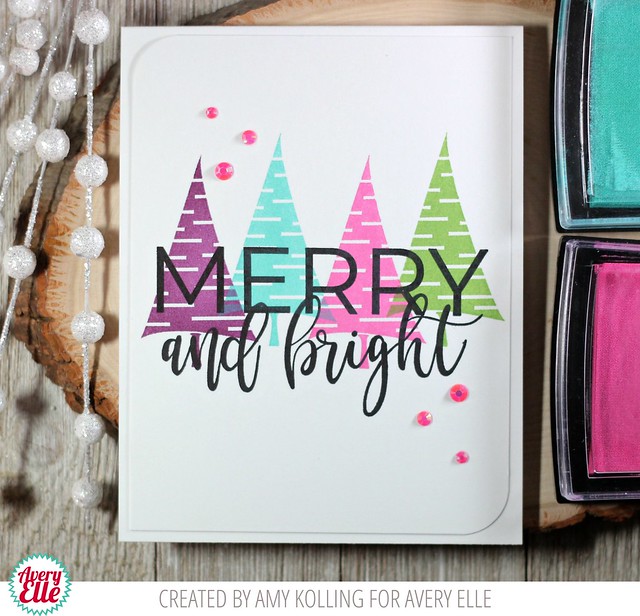
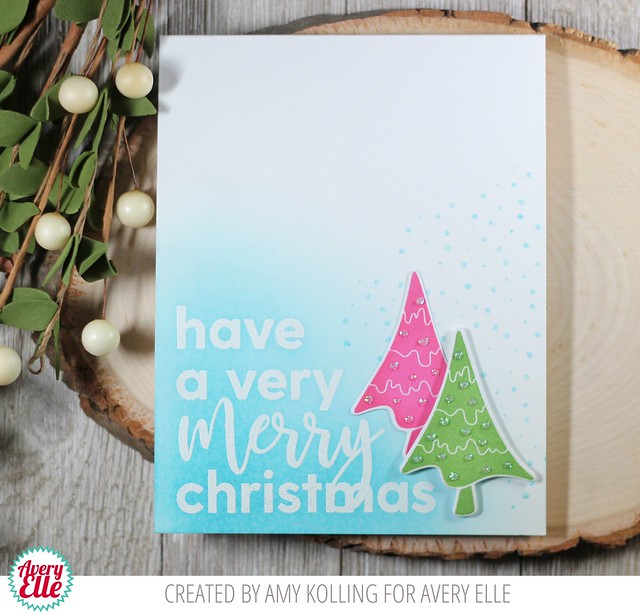
Hi Everyone! Ashley here sharing the Merry Merry stamp set. I love the big bold sentiments in this set. Let's get started...


Today I wanted to play up the awesome big words in this set by making a statement. I started by heat embossing the sentiment. I love that this set has big sentiments but also gives you lots of options for ordering them how you'd like. 

Next, 
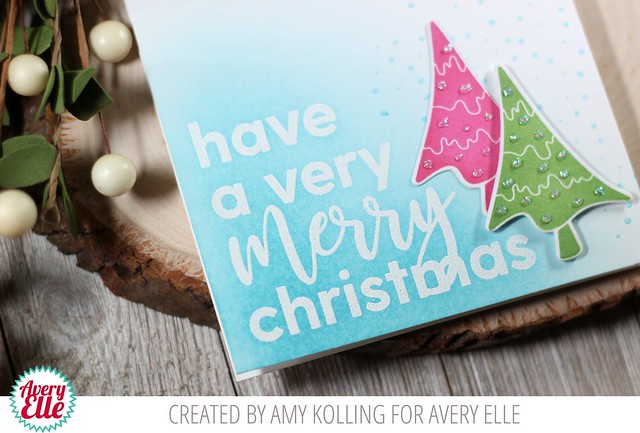
I taped off each word and blended distress inks. I could have stopped there but I want to add a little extra. I die cut shapes from Fireside and added them to my layout for a little interest and dimension. Fun, right?


Thank you for stopping by today! I can't wait to try this card again with different colors and a new sentiment. What will you create? 

Supplies:

Merry Merry Week - Day 4

September 27, 2018


Hey all!  Heather Campbell here.
I'm back with another project - this time using the new Merry Merry stamp set


I had so much fun with this sentiment set.  I started out by heat embossing my sentiment on an ink blended background.  


Then, I added a snowdrift and a bunch of mice from the A Merry Little Christmas stamp set

I also created this very graphic card just by stamping the sentiments together in different colors and popping it on top of a piece of patterned paper.  

Thanks so much for stopping by and sharing part of your day with me!  Have a great one! 
xoxo - Heather

Merry Merry Week - Day 3

September 26, 2018


Hello friends,

Katie here with a video to share with you today featuring the Merry Merry clear stamp set and the Gift Box Card Holder Elle-ments die.  With a teen and tween in the house, gift cards are a popular item on our family's wish list. 


The Merry Merry stamp set and Gift Box Card Holder die make it easy to create a fun and festive way to package and present gift cards.  I die cut the Gift Box outer box and insert from red glitter card stock and used the Wonky Square Frames and Wonky 3D Bow to trim the box to look like Santa's suit. 


I hope you'll take a peek at the video to see how it came together!


Supplies:


Thanks for stopping by!
Katie

Merry Merry Week - Day 2

September 25, 2018


Hello!  Amy K. here with a CAS card that uses some non-traditional colors---purple, turquoise, pink, and green.  This would be a perfect card to make multiples of for the holidays!

I've paired Merry Merry up with probably my favorite set of this past release--Quirky Christmas.  I stamped one of the trees in a row using Sugar Plum, Aquamarine, Magenta, and Celery pigment inks from Avery Elle.  I did use my mini Misti to get my alignment just right and to double stamp my trees for a darker look.

Merry Merry

Once my trees were stamped, I stamped the 'Merry and bright' sentiment over the top using Versafine Clair Nocturne ink.  I wanted that bold black sentiment to stand out over the bright, fun trees!  I added my trimmed panel, with opposite corners rounded, to a notecard and added some pink gems.  If you were doing multiples to send, I would most likely leave off the gems for easier mailing!

Merry Merry3 

Supplies:


Merry Merry Week - Day 1

September 24, 2018


Hi everyone, this is Nicky with you today sharing an 'infinity' shaker card I made using 'Merry Merry' which is a stamp set from the most recent release.


I took a panel of Bristol Smooth cardstock.  I stamped and heat embossed the sentiments in white then ink blended in Spun Sugar and Cracked Pistachio Distress Inks.   I applied a few sequins and other glittering embellishments with glue and once dry  I slid this panel into a stamp storage pocket, easing it down all the way to the very end.  I then put together a blend of sequins, stars, micro beads .. you name it and poured those into the pocket making sure that they only go on top of the decorative panel and not behind.  Once satisfied with the blend and the quantity I firmly wrapped the rest of the storage pocket around the back of the panel and stuck it down really well and then stuck the whole thing to a sturdy card base of 110lb cardstock which such a weighty card needs.


I'm in love with this moose from 'Polar Peekaboo Pals' and so I stamped it onto more Bristol Smooth using Ranger Archival Ink in Potting Soil.   I die cut the image and I watercolour painted it using Kuretake Zigs and highlighted a few points with a Uniball Signo White gel pen and stuck it onto the lower right of the front panel.


Such a fun and interactive card style for any time of the year.  I hope you like it!

I will see you again soon, thanks for stopping by to read today.

Nicky x

Merry Merry Clear Stamps
Polar Peekaboo Pals Clear Stamps 
Polar Peekaboo Pals Dies

Peaceful Pines Week - Day 3

September 21, 2018


Hello!  I am popping in today with this quick card and video I created using our Peaceful Pines Stamp Set.   Enjoy!


Thanks for stopping by to take a peek. Have a great weekend!

A Merry Little Christmas With Ashley

September 20, 2018


Hi Everyone! Ashley here today sharing A Merry Little Christmas and a few little tips on how I like to use Alcohol Inks. 

Let's kick it off by checking out the finished product...


Now, let's talk about the background. I just started experimenting with Alcohol Inks and I'm pleasantly surprised how easy they are!


Here are the products I used: inks, alcohol blending solution and 5x7 Yupo paper. Tip: I prefer to create on the 5x7 size and then trim it down. This allows me to pick the "best" section to display.


I start by adding Alcohol Blending Solution and a line of the two colors on opposite sides.


Next, I tipped and turned the paper to move the color where I wanted it. Tip: I used a paper towel to tap excess ink off of the sides. I found by doing this I could control the color from moving too much and I also got a lighter coverage, which I prefer. 


Finally, I stamped and die cut the cute critters from A Merry Little Christmas and then stamped the sentiment in a Wonky Circles.

Materials


Peaceful Pines Week - Day 2

September 19, 2018


Hello!  Amy here with a very clean and simple card using some heat embossing with Peaceful Pines.  

Clean and simple does not have to mean plain.  I've used the main pine image and heat embossed it with Rich Gold Embossing Powder and the berries in a red embossing powder.  This ramps things up with lots of shine!  

Peaceful Pines

This set can be used either with the dies or without. The main image was die cut along with the word Peace, from Peaceful Pines Elle-ments, out of thick red glitter cardstock and adhered it in the space on the stamped image. A supporting sentiment from Sending Peace was stamped on a tiny strip and adhered with foam adhesive.  To make this other wise simple card, I scored 1/2" up from the bottom and down from the top, leaving a space to adhere my focal image with foam adhesive.  It adds so much texture!

Peaceful Pines2
Supplies:

Adorable Card Using Our Photo Mat Die

September 18, 2018


Hi everyone! It's Deasy here. Today I want to share my card for Avery Elle featuring Photo Mat Die. I love this dies so much because it's so versatile and perfect for any themes you can imagine!


Avery Elle supplies that I'm using :
Photo Mat Elle-ments to die cut the photo mat
Polar Peek A Boo Pals Clear Stamps for the images and sentiment
Polar Peek A Boo Pals Elle-ments to die cut the images
The Sorbet Collection Paper Pad for the patterned paper
 
I stamp the images, color it using Copic then die cut it. To color the background. I'm using Distress Ink Cracked Pistacchio and Spun Sugar with blending tool then splash water and white watercolor with my brush. The sentiment is from white embossing powder. I color the clouds using Distress Ink Tumbled Glass with blending tool. For the embellishment, I add some clear sequins.

Thank you so much for stopping by and happy crafting!

Hugs,

Melania Deasy

Peaceful Pines Week - Day 1

September 17, 2018


Hello - Caryn here today with a card created with the Peaceful Pines stamps and dies.  This is a great set for whipping up a simple yet elegant card in no time at all which is what we all need at this time of year!

I stared with a 4-bar sized card base in red and used the rectangle die from Focal Point Stripes to cut an aperture on the front.  I glued a white piece of card behind this and then stamped the pine branches in Jungle pigment ink.

Next I die cut the word Merry 3 times from the piece of card I cut from the card base, stacked them up and spritzed them with a little shimmer spray.


To finish I dug out my red and gold Stickles glitter glue and ran a gold edge around the window (totally inspired by Julie Ebersole!!) and some red dots to the berries.

Supplies:

Snow Tags Week - Day 5

September 14, 2018


Hi Everyone! It's Ashley here today sharing a card using Snow Tags!


I started the card by embossing Snow Tags. I added color with Distress Inks and then die cut them. Then I used a Double Pierced Circle die to cut out the center. There are so many fun thing you can do with the window! Wouldn't it be fun to pop in family pictures?


Next, I stamped and die cut the penguins from Polar Peek a Boo Pals and popped them in the snowflake frames. I stamped Corner Sentiments to finish the card.


Thanks for stopping by!

Supplies:

Snow Tags Week - Day 4

September 13, 2018


Hey everyone!  Heather Campbell here today sharing a project I created with the new Snow Tags stamps and coordinating dies!
I heat embossed the snowflakes with Avery Elle white embossing powder and then die cut them out of the cardstock.  I then stamped the snowman from Christmas Magic and colored and die cut them.  The sentiments were heat embossed as well and cut apart to create more of a label look.  

On top of each snowflake, I used the new Wonky 3D Bow die to add a topper to each snowflake.  I love these wonky bows so much!   The twine is all Avery Elle too.  Best. Twine. EVER! 

Thanks so much for stopping by and sharing part of your day with me.  Have a great one! 
xoxo, Heather

Snow Tags Week - Day 3

September 12, 2018


Hello friends!

Katie Gehring here today to share a fun idea for a holiday card using the new Snow Tags stamp set and coordinating Elle-ments dies. Like the name suggests, Snow Tags is fantastic for making tags, but they work equally well on cards! 


First I stamped the snowflake tags onto white card stock with Versamark ink and heat embossed the images using Avery Elle's Rose Gold Embossing Powder.  I die cut the tags using the coordinating Elle-ments dies and cut out the center using a 1.25" circle punch. In the center of each snowflake, I added two of the Polar Peek-a-Boo Pals- colored with Copic Markers and die cut with the coordinating Elle-ments dies.


For the card background, I blended three shades of Distress Oxides (Worn Lipstick, Tattered Rose, and Spun Sugar) onto a panel of watercolor card stock.  I spattered some water onto the blended panel to lift the ink and stamped and heat embossed the sentiment with Rose Gold Embossing ink.

Supplies: 

Thanks so much for stopping by!
Katie

Snow Tags Week - Day 2

September 11, 2018


Hi there!

Elena here, with a trio of snowflake tags:


I used our Snow Tags stamp set and matching die, and brought in the cutie penguin from Polar Peek-a-boo Pals.  I started out by stamping each snowflake in black ink onto white cardstock. Then, I used a smaller circle die to cut out the middle of each snowflake so that the penguin could come popping out.


I used  B000 and B00 copic markers to color the snowflake and the inside of the circle, and colored the outer ring of the snowflake using an R24 marker. I love the extra pop that it gives!


I colored the penguins using a combo of T0, T1 and T4 copic markers, and gave each penguin a banner flag to hold.  The sentiment is from another penguin set, Brring On The Joy.

The banner die is from the Wonky Stitches Elle-ments set. I love the extra stitching lines on each end!

I hope you like what I've made for you today - thanks for stopping by!

♥.

Snow Tags Week - Day 1

September 10, 2018


Hi there!

It's Yainea here today featuring the Snow Tags stamps and coordinating die. 
As soon as I saw these snowflake stamps I knew I was going to create something with vellum involved. Finally, I decided to make a pair of Christmas tags. I started by stamping and heat embosing the snowflakes on vellum, using white embossing powder. 
Then I used the coordinating die to cut them and another two dies out of watercolor paper. I took my AE liquid watercolors and randomly colored the snowflake bases.


While the bases were drying, I cut two banners out of white cardstock and stamped the sentiments from the Snowflakes stamp set.
The final step was mounting all together. I used my Crop a Dile to place an eyelet on the tags, then I adhered the banners on top, added some golden sequins as a finishing touch and last, tied some golden string.


I hope you like what I made for today, maybe these tags inspire you a bit to create your own Christmas tags, it's a fun process and they're really pretty in real life!

Thanks so much for stopping by, have a great day!


Supply list:

Corner Sentiments Holiday Week - Day 5

September 7, 2018


Hi everyone!  I am popping in today with a quick video and card using our new Corner Sentiments Holiday and Polar Peek A Boo Pals stamps .  I hope that you love it as much as I do!


Thanks for stopping by to take a peek. Have a great weekend!

Corner Sentiments Holiday Week - Day 4

September 6, 2018


Hi Everyone! Ashley here sharing the super modern, gorgeous stamp set Corner Sentiments!


This card was so fun to make! I started by embossing the sentiment with Pure White Embossing Powder. Next, I taped off sections with Post-it Tape and blended Distress Ink. 


Next, I stamped and die cut the adorable reindeer from Polar Peek-A-Boo Pals and colored him with Copics. I mounted it all on a card base with a little bit of gold card stock.


This is one of my favorite cards I've ever made! I hope you like it too. Thanks for stopping by!


Corner Sentiments Holiday Week - Day 3

September 5, 2018


Hello.....Amy here!  The holidays will be here before you know it.  While I do send holiday cards, they tend to be more clean and simple with the rush rush of the holiday season.  My card could easily be created in multiples.

Corner Sentiments Holiday

I started with white heat embossing one of the sentiments from Corner Sentiments Holiday in the lower left corner.  After embossing, Tumbled Glass and Broken China Distress Inks were blended over the top for an ombre look.  To keep my sentiment crisp and white, I buffed the embossing with a paper towel.

Corner Sentiments Holiday2

I added some stamped snowflakes from Quirky Christmas using the same Distress Inks.  For a bit of fun, I added 2 stamped trees also from Quirky Christmas.....one in Celery Pigment Ink and one in Magenta Pigment Ink.  They were die cut using the coordinating Quirky Christmas Elle-ments, added with foam adhesive, and embellished with drops of Stickles for ornaments.

Supplies:

Corner Sentiments Holiday Week - Day 2

September 4, 2018


Hey all!
Heather Campbell here!   Today I've got a card using the super fun and very original Corner Sentiments Holiday stamp set.
To create my card, I ink blended a background lightly with my Avery Elle inks.  Then, I stamped the snowflakes in those same ink colors and lastly added the sentiment.


To finish my card, I added a good dusting and droplets of shimmer spray!  Easy, sophisticated and one layer - great for mailing this holiday season!

Thanks so much for stopping by and sharing part of your day with me.  Have a great one!

Corner Sentiments Holiday Week - Day 1

September 3, 2018


Hey there, Caryn here today sharing a card and video showcasing the fabulous Corner Sentiments: Holiday stamp set.  I've paired it with a previously released set Holiday Bouquet.

Here's a short video showing how this design came together:


I started with a white card base and die cut a frame in green using the Wonky Scalloped Frames die set.


Next I stamped the sentiment in the frame and stamped, coloured and die cut the images from Holiday Bouquet.


I added a wee bit of sparkle using Avery Elle Coarse Glitter to the berries and then assembled my coloured images onto the card front.

Supplies:
 
site design by designer blogs