Beachy Week - Day 5

July 29, 2022


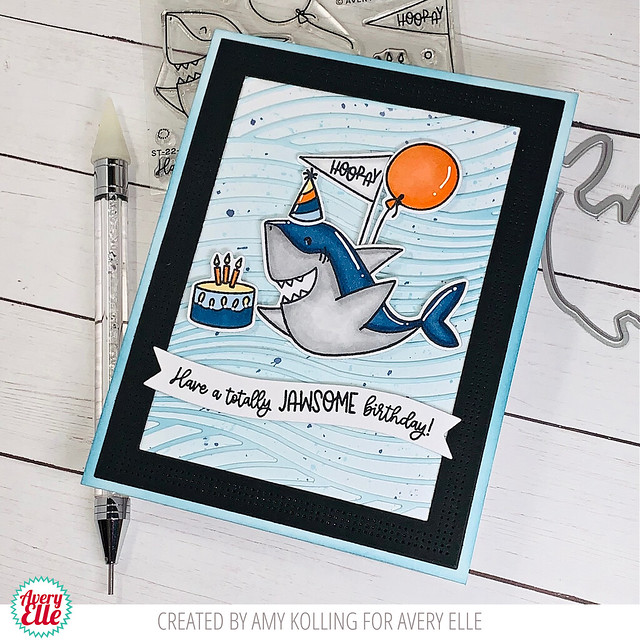
Hi Everyone! I'm wrapping up the week with Beachy!

I created a fun little scene using several stamps from the Beachy set. I also realized that the die cut of After All looks like a sandcastle so I thought that it would make a fun background! 

I've been enjoying the beach with my family this summer and also saving time to create! I can't wait to see what you create!

Supplies:

Beachy Stamps

Beachy Dies

After All Dies

Beachy Week - Day 4

July 28, 2022


Hello! I am back again today with another card that I created using our new Beachy Stamp & Die Sets.  Isn't this little bunny the cutest?


Thanks for stopping by to take a peek. Have a great day!

Beachy Week - Day 3

July 27, 2022


Hello-
I am popping in today to share this cute card I created using our new Beachy stamp and die set.  I just love how cute these guys are for summer themed cards!


Thanks for stopping by to take a peek. Have a great day!

Beachy Week - Day 2

July 26, 2022


Hi everyone!  
Amy here with a mid-summer card for those "sunny" days!!!

The Beachy stamp set is so fun with lots of adorable images to create your own beach scene!  The background was done by ink blending a die cut (using the Slimline Borders Elements) over and over to create a blue, summer sky.  The beach was ink blended lightly with a brown ink.  The focal point was made using the Oval Burst Elle-ments and adding it with foam adhesive to the background.


The beach elements were all Copic colored, die cut, and added to the scene with foam adhesive.  For some sparkle, Crystal Stickles was added to the images.  The sentiment was stamped onto a banner die from Easy Layers 1 Elle-ments.  

Here's to some sunny summer days!!!


Beachy Week - Day 1

July 25, 2022


Hi all! It's Deasy here. Today I want to share my card for Avery Elle featuring Beachy. This stamp set is perfect for summer card and it's so fun!


Avery Elle supply that I'm using : 

Beachy Stamp Set for the images and sentiment

Beachy Elle-ments to die cut the images

Pierced Ray Frame Elle-ments to die cut the frame


I stamp, color the images using copic then die cut it. The sentiment is from white embossing powder. To color the background, I'm using dye ink pad with blending tool then splash water with a brush. I add some clear sequins for the embellishment.

 
Thank you so much for stopping by and happy crafting!


Hugs,


Melania Deasy

After All Week - Day 4

July 22, 2022


Hi Everyone! Ashley here sharing a card using the After All set!


I can't tell you how much fun this set set was to color! The geometric shapes are amazing!

I stamped, die cut and colored the large building in this set. It makes a beautiful centerpiece for a card. Next, I ink blended and splattered the background panel and heat embossed a color card stock strip. This castle building would look SO amazing in SO many different color combos. I can't wait to see what you create!

Supplies:

After All Stamps

After All Dies

After All Week - Day 3

July 20, 2022


Hello! I am popping in today to share these two cute cards that I created using our new After All stamp and die set.  I just love how cute and whimsical these are!


Thanks for stopping by to take a peek. Have a great day!

After All Week - Day 2

July 19, 2022


Hi there!

Elena here, with a card featuring the fabulous set, After All:


I loved this set from the moment Caryn showed it to me. I colored the main images using copic markers in bubblegum shades and added highlights using a white gel pen.

For the background, I used the cloud border die (from the Oval Scene Die set) as a stencil to create the blended sky. I added some die-cut clouds from the same die set to complete the look. 

I hope you like it! Thanks for stopping by!

Supplies:

After All

Oval Scene Die

After All Week - Day 1

July 18, 2022


Hi there, Caryn here again with a card featuring the new After All stamp set.  I love the graphic style of this set and all the colouring options you have with it!  I chose to use the heat embossing and water colouring technique.  When you water colour with so many different areas all close to each other, heat embossing the image rather than just stamping it is a lot more forgiving than trying to stay within the lines and not have the colours bleed into one another!!


I used Tim Holtz water colour paper and heat embossed the image in gold.  I then chose my palette from my Karin Brush Markers


For my background I stamped and embossed the fireworks images in gold and blended some Distress Oxide ink (Shaded Lilac and Tumbled Glass) to create a night sky. For added shimmer and that little touch of "pixie dust" I sprayed some clear shimmer spray over the top.


To finish I stamped and embossed the sentiment in gold and adhered the image and sentiment with foam tape.

Supplies:


Jawsome Wishes Week - Day 6

July 16, 2022


Hi Everyone! Ashley here sharing the totally awesome Jawsome Wishes!

This stamp set was SO fun to create with! I stamped, die cut, and colored the party shark with his matching balloon and hat. Next, I ink blended the background and added a panel with the stamped sentiment. Finally, I added all of the stamped images and added a few embellishments! Easy and so cute!


Thanks for stopping by!

Supplies:


Jawsome Wishes Week - Day 5

July 15, 2022


I am popping in today with these two cute cards using our new Jawsome Wishes stamp and die set.  I just love how these turned out!


Thanks for stopping by to take a peek. Have a great day!

Jawsome Wishes Week - Day 4

July 14, 2022


Hey there, Caryn here. with a card using the fabulous Jawsome Wishes stamp set.  I'm a shark fanatic and Avery Elle has some of the best shark themed stamp sets available (in my humble opinion anyway!!)


I used the Oval Scene dies to create a vignette on the card front and blended some inks for the background.
I coloured the images using Copics and stamped the sentiment to finish off.


Supplies:


Jawsome Wishes Week - Day 3

July 13, 2022


Hello!

It's Yainea here today showcasing this totally jawsome set and coordinating dies: Jawsome Wishes. I think this set is just perfect for creating a fun and refreshing birthday card like I did, but it's great for many occassions as well, it'll sure bring a smile to the recipient! :)

To create my card I started die cutting a piece of watercolor paper and then I used Avery Elle liquid watercolors to create the background.

I colored the images with alcohol markers and I combined them with the sentiment from Pierced Birthday Frame Elle-ments. To get that shiny look I covered the sentiment with Glossy Accents.

I hope you like my project for today and feel inspired to start creating!

Thank you so much for stopping by, have an amazing day

Supply list:


Jawsome Wishes Week - Day 2

July 12, 2022


Hi friends!!  

Amy here with a 'JAWSOME' mini set that is perfect for some boy/masculine cards!  


JAWsome2

Using the Jawsome Wishes stamp set, the images were Copic colored and die cut.  To a white notecard, splatters of Broken China and Sapphire Distress Inks were added.  To create the rest of the background, a piece of cardstock was ink blended with Broken China Distress Ink and then die cut using the Waves Elle-ments.  This is such a fun die and one that I love having in my stash!  To frame out my scene, I added a black die cut frame from Pierced Birthday Frame Elle-ments.  All the images were added with foam adhesive to create the scene including a stamped sentiment onto a banner from Easy Layers 1 Elle-ments.

JAWsome

Jawsome Wishes
Jawsome Wishes Elle-ments
Waves Elle-ments
Pierced Birthday Frame Elle-ments (frame)

Easy Layers 1 Elle-ments (banner)

Jawsome Wishes Week - Day 1

July 11, 2022


Hi there!

Elena here, with a card featuring Jawsome Wishes:


I love this shark, so happy to celebrate his own birthday! haha! The hooray sign is my fave. I couldn't help but bring in the cliffs from Underwater Background Builder - it totally built the scene for me! I also brought in the little fish from Underwater Friends. They look like they don't know what to do with this huge shark.

I colored the cliffs using brown copic markers, and then used a blue ink to color the water in between, smudging it onto the cliffs to give them a dark blue shadow. 

I hope you like it! Thanks for stopping by!

Supplies:

Jawsome Wishes

Underwater Friends


Be Zesty Week - Day 4

July 7, 2022


Hey there! It's Heather here. Today I've card using the new Be Zesty stamp set. 

One of my favorite techniques for adding color to images like this is to use my watercolors. To keep everything in the right spot, I absolutely love heat embossing stamped images with either white or gold embossing powder. 

It creates such soft texture! 
For the frame, I just used the new Pierced Ray Frame die!
 
Thanks for stopping by and have a great day. 


Be Zesty Week - Day 3

July 6, 2022


Hello! I am back today with another card I created using our new Be Zesty Stamp and Die set.  I just love how this turned out!


Thanks for stopping by to take a peek. Have a great day!

Be Zesty Week - Day 2

July 5, 2022


Hey there!  Caryn here sharing this card I created using the Be Zesty stamp set.  If this doesn't make you think of Summer I don't know what will!


To begin I die cut a frame using the Oval Scene Dies from yellow card and blended a little green ink in the open area in the centre.  I stamped the images and coloured them using Copics before die cutting them.  
I arranged them and adhered them to the card using foam tape and liquid adhesive.
To finish I added some shimmer accents to the lemons and glossy accents to the jar to give dimension and an illusion of the glass.


Supplies:


Be Zesty Week - Day 1

July 4, 2022


Hello and Happy Fourth Of July to those of us in the US! Today I have two cute cards that I created using our new Be Zesty Stamps & Dies.   I just love how fun and summery this set is!


Thanks for stopping by to take a peek. Have a great day!

Ranunculus Week - Day 4

July 1, 2022


Hi Everyone! I love the featured stamp set this week Ranunculus. 


I was really inspired by the beautiful flower stamps. I loosely water colored the background, then layered the Oval Scene die cut with several stamped and die cut flowers and leaves. I used the Congrats sentiment in gold card stock from the Pierced Ray Frame die set to finish the card.


Supplies:


site design by designer blogs