Showing posts with label Peek A Boo Pals. Show all posts

You Did It Week

January 28, 2022


Hey crafty friends! Today I'm creating a card using You Did It and lots of other fun stamps!

I love mixing new and old Avery Elle stamp sets. 


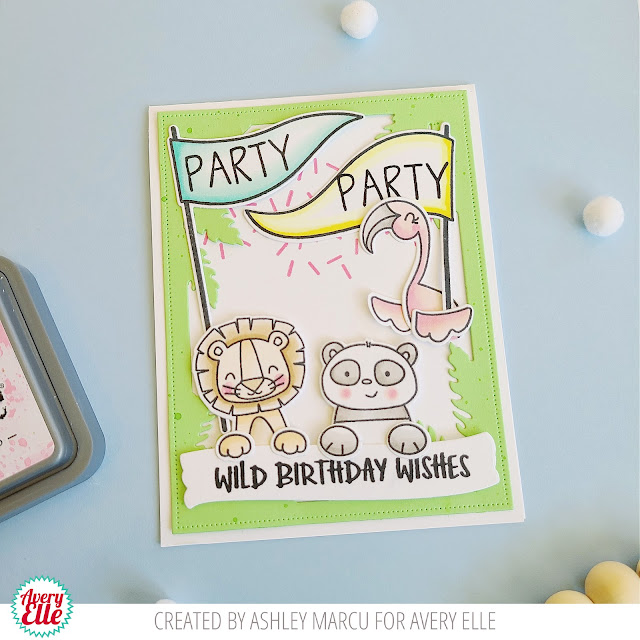
I looked through my favorite Peek a Boo sets and found a fun collection of zoo animals. Check out the supply list below to see what sets I pulled from. You can make this card with any Peek a Boo stamps so look to see what is in your stash!

Next I arranged the animals to hold the flags and put them on a scene of stamped confetti and the Leafy Frames die. 

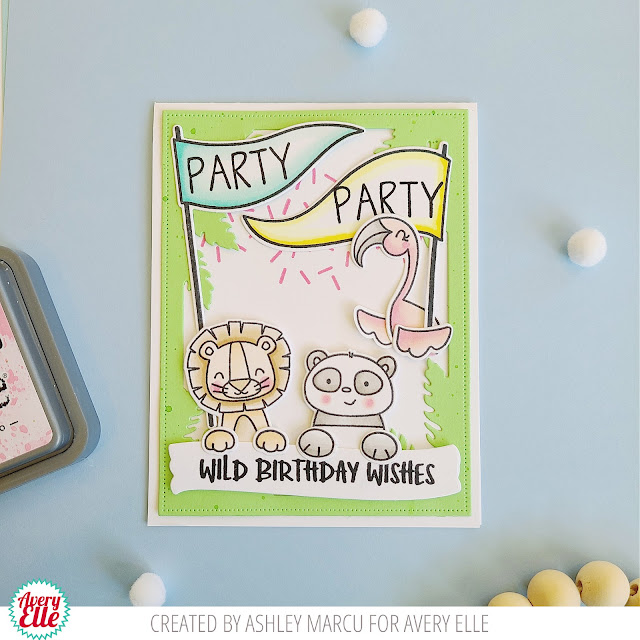
I hope this card inspires you to mix up your stamp and die sets to create something new! 


Supplies:
Peek a Boo Pals Dies
Peek a Boo Jungle Dies
Peek a Boo Summer Stamps (Flamingo)
Peek a Boo Summer Dies


Cup Of Wishes- Day 3

May 28, 2021


Hi Everyone! Today I'm sharing Cup of Wishes


I created this card by first stamping the large tea cup stamp. Then I masked the edges and added the leaf pattern. Next, I stamped, colored and die cut the flower and added it to the tea cup. 

Next, I stamped, colored and die cut the panda from Peek a Boo Pals. He is one of my favorites! I cut out the background elements with Easy Layers 1 and stamped the sentiment.


Thanks for stopping by!

Supplies:

Cup of Wishes Stamps

Cup of Wishes Dies

Peek a Boo Pals Stamps

Peek a Boo Pals Dies

Easy Layers 1 Dies


Peek-A-Boo Flight Week - Day 4 & Video

April 15, 2021


Hello friends, 

Katie Gehring here with a video to share with you today featuring the Peek-A-Boo flight stamp set. This set is so adorable, and I love having the option to create additional scenes for the Pee-A-Boo Pals! 


I hope you will take a peek and see how it all came together. 


Supplies: 


Thanks for stopping by!
Katie


Peek-A-Boo Flight Week - Day 3

April 14, 2021


Hi there!

Elena here, with a card featuring Peek-A-Boo Flight, from our current release.


I just love this Peek-A-Boo set! I opted for the helicopter image, and put the elephant from Peek-A-Boo Pals inside, mostly because I love how oversized he is, with his huge ears flopping out.

I colored the helicopter in a bright, sunny yellow, added a red garland, and set it all against a rainbow backdrop. I used the Rainbows die, and added the sentiment to the cloud at the bottom. Isn't it so sweet? To finish things off, I ink-blended the edges with a light blue ink.

I hope you like it! Thanks for stopping by!


Supplies:

Peek-A-Boo Flight

Peek-A-Boo Flight Elle-ments

Peek-A-Boo Pals

Peek-A-Boo Pals Elle-ments

Rainbows Elle-ments

Suns Out & Whiskers Week- Day 2

August 11, 2020


Hey there, Caryn here today sharing two cards that are sure to brighten the dullest day!

First up is the this card featuring the sweet Sun's Out set.  Isn't it the cutest?

I started with  a square card base and die cut the Sea Scene Elle-ments from some paper from the Spring Paper Collection pad die and added some silver glitter paper behind it where the wave shapes show through.  I kept the positive elements and added them to the card base for background texture.

Next I stamped and die cut some flowers and foliage from the Tropical Bouquet stamp set and added it to the card using it to frame the focal point for a bright and summery look.


To finish I used one of the speech bubble dies from the Peek-a-Boo Pals die set and stamped the cute sentiment in black ink and added some glaze to the shades!

My second card is a clean and simple idea using one of the cat images from the Whiskers stamp set.  I stamped the cat and coloured her using Copics.  Next I used the pink/blue pastel ombre paper from the Spring Paper Collection and die cut the frame using the Hearts Frame die.
I die cut and stamped a banner for my sentiment using Banner Bits and finished it all off with a few stamped hearts.
Supplies:


Let's Party With Elena

June 9, 2020


Hi there!

I have a fun little card to share, using a set from Avery Elle's newest release, Peek-A-Boo Pals:

Peek-A-Boo Pals (Avery Elle)


I stamped and die-cut a trio of critters and their matching paws. Aren't they just the cutest? I colored them with copic markers, keeping the tones very light. For the hippo, I used C00, C01 and C3 to color the main body. For the bunny, I used W00, W1 and W3, and for the monkey I used E30, E31 and E34.

I then used the Oval Burst die to frame them out and set them onto a blue background.

Peek-A-Boo Pals (Avery Elle)
I stamped the greeting on sentiment flags from the Wonky Stitches die set, and made them appear to be wrapping around the frame.

The entire scene was set onto a piece of soft violet paper and adhered to a card base. I added a few wooden stars as a finishing touch.

I hope you like what I've created! Thanks for stopping by!

Supplies:


♥ Elena.

An Adorable Journey by Ashley

May 20, 2020


I had to share one more cute card by Ashley today.  I just love these little critters popping out from behind the car! - Jamie


"Hi Everyone! Today I'm sharing Journey and a few other fun Avery Elle favorites!

Let's get started, shall we?


I started this card with the large car and balloon stamp from Journey. I colored it with Copics and added the "hooray" sentiment to the license plate. I love adding little details! 

Next I stamped a few of my favorite animals from Peek a Boo Pets and a Peek a Boo Pal. Finally I stamped a sign from All of Us.


I love that I can use this card for several types of occasions. It can be a birthday card, congratulations or graduation. All I need to do is add a sentiment inside once I know where it's going and it will be ready!

Thanks for stopping by today!"

Supplies:

Peek-A-Boo Balloon With Amy

May 8, 2020


I thought it would be fun to highlight some of our design teams' projects over the next few weeks as we await our next release.  Check out what Amy created back in January.  It is just as cute today as it was then!

"Hello!  
I am here with a card that would surely bring a smile and some hugs to a friend!

I love the Peek-a-Boo line from Avery Elle.  The addition of the Peek-a-Boo Balloon for the adorable Peek-a-Boo pals is awesome!
Peek-a-Boo Balloon

I started by die cutting a piece of white cardstock using the Pierced Clouds Elle-ments many times.  As I did this, I added every other row of clouds with foam adhesive.  My hot air balloon was Copic colored in rainbow fashion and die cut.  I added it over the raised clouds as it had a lot of dimension already.  I adhered my Peek-a-Boo bunny with foam adhesive peeking out of the basket.  A stamped 'Sending Hugs' and a few die cut red hearts finished the card.


Peek-a-Boo Balloon2 Supplies:

Peek-A-Boo Fair Week - Day 5

April 24, 2020


Hi Everyone! I'm excited to share Peek a Boo Fair!


This set is so much fun! To create my card I started by lightly water coloring the background. Next, I stamped the ferris wheel, unicorn and flags from Peek a Boo Fair.    


Then I stamped the monkey and panda from Peek a Boo Pals. I colored and die cut all of the images. Finally, I heat embossed the sentiment from Speech Bubbles. 


Thanks for stopping by!

Peek-A-Boo Fair Week - Day 3

April 22, 2020


Hello! Amy here with a scene from my childhood!  
I LOVED fair time when I was younger.  Bumper cars (and the ZIPPER ride) were my favorites!

I started making my background ink blending Scattered Straw, Spun Sugar, and Tumbled Glass Distress Inks.  Once done, this panel was die cut using the Hatch Mat Elle-ments.  Adding this just gives some interest to the background.  Plus, it reminds me of all the sparking above as the bumper cars sped across the floor!


I added two bumper cars, the unicorn from Peek-A-Boo Fair, and the panda from Peek-A-Boo Pals.  The cars were added with foam adhesive as well as the flags.  To add a little reality to the scene, the tiny spark stamp (from Peek-A-Boo Car) was added between the cars!  As a finishing touch, a sentiment was stamped onto a die cut speech bubble from Speech Bubble Elle-ments.


Supplies:

Peek-A-Boo Balloon Week - Day 5

January 31, 2020


Hi Everyone! I'm so excited to share my card today. I love the Peek a Boo Balloon so let's check it out!


I started this card with the Peek a Boo Balloon. Its such a fun stamp to color! I also stamped and die cut the clouds from the set. Next, I picked a Peek a Boo Pal to ride in the balloon. I added stars from Star Scene and embossed the sentiment.  


I love how this card came together! Thanks for stopping by!

Supplies:

Peek-A-Boo Balloon Week - Day 3

January 29, 2020


Hello!  Amy here with a card that would surely bring a smile and some hugs to a friend!

I love the Peek-a-Boo line from Avery Elle.  The addition of the Peek-a-Boo Balloon for the adorable Peek-a-Boo pals is awesome!

Peek-a-Boo Balloon

I started by die cutting a piece of white cardstock using the Pierced Clouds Elle-ments many times.  As I did this, I added every other row of clouds with foam adhesive.  My hot air balloon was Copic colored in rainbow fashion and die cut.  I added it over the raised clouds as it had a lot of dimension already.  I adhered my Peek-a-Boo bunny with foam adhesive peeking out of the basket.  A stamped 'Sending Hugs' and a few die cut red hearts finished the card.


Peek-a-Boo Balloon2 Supplies:

So Kind Week - Day 2

April 30, 2019


Hello friends,

Katie here with a card to share with you today featuring a sentiment from the So Kind stamp set. I love the fresh and fun mix of lettering on this sentiment set; it really compliments so many different images and occasions. For my card, I paired the "Hip Hip Hooray" sentiment with the original Peek-A-Boo Pals stamp set.


First, I blended a panel of water color card stock with two shades of Distress Oxide inks (Peacock Feathers and Dried Marigold). I left some white space between the two colors so they wouldn't blend together to make a muddy green. I spattered the blended panel with water and white paint. Once the panel was dry, I stamped the sentiment in black ink.


I stamped the Peek-A-Boo pals onto white card stock and colored them with Copic makers.  I used the coordinating dies to cut out the Pals and a few of the stars included in the stamp set. I adhered the largest Wonky Scalloped rectangle at an angle onto the water color panel and tucked the Pals and their paws towards the bottom of the frame.  As a finishing touch, I added a few clear sequins before adhering the completed panel to a white notecard.

Supplies

I hope this card makes you want to celebrate and shout "Hip Hip Hooray" for the So Kind stamp set! 

Thanks so much for stopping by!
Katie

Journey Week - Day 4

April 4, 2019


Hi Everyone! Ashley here today! I'm sharing Journey and a few other fun Avery Elle favorites!

Let's get started, shall we?


I started this card with the large car and balloon stamp from Journey. I colored it with Copics and added the "hooray" sentiment to the license plate. I love adding little details! 

Next I stamped a few of my favorite animals from Peek a Boo Pets and a Peek a Boo Pal. Finally I stamped a sign from All of Us.


I love that I can use this card for several types of occasions. It can be a birthday card, congratulations or graduation. All I need to do is add a sentiment inside once I know where it's going and it will be ready!

Thanks for stopping by today!

Supplies:


Cake For All Week - Day 5

March 29, 2019


Hi Everyone! Ashley here! Today I'm sharing the new Cake for All stamp set! I've combined it with a few of my favorite stamp sets. Let's take a look...


I started my card by stamping the cake and a few flowers from Cake for All. I colored them with Copics and die cut them. Next I picked an animal to peek out of the cake. I used the panda from Peek a Boo Pals. Next I assembled my stamps. 


I just love the panda with a flower on her head! She looks ready for spring. I decided on a sentiment from Peek a Boo Pets. I love that I can use this card for a bridal shower, wedding or even a new baby.

Finally, I created the background with Distress Oxides, then I assembled the card.

Thanks for checking out my card! I can't wait to see what YOU create!


Supplies:
Peek a Boo Pals Clear Stamps


Llamazing Week - Day 4

March 21, 2019


Hi Everyone! I'm excited to share my Llamazing card with you today! I'll be sharing a few tips and techniques I used to make this card too!

 First I started with a white card base and stamped the llama. I did a partial die cut, then trimmed from the card edge to the llama.

Next, I stamped and die cut the cactus and the fancy saddle then adhered them to the card. 


I wanted the sentiment to start on the front of the card and finish in the inside so I cut the sentiment in a few pieces. I used the speech bubble die cut from Peek a Boo Pets for the first part of the sentiment.


The second part of the sentiment went on a paper piece inside. I also put another llama with balloons and a party hat! I love this inside/outside card and I hope you do too!


Supplies:

Simple Sentiments Week - Day 4

January 26, 2019


Hey everyone!  Heather Campbell here.

Today, I've got a card to share using the new Simple Sentiments stamp set. I paired it with Peek-a-Boo Pals, Starry Scene and Photo Mat dies.
First, I stamped the background using Starry Scene in Avery Elle Aquamarine ink and then die cut it out with the coordinating die.  Then, I stamped the images from Peek-a-Boo Pals, colored them in and then die cut them out.  Finally, I die cut the polaroid shape from Photo Mat dies.

I assembled the card and then heat embossed a sentiment on black cardstock to add to the card. 

Thanks so much for stopping by and sharing part of your day with me.  Have a great one!
XOXO, Heather

And Then Week - Day 4

January 10, 2019


Hey all!  Heather here.
Today I've got a fun card using the amazing new And Then sentiment stamp set.


To create my card, I decided to have some fun with the sentiment and create a really cool splash of color behind it. To do this, I followed a few easy steps.


 First, I positioned my stamp on my MISTI and then inked the stamp with a few colors of water reactive ink (distress inks). 


Next, I spritzed the inked up stamp with water.


Quickly, I stamped the spritzed stamp onto my card.


Finally, once it was dry, I stamped the sentiment in black ink onto the card and ta-da done!  I love the look of this.  So fun too! 

Once I had the sentiment assembled, I positioned a few Peek-a-Boo Pals behind the largest Wonky Scallops frame die to finish my card.  
Thanks so much for stopping by and have a great day!
XO, 
Heather 

Peek A Boo Pals with Ashley

December 28, 2018


Hi Everyone! Ashley here! It's my last post of 2018, can you believe it?! I can't wait to see what's in store for Avery Elle in 2019 but first let's look back at some of my favorites from 2018.

Last week I shared part one of my 2018 favorites HERE. As promised, I'm back to share more favorites this week!


This card features many animals from Peek a Boo Pals. I stamped so many I had to make my card extra tall! I picked two water loving animals for the bottom, two forest loving animals for the middle and two tree loving animals for the top! This was a fun way to mix Peek a Boo Pals and Polar Peek a Boo Pals.


I framed the animals with Photo Mat Dies and added sentiment banners from Party Pals. I blended Distress Ink in each frame and then did a light water color wash on the entire background. The light water color background helps the frames pop.


I adore these animals and love how this card turned out! See you in 2019!

Supplies:
 
site design by designer blogs