Lava You Week - Day 3

January 31, 2018


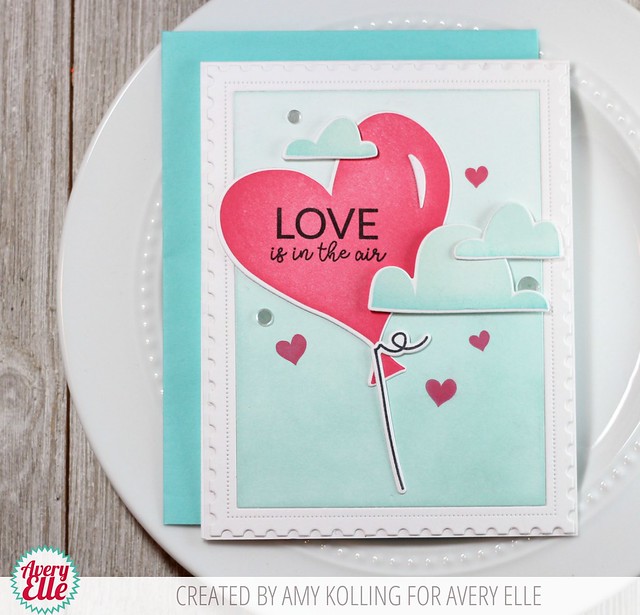
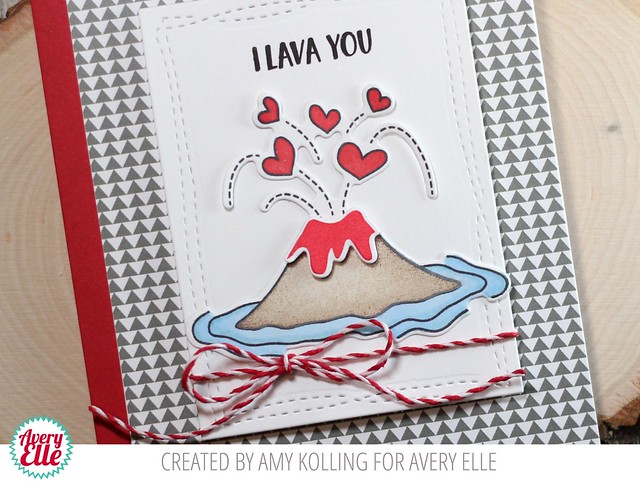
Hello!  Amy K. here with a punny Valentine using the Lava You stamp set!  What I love about this stamp set (besides that it is punny!) is the mini size.  The stamps included can make either an easy one layer card or a more dimensional card using the dies.

Lava You

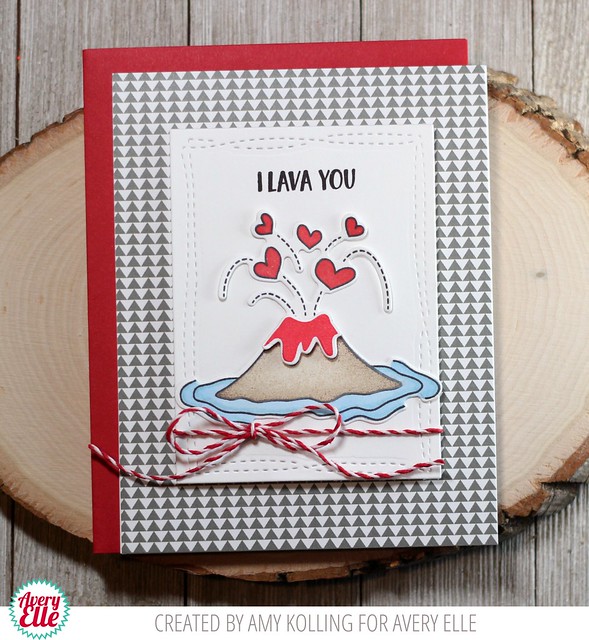
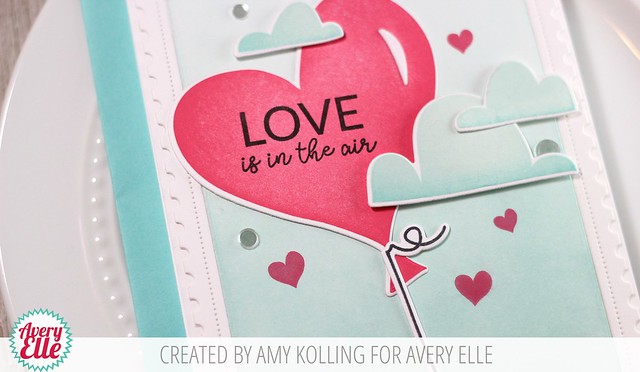
I have used the solid volanco stamp to "fill in" my volcano instead of using Copics.  But for the lava, I stamped and die cut the lava and popped it up with foam dimension.  This gave just the right amount of pop I was going for.  Because I was making this a more masculine card, I chose a pattern paper from the Everyday Collection 6x6 Paper Pad to adhere to a white notecard.  My cute volcano image was adhered to a Wonky Stitches Die and tied off with Cherry Hemp Twine.

Lava You2

Supplies:

Lava You Week - Day 2 & Video

January 30, 2018


Hello friends,

Katie here with a video to share with you today featuring the Lava You Clear Stamps and paper piecing!  The Lava You stamp set and coordinating Elle-ments dies were thoughtfully designed to accommodate many coloring preferences-- from markers and colored pencils to two step stamping.  Using the Elle-ments dies, paper piecing is a simple technique you can use to incorporate some color and personality onto your card using some scraps of patterned paper.


I stamped the volcano image onto Fizz and Kraft patterned paper and onto white card stock.  The white card stock volcano acted as the base on which I could adhere the die cuts of patterned paper. I colored the hearts and water with Copic markers and added the faces to the volcanos using the Cool Treats stamp set.


To assemble the card, I die cut a circle of patterned paper from the Everyday Patterned Paper Collection and inlaid onto a panel of white card stock also cut with the Double Pierced Circle Elle-ments.  I adore the pierced border pattern on the inside and outside of the die cut.  I attached the volcanoes and stamped the "I Lave You" sentiment with black ink.  A few clear sequins add a finishing touch. 

I hope you'll take a peek at my video to see how it all came together. 


Supplies:

Thanks for stopping by!
Katie

Lava You Week - Day 1

January 29, 2018


Hello there!  It's a (somewhat jet-lagged) Caryn Davies here today sharing a card using the punny Lava You stamp set.   I had so much fun creating this shaker card - I love the lift adding the Glossy Accents gives to the look.


I started with a 4.25" x 5.5" card and blended a small area behind where the window will be on the panel using Tumbled Glass Distress Ink.  I then die-cut a panel using the three connected dies from the Wonky Squares set to create a frame.  I made a shaker window with the frame by adhering an acetate panel being the aperture of the frame and adding foam tape all the way around being careful to leave no gaps!  I sprinkled some sequins inside and then carefully placed the window panel over the top.


I stamped and coloured the cute volcano image from the set using Avery Elle dye ink (my favourite ever ink for colouring with Copics) and finished off with some Glossy Accents.  The last thing was to stamp the sentiment below the shaker window and it's a wrap!!


Supplies used:

Wonky Squares - Day 3

January 25, 2018


Hey everyone!!!  It's Heather here.  For my project today, I used the new Wonky Squares die to create a super fun shaker card!

First, I die cut the middle solid square and the outer stitching from Wonky Squares. Then I stamped and die cut a pegasus and colored it in with Copics.  

I assembled the panel with the die cut square into a shaker and then added sequins and adhered my layers together.  The banner is from Wonky Stitches.

Thank you so much for stopping by and sharing part of your day with me!  I hope you have a great one!  

Wonky Squares - Day 2

January 24, 2018


Hello friends,

Katie here with a tip for getting more use out of your dies.  We all know that stamps and dies go great together, but coordinating dies can stand on their own too!  I am using the heart balloon Elle-ments dies which coordinate with the Love is in the Air stamp set to create a card that's perfect for Valentine's Day.


To start, I cut the heart balloons from a panel of watercolor card stock and pulled out some Distress Oxide inks in shades of red, pink and coral.


Using an ink blending tool, I added ink to the balloons creating a blended ombre effect on each balloon.


Once the inking was complete, I spritzed the balloon die cuts with water to lift some of the ink pigment and create this lovely spotted effect.  


To create the card, I die cut a panel of white card stock with the Wonky Squares die and attached it to a white note card with foam tape.  In the negative space left by the square die cut, I adhered the wonky square.  


I adhered the balloon die cuts over top of the Wonky Stitched Square with foam tape.  The hugs die is also from the Wonky Stitched Squares die set.  I tied white string to the balloons and added a few clear sequins for a finishing touch. 

Supplies: 

That's it for me today, but I hope this tip gives some inspiration to use explore stand-alone uses for your coordinating dies. 

Thanks for stopping by!
Katie

Two AMAZING Wonky Squares Cards

January 23, 2018


Check out this first card by Elena!

Hi there! Elena here, with a fun card featuring the super cute image from Birthday Bus framed out by a Wonky Squares die:


I chose to cut the largest of the Wonky Squares out of Kraft cardstock, which makes the focal images really pop. I colored them in primary colors and used a soft brown ink to sponge color onto the white borders, so that it blended into the kraft background a little more.

Underneath the kraft layer, I stamped the birthday sentiment included in Birthday Bus, and used the rectangle Wonky Stitches die to cut out that layer. I love that it sort of mimics what is going on in that focal layer.

To finish off, I added the "hello" die-cut, also found in the Wonky Squares set. I hope you like it!

Check out this next card by Yainea:

Hello there!

It's Yainea here featuring Wonky Squares Elle-ments. Since they were released, Wonky Rectangles has been one of my favorite dies sets and the new Wonky Squares is in that list too. They are perfect for most cards, adding a subtle texture while framing a focal element. Also, I love the sentiments included in Wonky Squares Elle-ments, they are a great addition for a lot o different cards.

For my project today I used the big Wonky Square die but instead of using it as a background I used it to create a frame for my card. If I had just cut a frame my card would probably look boring but those stitches add a nice interest to it!


I started by blending some aqua and teal ink on the background and sprinkling some water and perfect pearls on top. Then I cut my frame and adhered to the background using dimensional adhesive. The heart balloon and clouds are from the Love is in the Air stamp set, I stamped the heart with two tones of red and die cut it with the coordinating dies. I adhered everything to the background and tied some red twine to the balloon.


For the sentiment, I die cut the word three times and adhered them together to get more dimension. Finally, I added some clear sequins on top.

I hope you like my project for today!
Psssst, have you seen the new release?? It's super cute!!! You can take a look at it at the Avery Elle's Instagram page or if you are super lucky, at the Creativation Show: Booth 2636

Have a nice day!!

Supply list:
- Wonky Squares Elle-ments
- Love is in the Air Clear Stamps
- Love is in the Air Elle-ments
- Cherry Hemp twine

COME SEE US AT CREATIVATION BOOTH 2636

January 19, 2018


Are you going to the Creativation Show?  
If so stop by and see us in Booth 2636!  
We will be showcasing 
12 new stamp sets
16 new die sets
10 new liquid watercolors 
& coarse glitter!!!  

Not going to the show, be sure to check out our Instagram page, https://www.instagram.com/averyellestamps/ , for behind the scenes photos and sneak peeks of the show and of our February 8th, 2018 release!  

Thanks for stopping by to take a peek. Have a great day!

Love Is In The Air Week - Day 5


I have a quick video and card for you today.  Enjoy!!


Thanks for stopping by to take a peek. Have a great day!

Love is In the Air Week - Day 4

January 18, 2018


Hello there!

It's Yainea here today to share a pair of shaker tags I made featuring Love is in the Air set. I love that this set combines solid with non-solid images and it's full of cute images! It's perfect for Valentine's cards but I used it to make something that would suit any occassion. These tags were easy to make thanks to the Shaker Tags Elle-ments dies.


First I sponged some ink on the background with a blending tool and stamped the super cute clouds from teh set. I colored the birds with Copic markers and adhered on on the background. Then I mounted the shaker tags, adding some fun sparkling elements inside. To finish the tags I adhered the other bird on top with the sentiment and a little heart.


I hope you like my project for today and give these tags a try! They are fun to create and a sweet addition to a sweet gift for a special someone :)

Thanks for stopping by, have a nice day!!

Supply list:
- Love is in the Air Clear Stamps
- Love is in the Air Elle-ments
- Wonky Squares Elle-ments
- Shaker Tags Elle-ments
- Raspberry Hemp Twine
- Aquamarine Hemp Twine

Love Is In The Air Week - Day 3

January 17, 2018


Hello!  Amy K. here for a fun week ahead!  
Can I say one word?  CREATIVATION.  I am so excited to be attending this year working in the Avery Elle booth!  If you are coming, make sure to stop by for a make 'n take, to say hello, and maybe a selfie!  We have some fabulous new products that we can't wait to show you!


Love is in the Air

I could not wait to use the set today.  Balloons are so trendy right now and seriously, who wouldn't love this big heart balloon from Love is in the Air?  I've stamped the balloon in Raspberry Pigment Ink leaving the center a bit lighter.  After die cutting, I added the white bit to the balloon.  The clouds (flat bottom are my favorite) were stamped with Sea Glass and Aquamarine Pigment Inks.  My sentiment was stamped using New Moon Dye Ink.  

Love is in the Air2


For my main panel, I used the Postage Stamp Elle-ments frame and rectangle.  To the rectangle, I ombre blended Sea Glass Pigment Ink.  I adhered both the frame and panel to my white notecard.  After I adhered the balloon and clouds, I stamped some of the solid hearts in more Raspberry Pigment Ink and added the balloon string.  

Supplies:
Love is in the Air
Love is in the Air Elle-ments
Postage Stamp Elle-ments
Raspberry Pigment Ink
Sea Glass Pigment Ink
Aquamarine Pigment Ink
New Moon Dye Ink

Love Is In The Air Week - Day 2

January 16, 2018


Hi all! It's Deasy here. Today I want to share my card for Avery Elle featuring Love Is In The Air stamp set. This set is so cute and perfect for Valentine card!

Avery Elle supply that I'm using :
Love Is In The Air Clear Stamps for the images and sentiment
Lovc Is In The Air Elle-ments to die cut the images
Large Pierced Scallops Elle-ments to die cut the scallop frame
Raspberry, Strawberry, Pixie and Mint to Be Pigment Ink Pad to stamp the ballons, the clouds and the tiny hearts

I stamp, color the images using copic then die cut it. The sentiment is from white embossing powder. To color the background, I'm using Distress Ink Tumbled Glass with blending tool then splash watercolor with my brush.

Thank you so much for stopping by and happy crafting!

Hugs,

Melania Deasy

Love Is In the Air - Day 1

January 15, 2018


Hey there!  Caryn here.  This is an exciting week for many reasons - one is I get to share a card using the amazing Love Is In The Air stamp set and two - IT'S CHA THIS WEEKEND!!!  If you're going to be there, please stop by the Avery Elle Booth 2636 and say hi to us!!

So onto the card.  I covered my card in a watercolour effect paper and stamped and die cut the banners from Balloons and Banners.  I wanted the card to feel quite informal so I only loosely coloured the flags with Copics.  I used my MISTI to stamp a graduated colour onto the largest of the solid heart stamps using pigment inks and then finished with the sentiment stamped in the middle. 


Supplies Used:

Lava You with Heather

January 11, 2018


Hey y'all!  It's Heather here today!

Today, I'm sharing a fun card I created using the new Lava You stamp set!

To create my card, I stamped the volcano outline. Then, I added the solid images to the inside of the stamped lines. 
For the lava, I thought it'd be super fun to create it two-tone.  To do this, I inked up the entire stamp in the lightest color (here it's the yellow) than I went back and dabbed the ink pad carefully onto the stamp on the bottom portion only with the darker color (red).   You can see how it looks awesome on the stamp!

I had so much fun with this technique, I actually ended up using this same technique for all of the stamps - including the volcano! 

This is definitely one of those fun techniques that can really be fun! 

Thanks so much for stopping by and sharing part of your day with me!  Have a great one!

Otterly Fantastic With Katie

January 10, 2018


Hello!

Katie Gehring here with a card to share with you today featuring the totally adorable Otterly Fantastic stamp set.  These otters are the just the cutest, so I couldn't resist using two on my simple card!


I stamped, colored and die cut the otters and the hearts. I blended a circle of Distress Oxide Ink in Salty Ocean onto a panel of watercolor cards tock and spritzed with with water to lift some of the pigment.


I adhered the otters to the panel of watercolor card stock and die cut the panel with the Wonky Stitches Elle-ments die. I stamped the sentiment in black ink and attached the panel to a red note card.  A few clear gems add a finishing touch. 

Supplies:


Thanks so much for stopping by!
Katie

Otterly Fantastic With Yainea

January 8, 2018


Hello there!
It's Yainea here today with a simple card featuring Otterly Fantastic stamps and dies. How cute are those otters?? I really love otters so I'm always happy using them on my cards and projects.

I decided to go quick and simple, because sometimes we need just that to have a special handmade card for a special someone but we don't have a lot of time to make it.


I started with a pair of watercolors, aqua and teal and created a super quick background, finishing it sprinkling some more color on top. Then I stamped one of the otters and the little shell and used Copic makers to add some color.


After that, I die cut them using the coordinating dies, I love the one that creates cuts so the otter can hold little things!. To frame the little otter, I used a die I love, Heart Frame. Finally, I added some twine and little gems as a final touch.

I hope you like my project for today! Thank you so much for stopping by, have a nice day!!

Otterly Fantastic Clear Stamps
Otterly Fantastic Elle-ments
Hearts Frame Elle-ments
Sugar Plum Hemp Twine

Balloons & Banners Week - Day 4

January 4, 2018


Hi Everyone! Ashley here today sharing the super fun and versatile Balloons & Banners!


I started my card by heat embossing the double banner from Balloons & Banners on watercolor paper. Next, I water colored the background with Distress Inks. 

After my background was complete I watered colored another panel and stamped the balloon after it dried. I finished my card with Birthday Bus (one of my ALL time favorites!) and an embossed sentiment from Balloons & Banners.


This card was so fun to create! Thanks for stopping by!

Supplies

Balloons & Banners Week - Day 3

January 3, 2018


Hello and welcome to the new year!  As 2017 wrapped up for me, I had several birthdays to celebrate.  I found Balloons & Banners was a perfect basic set for both masculine and feminine depending on the color combinations used.  

Balloons & Banners

I went with a rainbow look using Avery Elle's pigments inks in Cherry, Fizz, Mimosa, Celery, Aquamarine, and Sugar Plum.  I created the distressed look to my balloons by inking them up with the ink, "dabbing" off some of the ink with a baby wipe, and stamping.  It made for some amazing balloons!  To create my balloon strings, I masked off one balloon and used that repeatedly to stamp my string "behind" the other balloons.  My sentiment was white heat embossed onto a black strip of cardstock.  One last detail was using the tiny solid circle from the Windmill stamp set to do the same technique as the balloons.

Balloons & Banners2

Supplies:

Balloons & Banner Week - Day 2

January 2, 2018


Hi everyone!  I hope that your first week of 2018 is off to a great start!  I have a quick card and video to share with you today.  I hope you enjoy taking a peek! 


Supplies:

Thanks for stopping by. Have a great day!

Happy New Year - Balloons & Banners Card & Video!

January 1, 2018


Happy New Year!!  

Hope you and yours have had the best holiday season ever so far.  I still feel very festive and am excited by what 2018 will bring.  I wish you all the very best for the coming year.

Today I'm sharing a card and a wee video of how to make a simple shaker card using the gorgeous Balloons and Banners stamps and co-ordinating Elle-ments.  I love the font in this set, I think it really lends itself to a fun style of birthday card and what could be more fun than balloons?


Supplies used:

 
site design by designer blogs