Party Fox Week - Day 5

November 30, 2018


Hi Everyone! Ashley here today sharing Party Fox! I love these party animals, are you ready to check them out??!


To create my card I started by water coloring a green background. I mixed in a little blue to add some variety to the color. 

Next, I stamped and die cut the foxes. These guys are adorable, don't you think? I colored them in fun festive colors and then added them to the background. I wanted a soft but fancy sentiment so I heat embossed "Happy Birthday" in Rose Gold Embossing Powder. 


I finished the card with some patterned paper I had in my stash and a few crystals. 

Thanks for stopping by!

Supplies:

Party Fox Week - Day 4 & Video

November 29, 2018


Hey everyone! Heather Campbell here.

Today, I'm super excited to be sharing not only a card using the new Party Fox stamp set but also a video to accompany it!  Woot!

Here's the card I created with the new Party Fox stamp set.  Eep!  So much fun. 

To get all of the details for how this came together, check out the video!  It's only 3ish minutes - so I hope you watch! 


And a close up of the card.
Thanks so much for stopping by and sharing part of your day with me. Have a great one!

Party Fox Week - Day 3

November 28, 2018


Hello friends,

Katie here.  I've got a card to share with you today featuring a pair of foxes and they're ready to party! 


I stamped the foxes and some of the party accessories with Versafine Onyx Black ink and embossed them with Clear Embossing powder. I colored the images with Copic markers and die cut the images using the coordinating Party Foxes Elle-ments dies.


I pulled out some older stamp sets and dies to create a background and sentiment for the Party Foxes. I die cut Aqua cardstock using the Chevron Mat Elle-ments die and adhered it to a white notecard.
I die cut white card stock with the Starburst Elle-ments die and added some Distress Oxide Ink in Mustard Seed. I affixed the foxes to the Starburst die cut and adhered it to the Chevron mat.  For the sentiment, I pulled out the Banner Bits stamp set and coordinating Elle-ments die. I stamped the banner outline and sentiment with Versafine Onyx Black ink and heat embossed the banner with Clear Embossing powder.

I hope this card and the Party Foxes make your day a little more festive and fun!  
Thanks for stopping by!
Katie

Supplies

Party Fox Week - Day 2

November 27, 2018


Hello there!!

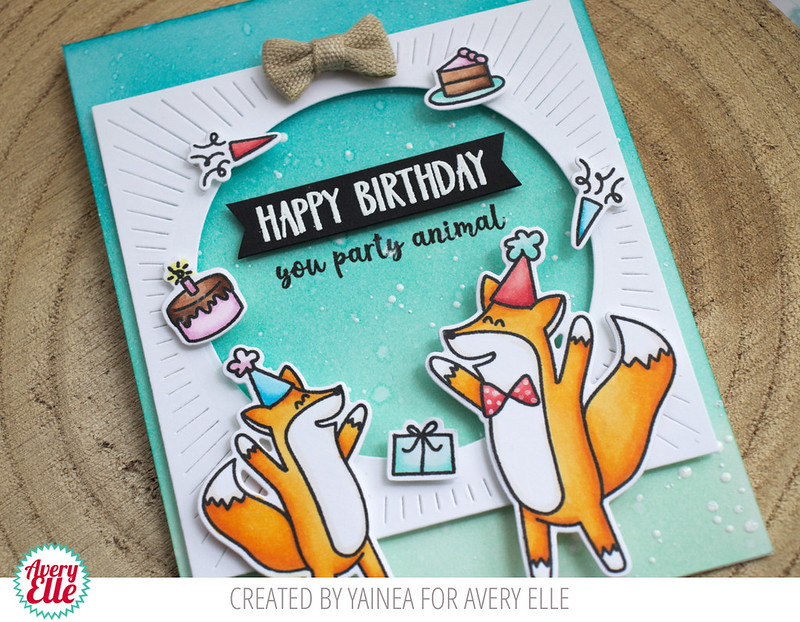
It's Yainea here today sharing a fun birthday card featuring Party Fox. Every cardmaker knows it's important to have a bunch of birthday cards in hand and everyone love foxes, right? (right?? Because they're super cute!!) so this set is just a prefect addition to our stash ;)


I had a lot fun coloring this cheerful guys with my alcohol markers! Once I had them all colored and cut using the coordinating die set, I started coloring the background. I used two tones of ink to create an ombre effect and then sprinkled some water and white paint on top to add a bit of texture.

I cut an extra layer for my card out of white cardstock using the Burst die and heat embossed the sentiment with white embossing powder over a black cardstock banner.
Finally, I arranged all the elements on my background using dimensional adhesive and added a little cloth bow that I had on my stash.


I hope you like my project for today and feel inspired to create something!

Thank you so much for stopping by, have a nice day!

Supply list:

Black Friday Sale Continued & Party Fox Week - Day 1

November 26, 2018


Hello this is Nicky with you today and I'm sharing a new card featuring Party Fox from the latest Avery Elle release.


For this card I ink blended a background panel using my Clarity Stencil Brushes.  Colours used are Distress Inks in Spun Sugar and Squeezed Lemonade.  I stamped the sentiment using Ranger Archival Ink in Potting Soil and then applied this panel to my 110lb white cardstock base.  Next I took another panel of white cardstock and die cut it twice using each of the dies from Postage Stamp.  I adhered the two together on the reverse then applied foam tape and applied the double frame to the card.


On Bristol Smooth cardstock I stamped all of my images again using Ranger Archival Ink in Potting Soil.  I watercolour painted everything using Kuretake Zigs, highlighted some points with a Uni-Ball Signo white gel pen then die cut everything and used foam tape to apply them to the scene.


The final touch was to simply grab a silver glitter gel pen and dot in the tiniest dots of sparkle for a pretty glint when the card is handled.

Hope you like the card, I appreciate you coming along to read the blog today, see you next time!

Nicky x

Products Used:-

Party Fox Clear Stamps
Postage Stamp Die

Black Friday Sale & Embellished Heart Week

November 23, 2018


Hello and Happy Friday! I hope that all in the US are enjoying their holiday weekend.  I am popping in with a quick card today.  Enjoy!

 Supplies:

Thanks for stopping by to take a peek. Have a great day!

Black Friday and Embellished Heart Week

November 22, 2018


Hi Everyone! Ashley here today sharing the new Embellished Heart die. Let's check it out!


To create my card I started by die cutting Embellished Heart on a piece of white card stock. Next, I used Post it tape to mask stripes and blended Distress Ink. The background was water colored, again with Distress Inks. 

I decorated the card with two of my favorite bears. :) The polar bear is from Polar Peek a Boo Pals and the panda is from Peek a Boo Pals. Finally, I die cut the sentiment from black card stock and added it to my card front.


Thanks for stopping by! I can't wait to see what you create!

Supplies:

Black Friday Sale & Embellished Heart Week

November 21, 2018


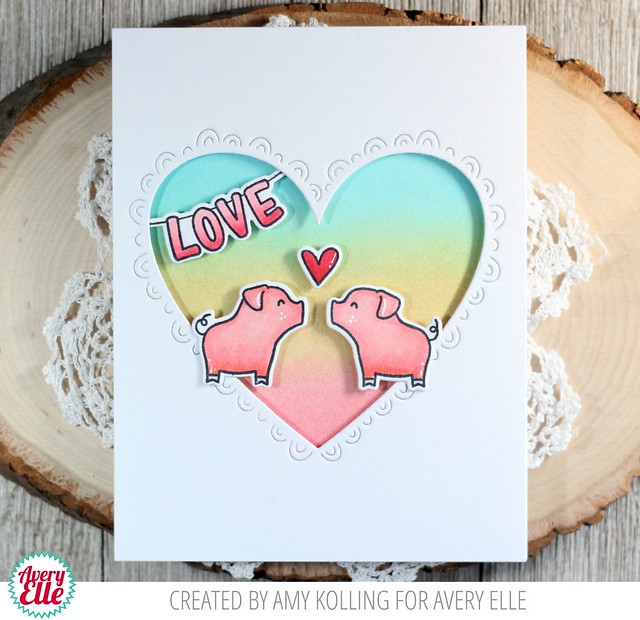
Hello!  Amy here and I'm so excited to be creating for the new year and all things "not" Christmas.  Valentine's is one of my favorite holidays to craft for.

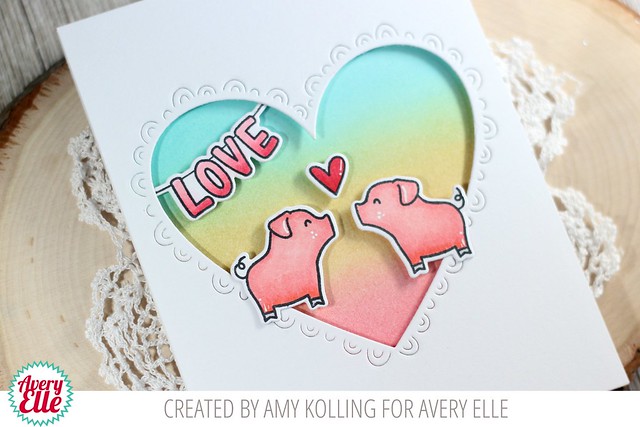
My card features the new Embellished Heart Elle-ments.  It features this large heart cut out with the cut decoration on the outside.  

Embellished Heart

I started by die cutting the Embellished Heart into a white panel of cardstock.  Then I ink blended Peacock Feathers, Scattered Straw, and Worn Lipstick Distress Inks onto Bristol Smooth cardstock.  I concentrated colors so that my heart would have the 3 color variation.  I added my heart panel over the to of my ink blended background with foam adhesive.  

I added some cute Copic colored images from Party Pals.  These little pigs are just adorable and "in love".  The banner in the corner of the heart was added with foam adhesive as well as the pigs and heart.  

Embellished Heart2

Supplies:

Black Friday Sale & Embellished Heart Die Week

November 20, 2018


Hi everyone! It's Deasy here. Today I want to share my card for Avery Elle featuring Embellished Heart Dies . I love this dies because it's so versatile and pretty. I combine it with another stamp set to make a cute love card!


Avery Elle supplies that I'm using :
Embellished Heart Elle-ments to die cut the frame and the sentiment
Party Pals Clear Stamps for the images
Party Pals Elle-ments to die cut the images
Dotted Borders Elle-ments to die cut the scallop border
The Sorbet Collection Paper Pad for the patterned paper

I stamp the images, color it using Copic then die cut it. To color the background. I'm using Distress Ink Worn Lipstick and Spun Sugar with blending tool then splash water with my brush.

Thank you so much for stopping by and happy crafting!

Hugs,

Melania Deasy

Embellished Heart Die Week - Day 1

November 19, 2018


Hey there!  It's Caryn here today with a couple of cards I created using the fantastic Embellished Heart Die.  I love when I can get more bang for my buck so this die is a great investment as it can give you a multitude of looks.  The die cuts an embellished aperture from your material leaving the "positive" heart die cut.  Simple to create to totally different cards with no waste!


I started by die cutting a piece of self adhesive wood veneer paper.  This gave me the negative part with the aperture and detailed border and also a heart from the centre.  I used similar supplies for both cards so whipping them up didn't take very long at all.  


For the first card I started with an A2 card base and carefully centred the die cut wood veneer to the front.  From the card I created last week using the Three Hearts Die I had the white hearts left over so used a couple of them on these cards (tip - always keep your die cuts - you never know when they'll come in handy).  I lightly brushed some Orchid pigment ink around the smaller heart to let it pop off the card a little  - it's subtle but it adds a lot of texture.  To bring the elements together I bunched some gold thread and held it down with some adhesive and popped the inked heart die cut onto it with foam tape.  I created the sentiment using the new Simple Sentiments stamp set, heat embossed with white powder and then die cut using one of the co-ordinating dies.  I added a few tiny black gems to tie the black sentiment in.


For the second card I used the Embellished Heart die again and die cut it from a white panel off-centre.  I popped this onto a white A2 card using foam tape and then adhered the wood veneer heart into the space and trimmed off the overhanging edge.  I grabbed another of my leftover hearts from my last card, the same gold thread and another white embossed sentiment and finished off this time with some gold Stickles around the edge of the heart to accent the thread.  

Supplies:

25 Days Of Christmas Tags Event

November 17, 2018


Welcome to the 8th Annual 25 Days of Christmas Tags hosted by our friend Tracey McNeely!  Avery Elle is happy to be today's sponsor.  Be sure to check out Tracey's blog at inmycreativeopinion.blogspot.ca for all of the details on the sponsors and how to win prizes during this event!  It is jam packed with inspiration and giveaways!


I created two tags for today.  I can't wait to tie these onto pretty packages next month!


Supplies:

Supplies:

Thanks for stopping by to take a peek. Have a great day!

Three Hearts Week - Day 5

November 16, 2018


Hi Friends! How are you? Ashley here sharing Three Hearts Die and so much more!

I love conversation heart candy, do you? I made my own paper version! Let's get started...


I started my card by die cutting the Three Hearts Die. Next I used Distress Ink to ink the cut outs AND behind the cut outs. This made a lot of fun hearts that I could add sentiments to. I picked several Simple Sentiments and heat embossed them on the hearts. I added the small black hearts with Tons of Hearts Frame and finished the card with a sentiment from And Then.


I love how this card turned out! Thanks for stopping by!
Supplies:

Three Hearts Week - Day 4

November 15, 2018


Hey everyone!  Heather Campbell here!  I'm back continuing the fun using the new Three Hearts die.
For my card today, I thought it'd be really fun to create a shaker with this die!  


First, I die cut the card front panel with the Three Hearts die.  Then, I ink blended a background and created everything to create my shaker.  


I used the adorable cactus from Stuck On You. I had so much fun coloring these images in!  I assembled my shaker using sequins that coordinated colors with the cactus.  Finally, I finished it off with hearts and sequins!

Thanks so much for stopping by and sharing part of your day with me!  Have a great one!
Heather 


Three Hearts Week - Day 3

November 14, 2018


Hello friends,

Katie here with a card to share with you today featuring the Three Hearts Die.  I just adore the latest addition to the Three Shape series of dies. It's perfect for Valentines Day! 


I positioned the die onto an A2 panel of white card stock and die cut the trio of hearts a few times.  I adhered the die cut panel on top of a panel of watercolor card stock colored with Distress Oxide inks and sprayed with water.


Inside the hearts I tucked the pair of cacti from the Stuck on You stamp set.  I added some of the tiny sentiments from this set inside the heart shapes.  They fit perfectly and remind me of conversation hearts!  I trimmed the panel and adhered it to a red A2 note card.

Supplies

Thanks for stopping by!
Katie

Three Hearts Week - Day 2

November 13, 2018


Hey there, Caryn here sharing a clean and simple card featuring the gorgeous new Three Hearts Die.  This die, like the previously released Three Stars die has so many uses and not just for Valentines day either.  I selected three of the striped papers from the Sorbet Collection paper pack and used a great sentiment (LOVE the font) from the new Some Bunny stamp set.


I die cut a white panel using the three hearts die and adhered the different patterned papers behind each aperture ensuring the stripes are angled in different directions.  I stamped the sentiment in Fog Dye ink and finished off by wrapping some white twine around the panel and popping it using foam tape onto a white card base.


Supplies:

Thanks for stopping by x

Three Hearts Week - Day 1 & A Winner

November 12, 2018


Hey there this is Nicky with you today and I'm sharing a card I've made using the lovely new and ever so useful 'Three Hearts Die' from Avery Elle's newest release.  This die will make your Valentine's cards incredibly easy!


For this card I called upon an old favourite stamp set Woodland Wonders.  I fancied this card as a love card from parent to younger child and so I imagined it like a children's book.

The card starts with a panel of white cardstock which I die cut using the Large Pierced Scallops Elle-ments die.  I then ink blended the edge softly using Distress Oxide Ink in Tumbled Glass.   I then die cut the Three Hearts Die.  I ink blended the negative heart cuts  with more of the Tumbled Glass and also with Cracked Pistachio and stamped a few tufts of grass from Woodland Wonders.


I stamped the sentiment 'LOVE you' in the top right hand corner using the new 'And Then' sentiment set then applied dimensional foam tape to the back of the panel and applied it to a Kraft cardstock base.  I applied adhesive to the back of each ink blended heart and recessed them carefully through the openings.  On Bristol Smooth cardstock I stamped the characters from Woodland Wonders, I then watercolour painted them then die cut and applied them with more dimensional foam tape.


To finish out this card I applied some toning sequins and then created a white paper writing insert inside the card (80lb weight) and stamped that with another sentiment from the 'And Then' sentiment set which reads:  You Make My Heart Happy.


I appreciate you stopping by to read about this card today, I hope you are a little inspired - happy crafting!

Nicky x

Products Used:

Three Hearts Die
And Then Clear Stamps
Large Pierced Scallops Elle-ments
Woodland Wonders Clear Stamps


The winner of our Winter 2018 Release Designer Blog Hop is  Karenb.

karenb said...
What a cute release!
I follow on Facebook.
I follow on Pinterest.
I follow your blog. :)
Congratulations!  Please contact us at customerservice at averyelle dot com so that we can get your prize to you!

Winter 2018 Designer Blog Hop

November 8, 2018


I am so excited because our Winter 2018 Release is finally here!!  We have an amazing blog hop full of inspiration today and we are so glad that you are here. Thank you so much for all of your comments and likes during our previews this week.  We read each and every comment and it really makes our day!!

For a summary of all of our new products that are available for purchase right now check out this section in our store .  Be sure to scroll all the way to the end of this post to read about the fun giveaway we are having.  We will be showcasing projects using our new sets starting today and will continue to show them throughout the next few months.  I can't wait!


 Let's get to the hop.  I have a ton of projects to share with you today!


 Supplies:
Tons Of Hearts Frame Die
And Then Clear Stamps
Silver Embossing Powder

 Supplies:
New Moon Dye Ink
Some Bunny Clear Stamps & Dies
Double Pierced Rectangles Dies

 Supplies:
New Moon Dye Ink
Stuck On You Clear Stamps & Dies

 Supplies:
Embellished Heart Die Set

 Supplies:
Party Fox Clear Stamps & Dies
Wonky Stitches Dies
New Moon Dye Ink
Pure White Embossing Powder


 Supplies:
Three Hearts Dies
Peacock Clear Stamps & Dies
Pure White Embossing Powder
New Moon Dye Ink

Supplies:
Simple Sentiments Clear Stamps & Dies
Pure White Embossing Powder


Avery Elle / Jamie - YOU ARE HERE


Caryn Davies
Heather Campbell
Yainea
Melania Deasy
Katie Gehring 
Amy Kolling 
Ashley Marcu
Elena Roussakis
Nicky Meek


To celebrate our Winter 2018 Release Blog Hop, Avery Elle is giving away a $25 Gift Certificate to one random winner.  To enter to win just comment on this post.  There is no purchase necessary and you must be 18 years of age or older to enter.  This giveaway is void where prohibited.  You can also do options 2, 3, 4, 5 or all 6 of the following to increase your chances of winning. You have until midnight Sunday, Novebmer 11th to enter.  The winner will be announced on the Avery Elle Blog on Monday, November 12th .  All products are available for purchase in the Avery Elle store right now.
To enter to win you can do 1, 2, 3, 4, 5 or all 6 of the following to increase your chances:


  1. Comment on any of the design team's posts and/or here on the Avery Elle Blog
  2. Follow us on Twitter and tweet the contest (we are @averyellestamps )
  3. Follow us on Facebook (we are www.facebook.com/AveryElle ) and share us with your friends - make sure they tell us you sent them.
  4. Follow us on Pinterest
  5. Become a blog follower through email (comment on the Avery Elle blog if you already follow us)
  6. Join our Flickr group (comment on the Avery Elle blog if you already belong)

Thanks for stopping by to take a peek. Have a great day!
 
site design by designer blogs