Windmill Week - Day 5

December 29, 2017


Hi Everyone! Ashley here and I'm excited to share the Windmill stamps and dies today!


To create my card I started by stamping all of my images. Then I die cut them and colored them with Copics. 


Next I embossed my sentiment from the stamp set Sentimental Too. Finally, I water colored the background and added a gem to the windmill.


Thanks for stopping by!

Supplies

Windmill Week - Day 4

December 28, 2017


Hey all!  It's Heather here.


Oh my gosh I'm excited to be here playing with the new Windmill stamp set.  This set is so much fun to play with.  There are so many bits and pieces which really allow you to customize your own little scene.  My favorite little images have to be the bugs.  Eep - so cute!


To create my card, I ink blended my background of clouds and grass using a stencil I created with Picket Fences dies. Then I stamped, colored and die cut all of the different elements to create my scene.

Thank you so much for stopping by and sharing part of your day with me!
Have a great one!

Windmill Week - Day 3

December 27, 2017


Hello friends,

Katie here with a card to share with you today featuring the adorable Windmill stamp set.  The Windmill stamp set reminds me of the Netherlands, and the Netherlands remind me of Delft Blue China and Ceramics.  Check out this sweet music box- classic Delft.

Using Delft Blue ceramics as an inspiration, I stamped and colored my Windmill with lots of moody blue Copic Markers (B21, B23, B24, B26 and B28). 


I used the Large Pierced Scallops Elle-ments die to create the frame for the little Dutch Delft scene.  I die cut the frame several times from blue card stock and adhered the layers together.


Supplies:

I hope you enjoyed this little Dutch journey.  
Thanks so much for stopping by!
Katie

Windmill Inspiration- Day 2

December 26, 2017


Hi all! It's Deasy here. Today I want to share my card for Avery Elle featuring Windmill stamp set. This set is so pretty and versatile for any theme. I have so much fun play with it!


Avery Elle supply that I'm using :
Windmill Clear Stamps for the images and sentiment
Windmill Elle-ments to die cut the images
Diagonal Stripes Elle-ments to die cut the frame

I stamp, color the images using copic then die cut it. The sentiment is from silver embossing powder. To color the background, I'm using Distress Ink Tumbled Glass and Bundled Sage with blending tool then splash watercolor with my brush. I add some clear sequins and clear droplets for the embellishment.

Thank you so much for stopping by and happy crafting!

Hugs,

Melania Deasy

Merry Christmas & A Cute Windmill Card

December 25, 2017


Hello and Merry Christmas everyone!

It's Yainea here with a colorful card featuring the pretty Windmill set. This set is perfect for creating scenes on your cards, and is great for just because cards.


I stamped all the little elements on watercolor paper and colored them using my watercolor brush makers, so relaxing! This set is also perfect for adding a littlr interactive element, just adding a brad on the center of the windmill blades :).


I also tried a fun technique to add some texture and additional interest to the card. I used the clouds from the Picket Fence set and embossed the background to create a fun cloudy sky. To do this technique you need to open the plataform of your cutting machine just like when you use embossing folders. I used an embossing mat but a piece of foam works well too. Place your elements like in the picture bellow: Plataform + embossing mat/foam + cardstock + die + plataform. Test with a small piece first to see if you like the embossing effect. You can always add more foam or a thicker cardstock. I really love the look!


This card looks elaborate but, as I only used watercolors, it's really very quick to make. Just stamping, coloring, dire cutting and adhereing everything together on the base card :)

I hope you like it, thank you so much for stopping by today, have an amazing Christmas!

Suppy list:
Windmill Clear Stamps
Windmill Elle-ments
Picket Fence Elle-ments
Postage Stamp Elle-ments

Advent Calendar Extravaganza

December 23, 2017


Hello!  Our friend Taheerah is having an Advent Calendar blog event and we are so happy to be a part of it again this year.   
Advent Calendar Extravaganza is -the- festive event of the season! This ‘hop with a twist’ was dreamed up by Taheerah Atchia and features surprise destinations each day! Joining in the fun with Taheerah are ONE HUNDRED special guests - each serving up some fantastic Christmas inspiration! Just like an Advent Calendar, you’ll never know where you’re going to be visiting next until you ‘open the door’!

And that’s not all! With 25 *amazing* sponsors taking part as guests as well, your crafty wish list is bound to get a boost with a chance to win a prize EVERY SINGLE DAY!!

I made this fun card for the event!  The wreath fits the center circle from our Horizontal Stripes Die Cut perfectly.  Don't you love that?  I also trimmed the Horizontal Stripes Die Cut down into a square shape for this card.  I love being able to customize my die cuts to get more looks out of them!


Supplies:

Avery Elle is offering up a $20 gift certificate as a prize so be sure to check out Taheerah's blog for all of the details.  There are a lot of prizes and the event runs from Dec 1st through the 25th.   Simply leave a comment on this post - then head back to taheerah-atchia.com and leave a comment there too! You must leave a comment on Taheerah’s blog as well as ours in order to be eligible to win! Don’t forget to grab the other surprise destinations from Taheerah’s blog and head over to them to leave comments there as well to improve your odds even more! You have until 23:59 EST on 31st December 2017 to enter.

Thanks for stopping by to take a peek. Have a great day!

Cool Beans With Jamie & Video

December 22, 2017


Hi Everyone!  I am popping in with a quick card and video using our new Cool Beans stamp and die set.   Check it out!


Supplies:

Thanks for stopping by to take a peek. Have a great day!

Cool Beans With Ashley

December 21, 2017


Hi Friends! Today I'm sharing how much fun I've been having with the stamp set Cool Beans

This set has the best coffee cup image. I've been filling in the cup with all sorts of fun images. Today I combined Cool Beans with Lava You.


I started the card by stamping the coffee cup, then masking the sides and bottom. Since the cup is such a simple image, I just used 4 pieces of post it tape. Next, I stamped the volcano image from Lava You. I was careful to leave out the mountain and only included the exploding hearts. 
Cute right?


Next, I water colored the background, added some copic coloring to my cup and die cut the sentiment from Diagonal Stripes. I finished the card with some patterned paper and a few sequins.


These cups are so fun to make I had to create another one! This time I created the background using Distress Inks and heat embossed the sentiment.


As you can imagine you can let your imagination run wild with whatever image you want to place on your cup! Have fun creating!

Supplies

Cool Beans With Amy

December 20, 2017


Hello!  Amy K. here with a "cool" card for the upcoming LOVE holiday.  The Cool Beans stamp set is tiny but mighty.  With coordinating dies, Cool Beans is perfect for those coffee/latte lovers!  

Cool Beans


I went clean and simple and created a light blue Distress Ink blended background.  I added a strip of red cardstock (that I stamped with one of the heart stamps from the set) and a strip of rainbow striped pattern paper from the Everyday Collection Paper Pad to the bottom of my card.  The coffee cup was stamped on kraft cardstock and hand trimmed out.  I did the same for the coffee cozy and lid.  The coffee cozy was paper pieced with some of the same rainbow striped pattern paper and a red cardstock heart was added along with a single clear gem.

Cool Beans2

Supplies:

Cool Beans With Elena

December 19, 2017


Hi there! Elena here.

I'm thrilled to be here showing off Cool Beans for Christmas. I give away a ton of Starbucks gift cards to tired teachers and this card would be perfect to give along with those gift cards:


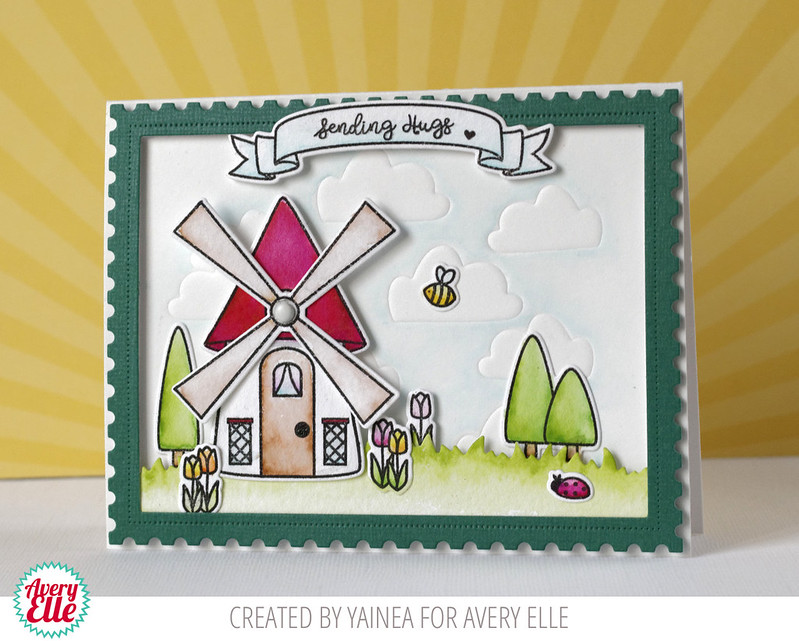
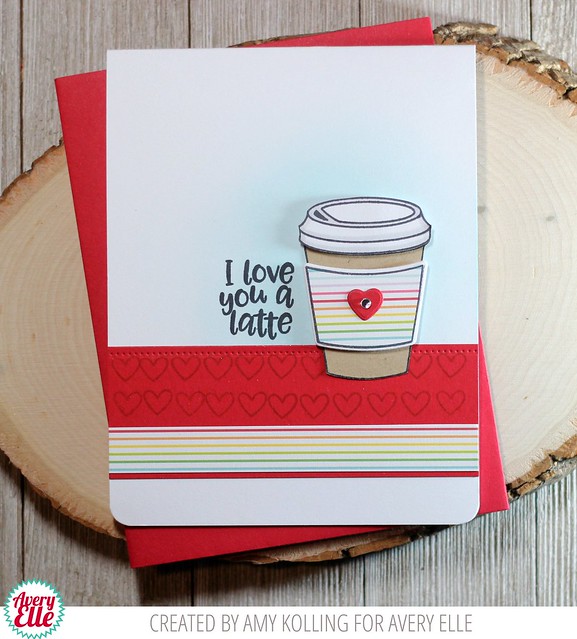
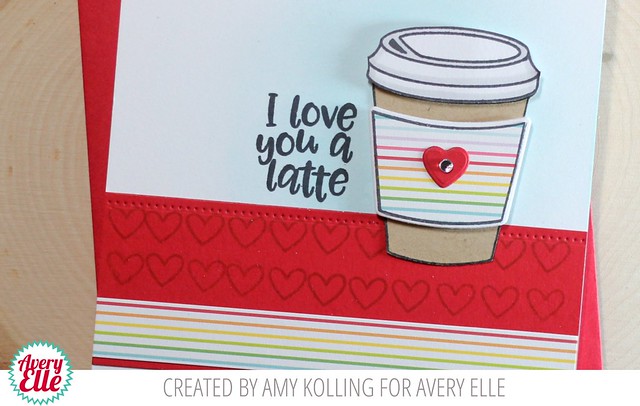
I used the very cool Waves cover plate to add interest to the background. I love how festive it looks in white over the red background!

For the coffee cup, I knew I wanted a circle with a heart inside, but I didn't have a circle I could stamp (I really wanted that black outlined image!) so I made my own:


I stamped the balloon from Hats Off - but can you see how the ink at the bottom was wiped away before I stamped it down? I stamped the heart from City Celebrations in the middle - perfect fit!

After die-cutting the balloon, I snipped off the balloon nub and re-drew the missing part of the circle with a copic multiliner pen.


Sometimes getting the look you want is as easy as looking at the stamps in your stash.

I colored the cup a vibrant red, and the circle a bright green.


To add some punch, I heat-embossed the sentiment (from Polar Pals) onto a rectangle of black cardstock.

I added highlights with a white gel pen to finish things off.

♥.

Cool Beans With Caryn

December 18, 2017


Hey there.  It's Caryn here with my take on the Cool Beans stamp set and dies.  As I have mentioned before, at this time of year my mind is solidly on Christmas and as I am staggeringly short of cards this year, every one I make NEEDS to be Christmas!!!  To make my coffee mugs feel all festive I coloured them with red Copics, added a rim of frosty glitter using Rock Candy Distress glitter and stamped a Christmas sentiment from the Retro Ornaments stamp set.

I added a backdrop of patterned paper from the Jewel Collection paper pad and a couple of strips of red glitter Washi tape and finished off with a couple of glitter dots.


Supplies used:

Windmill with Amy

December 15, 2017


Hello!  Amy K. here sharing a card to welcome someone to their new home using the Windmill stamp set.  

Windmill

I've colored this cutie "gnome" type of house in reds and greens.  All the little scene building images were Copic colored and die cut using the coordinating Windmill Elle-ments.  My background was made using the cloud die from the Picket Fence Elle-ments and some Aquamarine Pigment Ink to blend a sky background.  For the grass, again I've used the Picket Fence Elle-ments for a layered lawn by die cutting the grass twice.  After building and adhering my scene, I added a "home sweet home" banner along with a Cherry Hemp Twine bow.

Windmill2

Supplies:
Windmill Clear Stamps
Windmill Elle-ments
Picket Fence Elle-ments
Cherry Hemp Twine
Aquamarine Pigment Ink

Love Is In The Air With Heather

December 14, 2017


Hey everyone!  It's Heather here and I'm back sharing a card with the new Love Is In The Air.


Oh my gosh I love this set soooo much!  Something about clouds just makes me happy!


To create my card, I stamped a background using Sea Glass and Mermaid ink.  Then I die cut a frame from the Large Pierced Scallops dies and popped my frame up on foam.  Finally I stamped and die cut the heart balloon and string from Love Is In The Air and then stamped, die cut and colored in the birds to pop them all up on foam.

Thanks so much for stopping by and sharing part of your day with us here!

Have a great day!

Cool Beans With Katie

December 13, 2017


Hello friends,

Katie here with a card featuring the new Cool Beans stamp set.  Although the winter holidays are upon us, I am switching gears a bit and made a card suitable for Valentine's Day or really any time for a special friend.


I stamped and die cut the cup from the Cool Beans stamp set.  I love that the cup can be made into a shaker element! 

The "hugs" die is included with the Wonky Squares Elle-ments. I die cut the word several times from white card stock, stacked them together, and adhered the word die cut from black card stock on top. 

It would be so fun to include a gift card inside the card to the recipient's favorite coffee shop to treat him or her to a latte or favorite coffee beverage! 

Thanks a latte for stopping by!
Katie

Supplies: 

Windmill With Jamie

December 12, 2017


Hi Everyone!  I am popping in today to share a card I made using our new Windmill Stamp & Die Set.  I made a quick video for you too so be sure to check it out!


Supplies:

Thanks for stopping by to take a peek. Have a great day!

Cool Beans With Yainea

December 11, 2017


Hello!

It's Yainea here with a warm coffee card to share with you featuring Cool Beans stamps and dies. It's cold outside and I really love coffee so I decided to create a warm and cozy card using this great set.


Thinking about Winter and cozy a pattern cames to my mind: buffalo plaid. So I took a piece of red cardstock, black watercolor and a white gel pen and I created my own buffalo plaid patterned background. I wanted it to look handmade and messy so I didn't put a lot of care while drawing it.


The rest of the card is pretty simple, just some stamping, die cutting and embossing. For the stitched frame and big sentiment I used another die set from the newest release: Wonky Squares. An easy card to warm a friend during these cold days. I hope you like it!

Thanks for you visit, have a nice day!

Supply list:
Cool Beans Clear Stamps
Cool Beans Elle-ments
Wonky Squares Elle-ments
Postage Stamp Elle-ments
Pure White Fine Embossing Powder

Otterly Fantastic - Day 4

December 8, 2017


Hello and Happy Friday!  I am popping in today to share a simple card that I created using our new Otterly Fantastic Stamp & Die Set.  I have a quick video of the process as well so check it out!


Supplies:

Thanks for stopping by to take a peek. Have a great weekend!!

Otterly Fantastic - Day 3

December 7, 2017


Hi Everyone! I'm sharing Otterly Fantastic with you today, one of my favorite sets for the latest release!


I decided to bring some holiday spirit to my card today by incorporating Festive Wreath with Otterly Fantastic. I started by stamping, die cutting and coloring the images for my scene. 


Next, I blended the back panel with Distress Inks. I created the window with Double Pierced Rectangle Dies. Finally I stamped the sentiment with a blend of words from Otterly Fantastic and Festive Wreath.


Supplies

Alcohol Ink Backgrounds & Otterly Fantastic

December 6, 2017


Hello!  Amy K. here with a card that starts off my Valentine's using the adorable new set called Otterly Fantastic.   

Otterly Fantastic

Since alcohol inks have "come back in style", I used them here to create a water backdrop for my otter.  I started my card off with a panel of Yupo paper from Ranger.  These inks work best with this type of paper.  To an applicator, I added a felt pad (different than what we use for ink blending) and added a few, random drops of Mermaid, Citrus, and Silver Mixative.  They really only need to be drops as the next step is to add a few drops of Alcohol Blending Solution to the felt pad.  To create my background, I used the applicator and simply placed it on the paper, twisted, and lifted off.  I repeated this for the entire panel.  After letting the panel dry, I used the Wonky Stitches Die to die cut the panel.  

Otterly Fantastic4

My otter was Copic colored with E42, E43, E44 and die cut with the coordinating Otterly Fantastic Elle-ments.  What I love is that there is a die that cuts the paws so that the otter can "hold" something!  In this case since this is for Valentine's, I used the heart stamp from the set.  Using Scalloped & Pierced Hearts Elle-ments, I die cut a red heart and white heat embossed the sentiment.  After adding the heart to the right side, I added the otter and a few extra hearts.  This panel was added to my alcohol ink background created earlier. 

Otterly Fantastic3


Don't be afraid of trying new things with the alchol inks.  I have even "messed up" and simply laid more color down over it.  Have fun creating some amazing backgrounds!

Supplies:

Otterly Fantastic
Otterfly Fantastic Elle-ments
Wonky Stitches Die
Scalloped & Pierced Hearts Elle-ments


Cute Otterly Fantastic Card & Video

December 4, 2017


Hello, hello!  It's Heather Campbell here and I'm utterly excited to be here today sharing my fun otter card and I've even got a video for you today too!


Here's the video sharing how this card came together.  I also shared my favorite technique for using the die that cuts the otters hands out so he can hold the shell!


Supplies: 

Super fun and cute.  Thanks so much for stopping by and sharing part of your day here!  Have a great one! 

 
site design by designer blogs