Showing posts with label Watercolors. Show all posts

Jawsome Wishes Week - Day 3

July 13, 2022


Hello!

It's Yainea here today showcasing this totally jawsome set and coordinating dies: Jawsome Wishes. I think this set is just perfect for creating a fun and refreshing birthday card like I did, but it's great for many occassions as well, it'll sure bring a smile to the recipient! :)

To create my card I started die cutting a piece of watercolor paper and then I used Avery Elle liquid watercolors to create the background.

I colored the images with alcohol markers and I combined them with the sentiment from Pierced Birthday Frame Elle-ments. To get that shiny look I covered the sentiment with Glossy Accents.

I hope you like my project for today and feel inspired to start creating!

Thank you so much for stopping by, have an amazing day

Supply list:


Poppies With Caryn

September 10, 2020


Hello!  While we are getting ready for our next release on Sept 24th I will be featuring some of my favorite Design Team projects from our Summer release.  They are so amazing and they are worth taking a second look!  I cannot wait to show you the 14 stamp sets and 15 die sets that we have coming out on September 24th.   They are sooo good! In the meantime, enjoy this great project by Caryn!

Hello there, here today sharing a card featuring some fabulous products from the latest Summer release.  
The card features two new sets – Big Congrats and Poppies.  I thought it was high time I dusted off my Avery Elle Liquid Watercolours and the Poppy images in this set are perfect to show off the delicate colours and effects you can create. 

First I stamped the the poppy garland image in Versamark and heat embossed it in white.  I “coloured in” the image with plain water to begin with so I could drop tiny amounts of the liquid watercolour onto the design.  I love the way the two colours merge and mingle together creating an almost translucent appearance – just like a real poppy!  I used Cherry and Fizz liquid watercolours on the flowers and a combination of Lemongrass and Jungle  for the foliage.

I set the image aside to dry and then die cut the Congrats die from the Big Congrats set in white.  I was going to leave. it like that for a tone on tone effect but I decided it needed a bit “more” so added versamark to the bottom half and then heat embossed it in gold for a dipped effect.  I stamped and heat embossed the “So Happy For You” block also.

Finally I assembled my card.  I wanted the card to be a bit bigger than the standard A2 size so I created a custom size of 4′ x 7′.  This gave my design a much better look and allowed me no avoid the card looking crowded.  Sometimes we forget we can create a card ANY size we like, lol!  I added the die cut floral image using foam tape and the congrats sentiment die cuts using liquid adhesive.  For a final flourish I added some enamel dots to tie in the gold on the sentiment.

Thanks for stopping by to take a peek. Have a great day!

Two Fabulous Cards By Caryn

July 13, 2020


Hello there, Caryn here today sharing two cards featuring some fabulous products from the latest Summer release.  

The first card features two new sets - Big Congrats and Poppies.  I thought it was high time I dusted off my Avery Elle Liquid Watercolours and the Poppy images in this set are perfect to show off the delicate colours and effects you can create. 

First I stamped the the poppy garland image in Versamark and heat embossed it in white.  I "coloured in" the image with plain water to begin with so I could drop tiny amounts of the liquid watercolour onto the design.  I love the way the two colours merge and mingle together creating an almost translucent appearance - just like a real poppy!  I used Cherry and Fizz liquid watercolours on the flowers and a combination of Lemongrass and Jungle  for the foliage.


I set the image aside to dry and then die cut the Congrats die from the Big Congrats set in white.  I was going to leave. it like that for a tone on tone effect but I decided it needed a bit "more" so added versamark to the bottom half and then heat embossed it in gold for a dipped effect.  I stamped and heat embossed the "So Happy For You" block also.


Finally I assembled my card.  I wanted the card to be a bit bigger than the standard A2 size so I created a custom size of 4' x 7'.  This gave my design a much better look and allowed me no avoid the card looking crowded.  Sometimes we forget we can create a card ANY size we like, lol!  I added the die cut floral image using foam tape and the congrats sentiment die cuts using liquid adhesive.  For a final flourish I added some enamel dots to tie in the gold on the sentiment.


My second card today is a bit more childlike and features the fabulous Unicycle stamp set.  It would be great for a little boy and I happen to have a nephew with a birthday coming up soon so this should come in handy!


I cut a panel of the blue star paper from the Spring Collection paper pad and adhered it to the A2 white card base.  I then stamped the cute rhino and unicycle along with the wee birthday cake and coloured them using Copics.  


I die cut the images, adhered them to the card and stamped the sentiment.
Whenever I see the chance to use a pom pom on a card I don't waste it so his hat just had to have one!


Supplies used:

Card 1

Card 2


Thinking Of You With Ashley

May 18, 2020


Ashley created this simple but oh so lovely card using our You've Got This stamp set.  It is so pretty.

Hi Everyone! It's Ashley here on the blog today. I'm sharing the You've Got This stamp set today. The sentiments in this set are so thoughtful and perfect for so many occasions. Let me show you what I made.


I started my card with the water colored background. These are all colors from Avery Elle's amazing liquid water color line. Next I die cut, then stamped the large sentiment. I adhered the pieces together and then added the small sentiment. How perfect do those little letters stamp? I love it!


This is such a simple card but I love how it turn out. 

Thanks for stopping by!

Supplies:

Make A Wish With Yainea

May 1, 2020


Hello there!

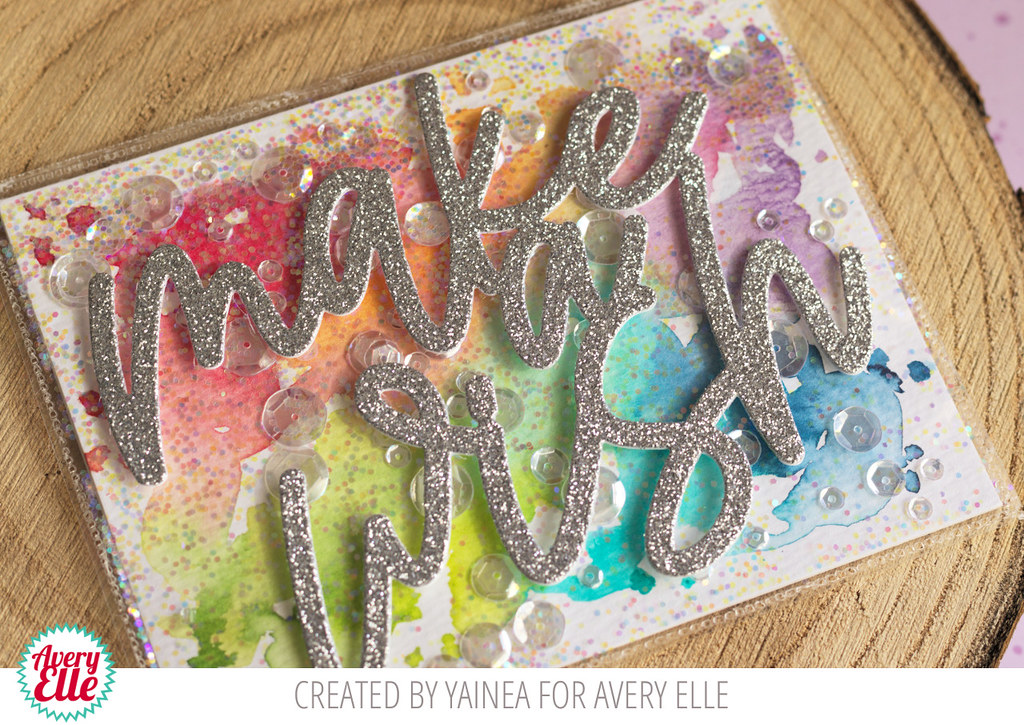
I hope you're all well and safe. It's Yainea here today bringing you some inspiration on how to use the Make a Wish die.

As soon as I saw this die I knew I was going to love it. The idea of using it as a cake topper is just amazing and I love that, if you use it on a standard size card, it almost covers it completely.


I wanted to create a super sparkly and colorful chaker card keeping the focus on the sentiment. So I used the Avery Elle liquid watercolors to create a rainbow background and used my fuse tool to create a plastic pocket and seal inside the background and a bunch of sequins.


Then I die cut the sentiment 2 times using regular white cardstock and one more using glittery silver cardstock. Finally, I adhered the pocket to a card base and the sentiment on top... and it's done!

It may hurts your eyes a little lol but it screams party!! I hope you feel inspired to create something today ;)

Thank you so much for your visit. Big hugs through the miles!

Supply list:

Peek-A-Boo Jungle Week - Day 5

February 14, 2020


Hi everyone! It's Deasy here. Today I want to share my card for Avery Elle featuring Peek A Boo Jungle. This stamp set is full of adorable critters and also perfect for any themes!


Avery Elle supply that I'm using : 
Peek A Boo Jungle Clear Stamps for the sentiment and images
Peek A Boo Jungle Elle-ments to die cut the images
Leafy Frames Elle-ments to die cut frame
The Spring Collection Paper Pad for the patterned paper
 
I stamp the images, color it using COPIC then die cut it. The sentiment is from white embossing powder.

Thank you so much for stopping by and happy crafting!


Hugs,


Melania Deasy


i Everyone! I'm excited to share the newest Peek a Boo set, Peek a Boo Jungle!


This set is SO fun! I love all of the Peek a Boo sets, but some how they just get better and better! I created my card by stamping, die cutting and coloring all of the animals and feet. Next, I stamped and die cut the banner and sentiment. I have really been in to water colored backgrounds lately, so I made one for this card. I used Avery Elle water color paints. Finally I die cut Leafy Frames dies and assembled the card.


I love this stamp set and I know you will too!
Thanks for stopping by!

Supplies


Peek-A-Boo Scary Week - Day 1

July 8, 2019


Hey there!  Nicky back with you today sharing a new card I have made using Peek-A-Boo Scary and the Plus Frame Die.


To begin, I ink blended a panel of cardstock using Distress Ink in Wilted Violet.  I mixed a little Faded Jeans with water and splattered this liberally over the entire panel.  I ink blended two grassy hill die-cuts using Distress Oxide in Blueprint Sketch and applied those with foam tape and finally I die cut the Plus Frame from white cardstock, backed it with foam tape and adhered it down.


The 'Scary' characters and their sign were stamped onto Bristol Smooth cardstock using Ranger Archival Ink in Potting Soil.  They were watercolour painted using Kuretake Zigs in Pink, Cobalt Blue, Light Violet, Gray Brown and Haze Blue. the sentiment was stamped on the sign and I die cut the images and backed them with foam tape and applied.


I adhered the panel to the white cardstock based and the final touch was the addition of several sparkling sequins of various sizes for accents.


So happy you came by to read about this card, thank you!  See you next time.


Nicky x


Products Used:-


Peek-A-Boo Scary Stamps

Peek-A-Boo Scary Dies
Plus Frame

Caryn here too with another card using the Peek-A-Boo Scary Pals stamp set. I've paired this adorable bat monster (my favourite one) with the new Classic Flags Elle-ments - such a useful set to have in your collection.  I took some watercolour cardstock and blended some liquid watercolour  (Cherry and Sugar Plum) with water onto the paper.  Once dry I die cut the banner shape from the Classic Flags die collection.  I die cut it a second time from vellum for a layered look and then adhered them to a pale pink card base.


I die cut the rounded tag die from the Classic Flags Elle-ments in white and threaded some Raspberry Hemp Twine through the hole.  On a separate piece of card I stamped the bat using New Moon dye ink and coloured him with Copics.  


To finish I die cut the small banner from the Classic Flags set and doubled it up stamping the sentiment on the lower one (so it wouldn't be obscured by the bat's little feet) and then added some Clear Shimmer to the feet and horn.


Supplie:

Liquid Watercolours (Cherry and Sugar Plum)


Modern Floral Frame Week - Day 3

June 12, 2019


Hello friends,

Katie here with a card to share with you featuring the gorgeous Modern Floral Frame stamp set. This beautiful set covers so many occasions from birthdays to babies, weddings to retirement.  It's also the perfect combination of soft florals paired with the graphic straight lines of the geometric frame.


I thought I would introduce a little softness to the frame by stamping and heat embossing the image onto vellum.  To hide the adhesive, I stamped the floral cluster onto watercolor paper. I watercolored the the florals using Avery Elle's Liquid watercolors and adhered the watercolor flowers onto the velum.


Along with a sentiment strip that I die cut using the Classic Flags Elle-ment dies, this gave me two places to hide the adhesive and secure the vellum frame to the card.


I attached the frame to an A2 note card framed with the Dotted Frame Elle-ments die, and I glued a few clear droplets to the card as a finishing touch.

Supplies:

Thanks for stopping by! 
Katie

So Kind Week - Day 1

April 29, 2019


Hey there, Caryn here today with a card featuring the fabulous sentiments from the So Kind set.  I love the scripty font in this set. 


I started with a piece of water colour cardstock and blotted some liquid water colours on to it (Sugar Plum and Cherry).  I then used the Rays die in my Gemini foil press with gold foil to deboss the design onto the card stock (love using dies in this way).  


I stamped the Thinking Of You sentiment onto a circle of white card using Versamark and then heat embossed it with Avery Elle Gold embossing powder.  To finish I splattered some gold spritz spray onto the front of the panel and adhered it to a white card base.

Supplies:

Phonomenal Week - Day 4

April 25, 2019


Hi Everyone! Ashley here! Are you having a Phonomenal week?! ;)

Let's check out the Phonomenal stamp set...


I had the best Ramen in New York last week and it was the inspiration for my card today. I started by stamping, die cutting coloring the bowl and small food items and chop sticks. It was fun to bring life to the stamps by adding the happy faces. 

Next, I water colored a simple background, added all the fun pieces and then stamped the steam and sentiment. 


Thanks for stopping by!

Supplies:

You've Got This Week - Day 4

April 18, 2019


Hi Everyone! It's Ashley here on the blog today. I'm sharing the You've Got This stamp set today. The sentiments in this set are so thoughtful and perfect for so many occasions. Let me show you what I made.


I started my card with the water colored background. These are all colors from Avery Elle's amazing liquid water color line. Next I die cut, then stamped the large sentiment. I adhered the pieces together and then added the small sentiment. How perfect do those little letters stamp? I love it!


This is such a simple card but I love how it turn out. 

Thanks for stopping by!

Supplies:

Orchid Week Card & Video - Day 1

March 4, 2019


Hey there Avery Elle fans.  Caryn here today with a card featuring the new Orchid stamp set along with some of my all-time favourite Avery Elle products.  I also wanted to see how the new Gemini Foil Press machine worked with the cover dies we have available and the result is stunning.  I have a little video to share showing how I created this card.  (Sincere apologies for the lack of voiceover - I have tonsilitis at the moment so was unable to record a video narration.  If anyone has any questions I'd be happy to answer them in the comments).


I started with some Ranger watercolour cardstock and used the Polka Plate cover die with gold foil in the foil press machine.  In the video you will see I made a sort of template using vellum to make sure the card is placed in the correct position.  I stole that top tip from Julie Ebersole!!  Once it was pressed with the foil I created a water coloured background over it using Avery Elle water colours in Cherry and Sugar Plum and set it aside to dry.


Meanwhile I stamped the Orchid images onto some more water colour card using Versamark and heat embossed them in gold embossing powder.  I coloured them using the water colours (Cherry for the petals, Celery for the leaves and Sea Glass for the pot) and then die cut them.


To diffuse the colours a little on the background piece I added a small panel of vellum then adhered the die cut pieces and finished with some iridescent sequins and a gold embossed happy birthday sentiment from the set.


Supplies

Tons of Hearts Frame Week - Day 4

January 18, 2019


Hi Everyone! It's Ashley here today sharing the Tons of Hearts Frame. I've added a few of my other favorite stamps to today's card too! Let's take a look...

I started my card by water coloring a panel and placing it behind the Tons of Hearts Frame. Next, I die cut a circle and stamped a sentiment from And Then. I ended up masking the sentiment to take out the "O" and widen the gap between the "Y" and "U". 

In the gap, I adhered a die cut cat from Party Pals. Isn't he cute?!

I finished the card with a heart speech bubble. I made this with a word bubble from the Photo Mat dies and a heart die from Otterly Fantastic.

Thanks for stopping by today!

Supplies
Hi Everyone!  Jamie Here. I am popping in quickly with a cute card for you today.  I hope that you enjoy it.


Have a great weekend!
x-Jamie
 
site design by designer blogs