Ballons & Banners Week - Day 2

November 30, 2017


Hello everyone! Heather Campbell here.
How's your week coming along?  I think I'm finally recuperating after the holiday weekend.  :)

To the card, shall we?

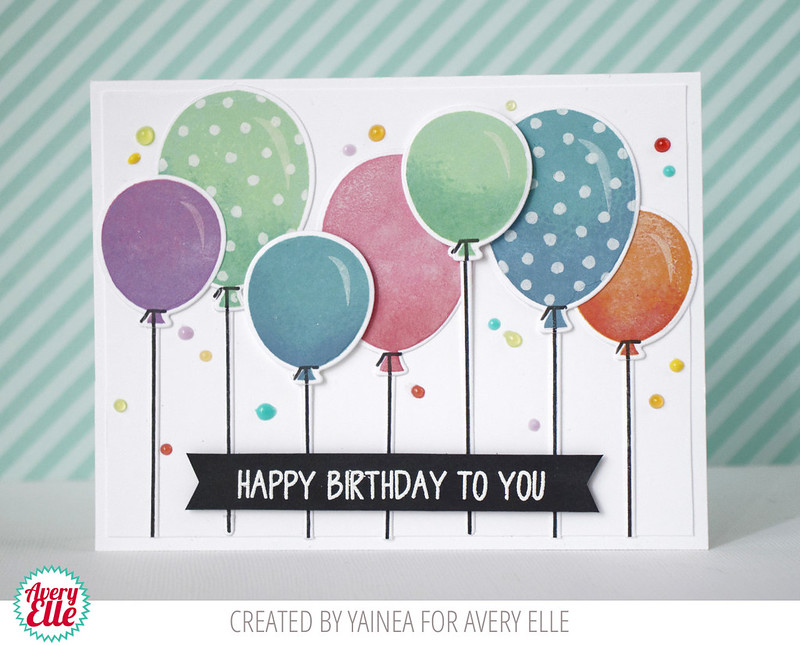
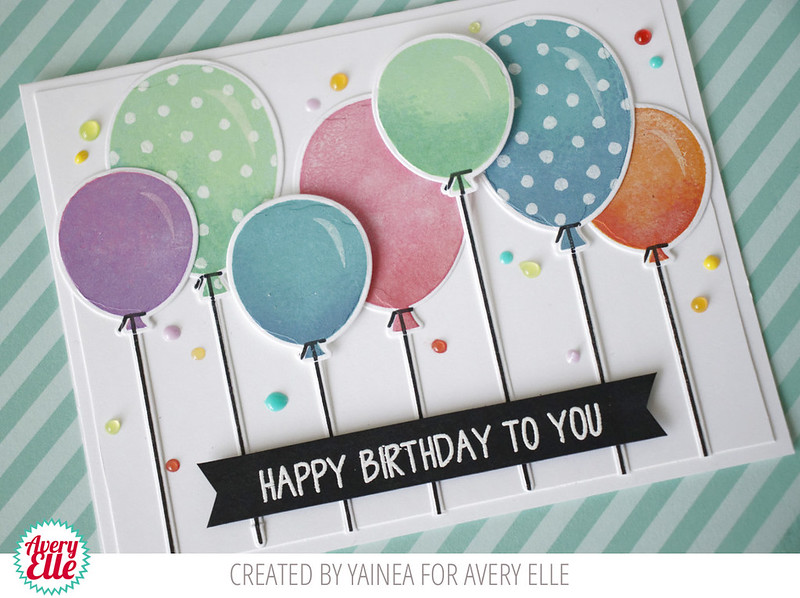
For today, I'm continuing playing with the new Balloons and Banners stamp set.
I love these balloons so much.  Really, I find a great balloon stamp super versatile so I was thrilled to see this set.  I paired the balloons with a sentiment from Big Greetings stamp set

To create the inked effect for these balloons, I simply dabbed only the edges of the balloons in the ink leaving much of the inner part of the balloon stamp un-inked.   I love how this technique works with balloons by creating the perfect airiness! 

That's it for me today.  Can you believe it's December 1st tomorrow? 
Yikes, stuff to do! Stuff to do! 

Thanks so much for stopping by and sharing part of your day with me.  Have a great one! 
Thanks, 
Heather

Shaped Cards With Katie

November 29, 2017


Hello friends, 

Katie here with a sweet card to share with you featuring the new Windmill stamp set along with the Large Pierced Scallops Dies.  A linked list of all the Avery Elle products used on my card is at the end of the post. 


The Large Pierced Scalloped dies are wonderful as a layer on a rectangle A-2 card, but I used the largest rectangle die to create a shaped card base.  To create the shaped card base, I started with a top fold A-2 card.  Next I positioned the largest die on over the card base so that the top fold would not be cut by the die.  I ran the card and die through the die cut machine and created the shaped card base.


Next, I create the front of the card by cutting a panel of white card stock and a panel of green card stock with the largest scalloped die.  With  an ink brush, I created the soft yellow background and I used the Dotted Borders Elle-ments die to create the slopes in the hills. 


Finally, I stamped the images from the Windmill stamp set onto white card stock and colored them in using Copic Markers. I die cut the images and adhered them to the card front before adhering the card front to the scalloped card base. 

I love this little scene- with all the flowers and bugs, it's like a breath of spring as the weather is turning colder! 


Thanks for stopping by!
Katie

Supplies

Balloons & Banners Week - Day 1

November 27, 2017


Hello friends!
It's Yainea here with a birthday card! I know you're busy creating your Christmas cards but what about the December birthdays? You can make a quick and fun birthday card with the new Balloons and Banners set.


I used pigment inks to stamp the balloons, two different shades of the same color on each balloon, rubbing the ink pad of the darkest shade just on the bottom and using a clean kitchen paper to blur the edges of the ink to get a nice transition. I added the dots with a white gel pen.

Then I die cut all the balloons with the corrdinating dies and stamped and die cut the strings as well. I adhered all to a card base with liquid glue and dimensional adhesive.


For the sentiment, I cut a stripe out of black cardstock and heat embossed the sentiment using whiote embossing powder. As a finishing and festive touch, I used my Nuvo liquid drops to add some confetti all over the background.

I hope you like my card, thanks for stopping by and have a nice day!

Supply list:
Balloons and Banners Clear Stamps
Balloons and Banners Elle-ments
Pure White Fine embossing powder

Large Pierced Scallops - Day 5

November 24, 2017


Hi there!

Elena here, with a closer look at the Large Pierced Scallops Rectangle dies.


I created a frame using the large set of dies in the set, and built a little gift-giving scene inside. The penguins from Brring On The Joy are so cute! I love sets that include mirror-imaged critters - it makes it so easy to build little scenes.

I stamped the penguins, two ice-blocks, and two gifts. I nestled them on either side of the scene, and created a backdrop of snow using our Pierced Clouds dies and the rolling hill die from the Picket Fence die collection.


I used a piece of patterned paper (a striped tone-on-tone blue from the Sorbet Collection) and added white gel-pen dots for a snowy background. 

The sentiment was heat-embossed onto a flag (from the Pierced Banner Layers collection.)

By propping up the frame with foam adhesive, it makes it look like a little penguin diorama! I hope you like it too, and thanks for stopping by!

♥.

SALE & Large Pierced Scallop Dies - Day 4

November 23, 2017


Hi! Ashley here today sharing the amazing Large Pierced Scallop dies. This is one of those die sets you can use again and again. I've already used it several times!

In today's card, I started by stamping the coffee cup from Cool Beans. This coffee cup is SO fun to decorate. I added the bear and deer from Winter Woodland Wonders by masking the sides of the cup image, then I die cut and colored the cups. Next, I stamped the hearts from Cool Beans, colored and die cut them. 


Next, I blended Distress Ink on a the back panel and embossed the perfect greeting from Merriest. It's so fun to dig through my older stamps to find the perfect greeting to match the new release!

I finished the card with the sweet white frame from from Large Pierced Scallop dies and my card was complete!

Thanks for sharing some crafting time with me! 

Supplies:


SALE & Large Pierced Scallops - Day 3

November 22, 2017


Hello!  Amy K. here with my take on the new Large Pierced Scallops Elle-ments.  There are so many uses for a die set like this!  I love to use my dies for shaped cards and the largest scallop rectangle is perfect!

Pierced Scallop Rectangle

I started my card by using the largest scallop rectangle die to cut my card base.  To do this, you place your folded cardstock just below the cutting edge of your die.  What you are left with is a shaped card base!  

Pierced Scallop Rectangle2

For my main panel, I used the layering rectangle in the Large Pierced Scallops Elle-ments.  
I love this coffee themed set, Cool Beans, that has 6 fun sentiments in a cool font.  This set is perfect for all those coffee lovers out there!  I repeatedly stamped the 'thanks a latte' in New Moon Dye Ink and stamped one of the small heart stamps in between the repeated sentiments.  I colored in the heart with Copic R29.  My to go coffee cup was colored in with Copic 110.  For the cozy, I made my own buffalo check pattern with red cardstock and the Copic 110.

Supplies:

Large Pierced Scallops - Day 2

November 21, 2017


Hi all! It's Deasy here. Today I want to share my card featuring Large Pierced Scallop Elle-ments. It's so versatile and pretty so I combine it with another stamps and dies to make a romantic scene.


Avery Elle supply that I'm using :
Large Pierced Scallops Elle-ments to die cut the frame
Windmill Clear Stamps for the images
Windmill Elle-ments to die cut the images
Swans Clear Stamps for the images and sentiment
Swans Elle-ments to die cut the images
Picket Fence Elle-ments to die cut the grass

I stamp, color the images using copic then die cut it. The sentiment is from silver embossing powder. To color the background, I'm using Dye Ink with blending tool then splash water with my brush.

Thank you so much for stopping by and happy crafting!

Hugs,

Melania Deasy

Large Pierced Scallops & Tip


Hello, Caryn here and today I'm sharing a card featuring the new Large Pierced Scallops Elle-ments.  This collection of dies has so many uses but I particularly love how you can create a perfect frame for your 4' x 5 1/4" cards as well as a smaller frame.  I'm really into neutral colour schemes at the moment (maybe the time of year) so used a very natural palette for my card today.  


I used Avery Elle Truffle Dye Ink for all my stamping and added some colour using Copics.  There are a couple of little dots in this set so I added some polka dots to the roof of my windmill - now I want to cover everything in polka dots!!!
I curved the sentiment on my MISTI so that it would follow the line in the banner and then used foam tape to give everything a wee bit of dimension.

Supplies used:


Modern Calligraphy Week - Day 5

November 17, 2017


Hi Everyone! Today I'm sharing some of the sweet new stamps and dies just released! 


Alphabet stamps are on the top of my favorites list and Modern Calligraphy is a show stopper. It is my DIY dream come true! 

For my card today, I personalized it by starting the card with my daughter's name. Stamping the letters was so easy. I just used a ruler to make a soft pencil line, stamped, then erased my line. 

Next, I die cut the frame from Large Pierced Scallop Dies. The pink patterned paper from The Sorbet Collection is also one of my favorites. I stamped, die cut and colored the otter and hearts from Otterly Fantastic. Isn't that otter so sweet?

I finished the card by ink blending the waves on the card base, assembling all of my stamped and die cut pieces and then finally stamping the sentiment. 


I hope you enjoyed my card today! I can't wait to see what YOU create.

Supplies:

Modern Calligraphy Week - Day 4

November 16, 2017


Hey everyone! It's Heather here on the blog today!
Are you having fun with the new Avery Elle release?  I can't wait to see what everyone makes with it as their orders arrive! :)

To the card, shall we?  Today, we're continuing the fun with Modern Calligraphy.  For my card, I decided to personalize my card with the recipient's name.
The individual letters were super easy to line up and I love how it looks like I wrote it myself!  I love the versatility of this set - it really allows you to create any sentiment you could possibly want!

I stamped the flowers and a few add ons to create the floral arrangement at the top.  Then I colored everything in with my Copics.   

Thanks so much for stopping by and sharing part of your day here!
Have a great day! 
Heather

Modern Calligraphy Week - Day 3

November 15, 2017


Hello friends,

Katie here with a simple project to share with you today featuring the Modern Calligraphy stamp set.  I love to add a little handmade touch to my celebrations- whatever the occasion! Last weekend was the semi-annual weekend retreat with my crafty friends, so I created some place cards to decorate their tables. 


First, I used the Large Pierced Scallop Rectangles to die cut the paper. Next, I stamped each letter of my friends' names with black ink.  It may look tricky, but the letters flow together wonderfully.  I was really pleased with the look- just like hand-lettered calligraphy! If your placement is off just a bit, you can use a black pigment ink pen to connect the letters. 


I stamped and die cut the flower, coloring it in with Copic markers before adhering it to the place card with foam tape. I punched a small hole in each place card and tied it to the burlap leaf with some twine.  I found the burlap leaves at my local Hobby Lobby.


I've included a list of the Avery Elle supplies that I used to create these place cards below.  

Suppplies:


I hope you'll consider adding a little handmade touch to your next celebration or event!

Thanks for stopping by!
Katie

Modern Calligraphy Week - Day 2

November 14, 2017


Hey Avery Elle fans!  It's Caryn here today sharing a card using some of the fun new products from our brand new Winter release.    The new Modern Calligraphy alphabet set is a delight - so easy to line up!  The little flowers and other elements in the set are great for dressing it up  too - I love it.


 I started by putting some patterned paper onto my card front and then die cut a frame 4 times using some of the dies from the new Large Pierced Scallops elle-ments.  I stacked them up to give the frame a bit more dimension and then stamped the word "hey" using the Modern Calligraphy alphabet.  From that set I also stamped and die cut some of the flower images to dress the frame up a wee bit more.  The "congrats" is taken from the Balloons and Banners stamp set from the release.  To finish I added some little sequins and a added touch of shimmer to the flowers.


Supplies used:


Thanks so much for stopping by xxx

Modern Calligraphy Week - Day 1 (Card, Video & Winner)

November 13, 2017


Hello there!

It's Yainea here featuring the Modern Calligraphy stamp sets. I'm super excited about the new release and about this set in particular, How gorgeous are these calligraphy letters?? I'm in love!


I have tons of ideas for them but the first thing that came into my mind was wedding invitations. There are tons of ideas in Pinterest to help making wedding invitations and I decided to go with something simple and fun to create but that looks special.


I stamped everything with Versmark ink and heat embossed with white embossing powder. Then I rubbed two colors of Distress ink on my clear block and mixed with water to use them as watercolors.

Watercolor backgrounds are easy to create and I love that every invitation will be unique. To finish the invitations I die cut each piece using the Double Pierced Rectangle dies added a little piece of wood with a white cardstock heart and tied some rustic twine all around the panel.

I decided to create a matching envelope using the same technique but decorating just a stripe.


Of course, this design is very versatile, you can use it for a hello, miss you, thank you, or birthday card... just have fun! :)

I hope you like it, thanks for stopping by and have a great day!

Supply list:
- Modern Calligraphy Clear Stamps
- Modern Calligraphy Numbers Clear Stamps
- Double Pierced Rectangles Elle-ments
- Pure White Fine embossing powder

We also have this quick card and video by Jamie for you today.  Check it out...


The winner of our blog hop from last week is Arianna Barbara  for her comment on Heather Campbell's blog.

Wow! Such adorable set!!! Love this release!!!
Your CAS card is really lovely!!!
 

Congratulations Arianna.  Please email us at customerservice at averyelle dot com so that we can get your prize to you!

Thanks for stopping by to take a peek. Have a great day!

Winter 2017 Release Designer Blog Hop

November 9, 2017


I am so excited because our Winter 2017 Release is finally here!!  We have an amazing blog hop full of inspiration today and we are so glad that you are here. Thank you so much for all of your comments and likes during our previews this week.  We read each and every comment and it really makes our day!!

For a summary of all of our new products that are available for purchase right now check out this section in our store .  Be sure to scroll all the way to the end of this post to read about the fun giveaway we are having.  We will be showcasing projects using our new sets starting today and will continue to show them throughout the next few months.  I can't wait!

 Let's get to the hop.  I have a ton of projects to share with you today!


Avery Elle / Jamie - YOU ARE HERE
Caryn Davies
Heather Campbell
Yainea
Melania Deasy
Katie Gehring 
Amy Kolling 
Ashley Marcu
Elena Roussakis

To celebrate our Winter 2017 Release Blog Hop, Avery Elle is giving away a $25 Gift Certificate to one random winner.  To enter to win just comment on this post.  There is no purchase necessary and you must be 18 years of age or older to enter.  This giveaway is void where prohibited.  You can also do options 2, 3, 4, 5 or all 6 of the following to increase your chances of winning. You have until midnight Sunday, November 12th to enter.  The winner will be announced on the Avery Elle Blog on Monday, November 13th .  All products are available for purchase in the Avery Elle store right now.
To enter to win you can do 1, 2, 3, 4, 5 or all 6 of the following to increase your chances:
  1. Comment on any of the design team's posts and/or here on the Avery Elle Blog
  2. Follow us on Twitter and tweet the contest (we are @averyellestamps )
  3. Follow us on Instagram (we are @averyellestamps).  Comment on the Avery Elle blog if you already belong
  4. Follow us on Facebook (we are www.facebook.com/AveryElle ) and share us with your friends - make sure they tell us you sent them.
  5. Follow us on Pinterest
  6. Become a blog follower through email (comment on the Avery Elle blog if you already follow us)
  7. Join our Flickr group (comment on the Avery Elle blog if you already belong)
 Thanks for stopping by to take a peek. Have a great day!

 
site design by designer blogs