Snow Fun Week - Day 4

October 31, 2019


Hey everyone! Heather Campbell here.
First of all... HAPPY HALLOWEEN! Hopefully you all have something spooktacular planned for tonight!

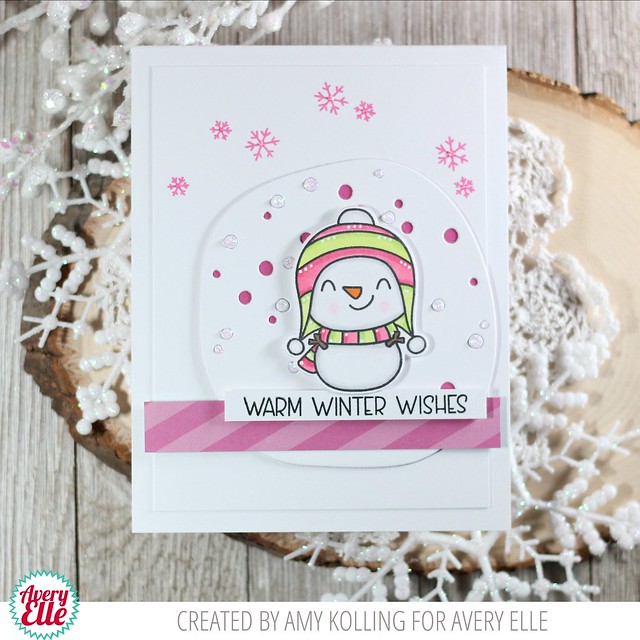
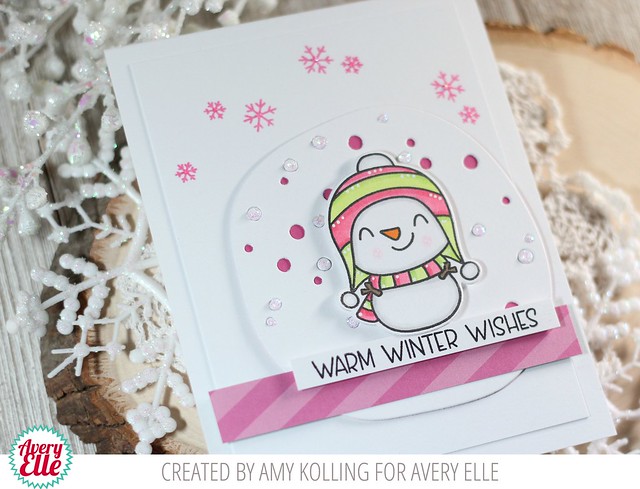
Now to business... the card! Today, I am playing with Snow Fun.


For my card, first I stamped, die cut and colored in the images from Snow Fun. Then, I got to work playing with lots of Avery Elle dies - especially the Oval Burst die and the Snow Scene die. 


I pulled everything together and matted it on a card front layered with Avery Elle Holiday patterned paper. Have you tried our new patterned papers yet? They are AMAZING! 

Anyways, that's it from me today! Thanks for stopping by and have a great day! 

Snow Fun Week - Day 3

October 30, 2019


Hello!

Katie Gehring here with a quick video to share with you today featuring the adorable snow people from the Snow Fun stamp set and coordinating Elle-ments dies. 


 In my video, I demonstrate a simple technique for creating DIY stencils using my Avery Elle dies along with Mylar stencil sheets that I purchased from Amazon. 


I love finding new uses for supplies that I already own and creating re-usable stencils using dies is a great way to stretch your crafty stash! I hope you'll take a peek at my video to see how it all came together! 


Supplies: 

Thanks for stopping by!
Katie

Snow Fun Week - Day 2

October 29, 2019


Hi everyone! It's Deasy here. Today I want to share my card for Avery Elle featuring Snow Fun stamp set. It's full of cute and adorable snowman! They are so fun to color and perfect together.

Avery Elle supplies that I'm using :
Snow Fun Clear Stamps for the sentiment and images
Snow Fun Elle-ments to die cut the images
Star Scene Elle-ments to die cut the star scene then color it using Dye Ink Pad with blending tool
The Holiday Collection Paper Pad for the patterned paper
Wonky Stitches Elle-ments to die cut the banner for the sentiment

I stamp the images, color it using COPIC then die cut it. The sentiment is from silver embossing powder.

Thank you so much for stopping by and happy crafting!

Hugs,


Melania Deasy


--------------------------------------------------------------------------------


Hello!  Amy here with an adorable snowman from the Snow Fun stamp set.  Snowmen are one of my weaknesses.  This set FIVE snowmen and a few birds.  This set can be used for so many occasions throughout the holidays!

Snow Fun

I went retro with my snowman color.....pink and green!  I started with the Snow Scene Elle-ments die cut with white cardstock and then a layer of pink cardstock behind.  Doesn't everyone want to see pink snowflakes?  

To add a bit more color, I adhered a strip of striped paper from The Happy Collection Paper Pad.  I adhered my colored and die cut snowman with foam adhesive over a adhesive backed sentiment strip.  As a finishing touch, I added Crystal Stickles to all the snowflakes!

Snow Fun2 

Supplies:
Snow Fun Clear Stamps
The Happy Collection Paper Pad


Thanks for sharing a part of your day!  


Amy


Snow Fun Week - Day 1

October 28, 2019


Hi there! Elena here, with a fun card featuring the adorable Snow Fun stamp set. I also used some elements from the ephemera set, which makes putting Christmas cards together so easy!


I started out by lifting a sheet of blue snowy patterned paper, from our Holiday Collection paper pad. I love that the blue has more depth of color at the bottom and fades out near the top. 

The trio of snowmen are holding a string of lights from another new set, Cocoa Stand. The tree, present and candy cane are also from that set. I love how well the sets work together!


To finish off, I added a sentiment from the Holiday Ephemera pack. I love how it fills up the space!

I hope you like it! Thanks for stopping by!

♥.


Alpine Christmas - Day 2

October 25, 2019


Hello!  Amy here sharing a classic holiday card to celebrate Christmas using Alpine Christmas.

Alpine Christmas

I am a big fan of sleds for decor at the holidays.  I love old rusty and vintage sleds.  I started with stamping the sled outline with black ink and then using the woodgrain stamps, stamping the woodgrain with Kraft Pigment Ink.  To round out my sled, I added a few Copic touches.   

Alpine Christmas2 
To embellish the sled is the perfect little bow and wreath.  The wreath was stamped with Jungle Pigment Ink.  I added in red berries and a foam adhered bow.

To keep this very classy, I added some simple scoring details with a stylus and a paper piercer.  The sky's the limit when it comes to details like these!  Once my card was completely done, I spritzed the whole card with Shimmer Spray.

Alpine Christmas3 


Supplies:
Alpine Christmas
Alpine Christmas Elle-ments
Jungle Pigment Ink
Kraft Pigment Ink

Hi! Ashley here sharing another Alpine Christmas card.


I created my card starting with the sled and bow image from Alpine Christmas. Next I stamped a snowman from Snow Fun and trees from Cocoa Stand. I added all of these fun images to a scene and used the Dotted Frame for a finishing touch!


Supplies:

Alpine Christmas With Yainea

October 24, 2019


Hello friends!

It's Yainea here today with a Christmas card featuring Alpine Christmas stamp set and coordinating dies. I must recognize I'm more on the cute cards side, but this vintage stamp set totally caught my attention the first time I saw it. It's just so lovely!! I couldn't wait to put my hands on it and create a simple and elegant vintage card with those beautiful wooden textures.


So I mixed it with a snowflakes background from the Holiday Collection paper pack and a stripe of the red plaid pattern and my card was done in no time, I love when the process is that smooth! :)

The wooden pieces of the slider were hand cut and adhered to the stamped piece to add more dimension.


I hope you like my project for today, have a nice day!!

Supply list:


Santa Bear Week - Day 3

October 23, 2019


Hey there, Caryn here with a card using the fabulous Santa Bear stamp set designed by the wonderful Elena.  This card was super simple to pull together thanks to the Holiday Ephemera pack and the Holiday Paper Pack


I started by taking one of the frames from the ephemera pack and adhering it to one of the papers from the Holiday Paper Pack.  I then took one of the snow globe images from the ephemera pack to create my focal point for the Santa Bear image to sit in.  Here's a little tip - to make the stamped image and die cut image look more connected, I used a scalpel to cut along the edge of the snow line and slipped the stamped image in behind it.  Now it looks like it's all one image!  


To finish I added a bit of glitter to the snowy bits and added a die cut sentiment.

Supplies:


Hi Everyone! Ashley here sharing another card using the adorable Santa Bear stamp set. 


 To create my card I stamped several images from Santa bear, colored and die cut them. Then I die cut Snow Scene and added some ink for interest.

Next, I cut a card base 6.5 inches by 4 inches. This is such a fun size to work with. I inked up the edges and added a few splatters before I layered all of my pieces. 


Finally, I stamped the sentiment and added twine. 

Supplies:


Santa Bear Week - Day 2

October 22, 2019


Hi there! Elena here, with a closer look at Santa Bear.


This one was so fun to put together! All of those cute critters lined up to sit on Santa's lap? I die. I stamped, die-cut and colored all of the images using copic markers. The critters are all neutral colored, so I made sure that the little bits of green and red were pretty punchy. I also set them all against a black snowy layer to make sure that they stood out, and framed out the whole scene with an Oval Burst die.


The only sentiment comes by way of the Ho-Ho-Ho in the speech bubble. What else would Santa bear say?

Thanks for stopping by!

♥.


Santa Bear Week - Day 1

October 21, 2019


Hello!  Today and I have a new holiday card that combines no-line watercolour painting with the adorable Santa Bear stamp set by Avery Elle.


To start this card I ink blended a white panel of cardstock using Distress Inks in Tumbled Glass and Iced Spruce and I created a soft focal point in the centre.  Once fully dry I used the falling snow stamp from Santa Bear and repeatedly stamped the image using Versamark Ink and then heat embossed in white.  I set this to one side.


I used the Dotted Borders Die to create the snow hill and I backed it with foam tape and applied it to the panel.  I then stamped the sentiment with Versamark Ink and heat embossed in gold on a strip of vellum which I then wrapped around the panel and secured on the reverse.  I was now able to attach the panel to the 110lb white cardstock base.


On Strathmore Bristol Smooth I stamped my images using Distress Oxide Ink in Antique Linen then watercolour painted them using the following Kuretake Zig colours - Dark Brown, Dark Gray, Warm Gray 2, Brown, Light Pink, Persian Green, Mid Brown, Carmine Red, Oatmeal, Mid Gray, Green and Beige. The images were die cut, backed with foam tape and applied.


Points were highlighted with a white gel pen and the greenery behind the Santa Bear was glittered up using Stickles in Crystal.

I think the card has a lovely soft retro feel to it, I hope you enjoyed it and are feeling inspired.

Happy crafting!

Nicky x

Cloche Week - Day 4

October 17, 2019


Hi Everyone! Today I'm sharing Cloche with a few other fun stamps and ephemera. I love this stamp set!


I wanted to create a window shaker style card so I stared by stamping Cloche and die cutting the center of the stamp. Next, I stamped, die cut and colored several pieces to put inside from Snow Fun and Cocoa Stand. I placed the snow person inside the cloche with a few sequins and the present and tree outside. I also added a sentiment from the Holiday Ephemera pack.


To finish the card I added some branches and twine to the top of the cloche. 

Thanks for stopping by!

Supplies:

Cloche Week - Day 3

October 16, 2019


Hey everyone! Heather Campbell here with a fun project and video to share using the new Cloche stamp set!

I am really super excited about this stamp set. I knew as I was creating Cloche that it would make fantastic tags - and gosh does it ever! How fun are these shaker tags!?!

Check out the video here.


Thanks so much for stopping by and sharing part of your day with me! Have a great one!

Cloche Week - Day 2

October 15, 2019


Hi there!

Elena here, with a sweet fall-themed card featuring a mix of sets from our newest release.


I started out by stamping and die-cutting the large cloche image from... Cloche. ha. I love the shape of it! I colored the base using copic markers so that it would look wooden. I swiped a light blue marker around the "glass" top to give it some depth.

I then set out to fill the cloche using images from Fall Foliage and Santa Bear


I layered sprigs and berries behind the fox, and set him in front of a seasonal pumpkin. To further the warm and cozy vibe, I stamped a greeting from Seasonal Simple Sentiments onto the cloche base. I love that any one of the sentiments could fit in there! A cloche for all seasons!

The Plus Frame adds the perfect finishing touch. I hope you like it!

♥.

Cloche Week - Day 1

October 14, 2019


Hello friends,

Katie here with a card featuring the Cloche stamp set. I love cloche jars for creating vignettes and highlighting special objects, and you can do the same thing with stamped images using the Cloche clear stamps.


I used the Cloche stamp set and coordinating Elle-ments die and created a shaker jar. Before sealing the shaker element, I blended some blue ink on the back panel and added a few pinches of coarse glitter.  I stamped the flowers from the Cloche stamp set along with one of the snowmen and bird from the Snow Fun stamp set. I colored the images with Copic markers, added them to the jar and tied a bow with Cherry Hemp Twine as a finishing touch.


I trimmed the blue snowfall paper from The Holiday Collection paper pack and adhered it to a navy A2 card base. I adhered the scalloped frame from the Holiday Ephemera pack and attached the cloche image to the card. Finally I added one of the sentiment banners from the ephemera pack to the cloche jar.

Supplies:

That's all for me today! Thanks for stopping by!
Katie

Introducing our Limited Edition Create Magic Card Kit

October 11, 2019


I am so excited because today I get to introduce a new product to you that is available for purchase now!  Our Limited Edition Exclusive Create Magic Card Kit costs $27 and is only available on www.averyelle.com while supplies last.  This card kit is a fabulous deal and is full of inspiration and exclusive supplies to create adorable cards, tags and more.    If you are interested in this kit I suggest you pick it up quickly as they are sure to sell out.  You can find this kit here.

Kit includes the following items:
1-  Exclusive 4 x 6"  stamp  set - not available anywhere else
1 - .5 oz Coarse Glitter
1 - Strawberry Hemp Twine Roll
4 - 4.25" x 5.5" sheets of acetate
1 - Create Magic exclusive Vinyl Zippered Mesh bag - - not available anywhere else
12 - Create Magic exclusive 6" x 6" Sheets of patterned paper - - not available anywhere else
1 - Exclusive Fairy Ephemera Pack - - not available anywhere else

* There is an add-on of a coordinating die to the Create Magic Card Kit that is sold separately here.

To see more of this kit be sure to check out the following video.


You can find a downloadable pdf file full of inspiration from our Design Team for this kit Here.

Thanks for stopping by to take a peek. I hope that you love our new card kit as much as we do.  Have a great day!

Simply Said Bright Week - Day 4

October 10, 2019


Hi Everyone! I'm sharing Simply Said: Bright today and I mixed in a few other great stamps from the current release! Let's check it out...


To create my card I heat embossed the sentiment on white card stock and blended yellow ink. Next I  water colored the background. I layered these two pieces of papers together and added the Horizontal Stripes die. 


Next, I added two penguins from Polar Playtime and the tree and garland from Cocoa Stand. I love this bright and cheerful card. 

Supplies:


Simple Said: Bright Week - Day 3

October 9, 2019


Hey there! It's Heather here. I'm back with another card using Simply Said: Bright. I love this stamp set so much as it's such a great staple for the crafting stash!

To create my card, I stamped and asked the pals from Polar Peek-a-Boo Pals at the bottom of the card. Then, I masked each of the images and blended color around the bottom of the card.

Finally, I took off the masks, colored the images in and added the sentiment. I wrapped twine around the top of the card and added gel pen accents!

Thanks so much for stopping by and have a great day!

Simply Said: Bright Week - Day 2

October 8, 2019


Hey there, Caryn here with my take on the gorgeous new Simply Said: Bright stamp set and dies.  I really love the versatility of this set, with the different options. You can choose to include the mat or just use the co-ordinating sentiment die as I've done here.  I created a cluster of foliage using stamps from the Alpine Christmas and Holiday Skates sets and added a ready-made frame form the Holiday Ephemera pack.


I stamped the Bright sentiment in red and used the co-ordinating die to cut it out.  I finished it of with a bit of sparkle (hard to see in the photo as always) using the Shimmer Spray (struggling to make a card without that these days, lol)!


Supplies:


Simply Said Bright Week - Day 1

October 7, 2019


Hey it's Nicky back with you today with a new holiday card that features the Simply Said - Bright stamp set and I paired it with the Polar Playtime stamp set.


First of all I ink blended an A2 panel using Distress Oxide Ink in Spun Sugar - creating a soft focal point.  I then used 2nd and 3rd generation stamps of the snowflake images from Polar Playtime and I also splashed a little paint casually.  I set the background to one side to completely dry.


I created the snow hill using a die from Dotted Borders and adhered that die cut into position.

The Simply Said - Bright sentiment set allows you to die cut a border for your 'Bright' word.  I chose to die cut this border 3 times and adhered them in a stack.  I then die cut the word 'Bright' from white cardstock and again from silver foil cardstock and adhered those two together and in turn added the word to the border .... so many possibilities here!  I also chose two extra mini sentiments to make up the whole phrase I wanted - again, endless possibilities.  The mini sentiment strips were backed with foam tape and applied.


On Strathmore Bristol Smooth I stamped the image I chose from Polar Playtime using Ranger Archival Ink in Potting Soil.  I watercolour painted the image using Kuretake Zigs in Natural Gray, Mid Gray, Oatmeal, Light Pink, Persian Green, Light Gray and Bright Yellow.  Points were highlighted with a white gel pen and then the image was die cut, backed with foam tape and applied.


Here's another close up look at the Simply Said - Bright sentiment set!  The card was finished out with a few dots of pale gold gel pen dotted into the background for a sweet twinkle.

Thanks for stopping by to read today, see you again soon!

Nicky x

Products Used:-

Simply Said - Bright
Simply Said - Bright Die
Polar Playtime
Polar Playtime Die
Dotted Borders


site design by designer blogs