Cake For All Week - Day 5

March 29, 2019


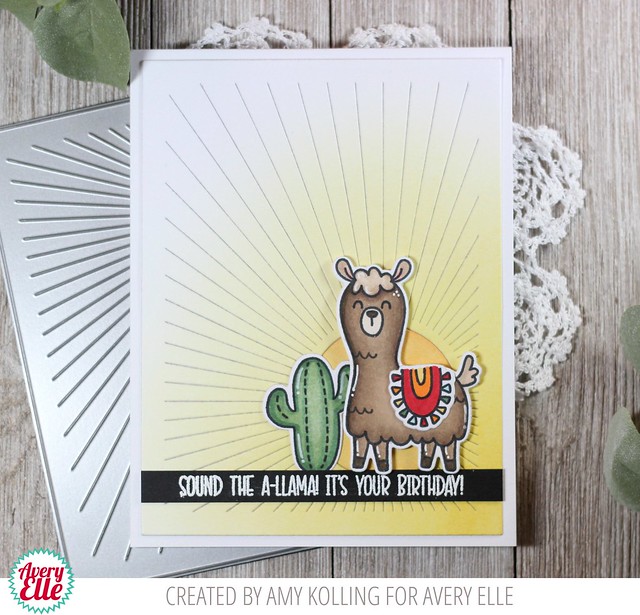
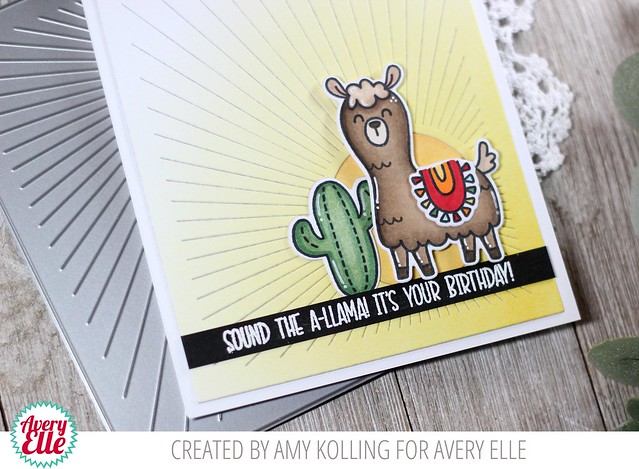
Hi Everyone! Ashley here! Today I'm sharing the new Cake for All stamp set! I've combined it with a few of my favorite stamp sets. Let's take a look...


I started my card by stamping the cake and a few flowers from Cake for All. I colored them with Copics and die cut them. Next I picked an animal to peek out of the cake. I used the panda from Peek a Boo Pals. Next I assembled my stamps. 


I just love the panda with a flower on her head! She looks ready for spring. I decided on a sentiment from Peek a Boo Pets. I love that I can use this card for a bridal shower, wedding or even a new baby.

Finally, I created the background with Distress Oxides, then I assembled the card.

Thanks for checking out my card! I can't wait to see what YOU create!


Supplies:
Peek a Boo Pals Clear Stamps


Cake For All Week - Day 4

March 28, 2019


Hey all! 
Heather Campbell here with a card using the new Cake For All stamp set.  I love this set and how you can decorate the cake to fit any occasion or recipient!  Such a great, universal set! 


For my card, I decided to put the beautiful flowers on it with the great sparkler candles. 

I dabbed different ink colors onto the sparklers to make them appear multicolor! 

Supplies:
Cake For All Clear Stamps
Cake For All Dies
Wonky Scalloped Frames Dies
New Moon Dye Ink


Thanks so much for stopping by and sharing part of your day with me.  Have a great one!

Cake For All Week - Day 3

March 27, 2019


Hello!

Katie here with a video to share with you today featuring the Cake for All stamp set and the Scalloped Mat Elle-Ments die.

Using the Scalloped Mat die and some adhesive-backed fun foam, I made a shaker window that I filled with clay sprinkles.


I heat embossed the images from Cake for All using Rose Gold Embossing powder and colored them in using Zig Clean Color Real Brush Markers.  Zig Colors- Pale Pink, Light Carmine, Light Blue, Lilac, Light Green and Pale Green.


Take a peek at the video to see how it all came together.  


Supplies: 

Thanks for stopping by!
Katie

Cake For All Week - Day 2

March 26, 2019


Hello Avery Elle friends!  Amy here today sharing a card using the Cake For All stamps.  This is a perfect set for so many occasions!  


I've colored this up with one of my favorite color combos......purple and green.  These were my wedding colors so I had to make a card using them!  I began by ink blending Wilted Violet Distress Ink over a white panel.  Using the Confetti Mat Elle-ments, the ink blended panel was die cut.


I did some basic coloring of my floral sprays and highlighting of my cake.  I added all my elements to the Confetti Mat panel with foam adhesive and added purple gems over my panel and to embellish the cake.

Supplies:
Cake for All Clear Stamps

Thanks for sharing a part of your day with me!

Amy


Cake For All Week - Day 1

March 25, 2019


Hi!  Nicky back with you today with a new card for Avery Elle.  Today I'm sharing a card using  Cake For All together with the coordinating Elle-ments.  Also used is the new Scalloped Mat Die.


First things first.  I ink blended a little Distress Oxide in Spun Sugar onto the top of my card base and set it to one side (this shows through the oval opening).  I then took another panel and ink blended it using Distress Oxide in Twisted Citron.  I used it with intensity at one end and faded it away in an ombré style towards the other.   It splattered on some water and blotted it up to distress it a little.   I then die cut the panel using the Scalloped Mat Die.  I stamped the sentiment in the lower right hand corner then backed the panel with dimensional foam tape and attached it to the card base.  Over this I layered a die cut from Postage Stamp Elle-ments with foam tape.


On Bristol Smooth cardstock I stamped my images from Cake For All using Ranger Archival Ink in Potting Soil.  I watercolour painted the images using Kuretake Zigs in May Green 047, Light Pink 026 and Cool Gray (1) 099 (to shade the cake subtly.  The purple shade is an Arteza  Real Brush Pen in Light Magenta/A184.

I die cut the images and applied them with yet more foam tape.


The final touch was to use Ranger Multi Medium Matte to attach some toning jewel style embellishments!

Thanks for stopping by the blog today, happy crafting everybody!

Nicky x


Products Used:-

Cake For All Clear Stamps
Cake For All Elle-ments
Scalloped Mat Die
Postage Stamp Elle-ments

Llamazing Week - Day 5

March 22, 2019


Hello! I am popping in today to share a cute card I created using our new Llamazing clear stamps.  I hope you like it as much as I liked making it!


Supplies:
Arrow Mat Die Set
Llamazing Clear Stamps 
Llamazing Die Set
New Moon Dye Ink
Pigment Ink blended onto background:
Pixie Pigment Ink
Fizz Pigment Ink

Thanks for stopping by to take a peek. Have a great weekend!

Llamazing Week - Day 4

March 21, 2019


Hi Everyone! I'm excited to share my Llamazing card with you today! I'll be sharing a few tips and techniques I used to make this card too!

 First I started with a white card base and stamped the llama. I did a partial die cut, then trimmed from the card edge to the llama.

Next, I stamped and die cut the cactus and the fancy saddle then adhered them to the card. 


I wanted the sentiment to start on the front of the card and finish in the inside so I cut the sentiment in a few pieces. I used the speech bubble die cut from Peek a Boo Pets for the first part of the sentiment.


The second part of the sentiment went on a paper piece inside. I also put another llama with balloons and a party hat! I love this inside/outside card and I hope you do too!


Supplies:

Llamazing Week - Day 3

March 20, 2019


Hello!  Amy here today sharing a 'llamazing' card with you!  These llamas are the cutest and there are several images in the set that you can use to embellish them.......you can even make a 'llama-corn'!  ☺

Llamazing

I created a sunset background with some ink blending of Dried Marigold and Mustard Seed Distress Inks and then die cut using the Ray Elle-ments.  I made my sun a bit darker using more of the Dried Marigold.  My images were Copic colored and die cut with the coordinating dies and were added over a white heat embossed sentiment strip of black cardstock.


Llamazing2 
Supplies:

Llamazing Week - Day 2

March 19, 2019


Hi everyone! It's Deasy here. Today I want to share my card for Avery Elle featuring Llamazing. This stamp set is super adorable and fun! It's full of cute Llama and perfect for any theme you can imagine.


Avery Elle supplies that I'm using :
Llamazing Clear Stamps for the sentiment
Llamazing Elle-ments to die cut the sentiment
Diagonal Stripes Elle-ments to die cut the frame on blue card stock and a white foam and use it as a shaker

I stamp the images, color it using COPIC then die cut it. The background is from Dye Ink Pad with blending tool then splash water with a brush. The sentiment is from white embossing powder.

Thank you so much for stopping by and happy crafting!


Hugs,


Melania Deasy

Llamazing Week - Day 1

March 18, 2019


Hi everyone!  Check out this cute card that Caryn made using our new LLamazing clear stamps and dies.  So cute right?!


Supplies:


Thanks for stopping by to take a peek. Have a great day!

Easter Chicks Week - Day 5

March 15, 2019


Hi Everyone! Today I'm excited to share the Easter Chicks stamp set along with Market Stand!

Let's take a peek...

 I started my card by stamping, die cutting and coloring the 3 cute chicks from Easter Chicks. I didn't really have a plan for them but I had fun stacking them and placing them on things. Finally, I settled on a Market Sand take over! :) The chicks seem to be made perfectly to go along with the Market Stand set. 

I stamped, die cut and colored the Market Stand and then added the lamb from Peek a Boo Pets. The finished touch was a few clouds from Photo Mat Dies!

Thanks for stopping by!

Supplies:

Easter Chicks Week - Day 4

March 14, 2019


Hey everyone! Heather here sharing my latest card using the new Easter Chicks stamp set.

These Easter Chicks are just too fun and it's such a cute little set.  I also love how they're totally versatile and work for way more than just Easter.

To create my card, I stamped and die cut each of the chicks and butterflies.  Then I colored them in and added some sweet gel pen accents.  Then I heat embossed and die cut the banner from Banner Bits. Finally, I die cut my layers using the new Quilted Frame cover plate die.

Such a sweet little grouping of chicks. 
Banner Bits Clear Stamps & Dies
 Quilted Frame Dies


Thank you so much for stopping by and sharing part of your day with me! 
Heather

Easter Chicks Week - Day 3

March 13, 2019


Hello friends! 

Spring is in the air, and Easter is just around the corner.  I have a sweet card to share with you today featuring the adorable Easter Chicks stamp set.


To make the card, first I blended some Distress Oxide ink onto a panel of watercolor card stock and spattered the background with spray ink. I stamped the chicks, eggshell and butterflies using Avery Elle's dye ink in New Moon and colored the images using Copic makers.


I die cut the images using the coordinating Easter Chicks Elle-ments dies and arranged them onto the blended background.  I stamped the sentiment and the butterfly trails and added some polka dots to he eggshell using a white gel pen.  Finally, I framed the scene using the new Quilted Frames Elle-ments die and adhered the panel to a yellow A-2 notecard.

Supplies


I hope these cute chicks brighten your day.  Thanks so much for stopping by!
Katie

Easter Chicks Week - Day 2

March 12, 2019


Hi there!

Elena here with a card that uses the new Easter Chicks stamp set:


I started out by stamping the images from Easter Chicks: the 3 chicks, the broken egg shell, and the 2 butterflies. That's a lot of stuff all packed into one tiny set!


I gave the chicks a leafy canopy to stand under. I stamped the big oval wreath image from Loved And Admired, but chopped it off at the bottom. I really wanted the chicks to be able to stand on a flat surface.


I then stamped the Happy Easter greeting into a flag image (from an older, retired set called Band Camp - it's the flag that the marching turtle was holding, and I just cut him away.)

Once everything was assembled, I forgot that there was a perfectly good butterfly trail image in the stamp set (doh!) but I wanted the look so I added my own to the 2 butterflies using a black pen.

I hope you like it! Thanks for stopping by!

♥.

Easter Chicks Week - Day 1

March 11, 2019


Hello!

It's Yainea here sharing a cute idea to create little bags to give your Easter treats to your loved ones. I'm featuring the adorable Easter Chicks stamp set.


I created a little scene using the stamps, coloring the images with alcohol markers and the background with ink and a blending tool. You can totally adhere the final circle to a card base and that's it you have a card :)


But this time I wanted to create something different so I used the Treat Topper die and created this easy treat bag that is just perfect for Easter or you just could change the sentiment and use it for a baby shower, too!

Thank you so much for your visit, have an amazing week!

Supply list:

Orchid Week - Day 4

March 7, 2019


Hi Everyone! Today I'm excited to share the new Orchid stamp set and matching dies. 


This card was so easy to create because the large orchid stamp quickly takes up space on the card front and becomes the star of the show! I stamped, die cut and colored the orchid. Then I adhered it to a water colored card base and stamped the card base. That's it! I love this beautiful stamp set and I know you will too!


Stamps:

Orchid Week - Day 3

March 6, 2019


Hello!  Amy here sharing a card using the beautiful Orchid stamp set.  
With the sentiments included, this set can be used for ANY occasion.

Orchid

I stamped the main orchid image with Black New Moon Dye Ink from Avery Elle.  Using Copics, the image was colored in adding in shading in places.  I wanted my image to be front and center.  To do this, I added my Copic colored and die cut image with foam adhesive over a background blended with Seedless Preserves Distress Ink and a white Scalloped Mat Elle-Ments panel.  To finish, I added a white sentiment strip and some Wink of Stella on the blooms.

Orchid2 

Supplies:


Orchid Week - Day 2

March 5, 2019


Hello! Today I am popping in with a quick card that I created using our Orchid Stamp & Die Set. I had a lot of fun making it!


Supplies:
Orchid Clear Stamps
Orchid Die Set
You've Got This Clear Stamps
New Moon Dye Ink
Pure White Embossing Powder
Double Pierced Rectangles Die Set
Sugar Plum Pigment Ink (blended onto background)


Thanks for stopping by to take a peek. Have a great day!

Orchid Week Card & Video - Day 1

March 4, 2019


Hey there Avery Elle fans.  Caryn here today with a card featuring the new Orchid stamp set along with some of my all-time favourite Avery Elle products.  I also wanted to see how the new Gemini Foil Press machine worked with the cover dies we have available and the result is stunning.  I have a little video to share showing how I created this card.  (Sincere apologies for the lack of voiceover - I have tonsilitis at the moment so was unable to record a video narration.  If anyone has any questions I'd be happy to answer them in the comments).


I started with some Ranger watercolour cardstock and used the Polka Plate cover die with gold foil in the foil press machine.  In the video you will see I made a sort of template using vellum to make sure the card is placed in the correct position.  I stole that top tip from Julie Ebersole!!  Once it was pressed with the foil I created a water coloured background over it using Avery Elle water colours in Cherry and Sugar Plum and set it aside to dry.


Meanwhile I stamped the Orchid images onto some more water colour card using Versamark and heat embossed them in gold embossing powder.  I coloured them using the water colours (Cherry for the petals, Celery for the leaves and Sea Glass for the pot) and then die cut them.


To diffuse the colours a little on the background piece I added a small panel of vellum then adhered the die cut pieces and finished with some iridescent sequins and a gold embossed happy birthday sentiment from the set.


Supplies

Cotton Candy Week - Day 4


Hi Everyone! Today I'm sharing a *sweet* card using the stamp set  Cotton Candy


To create my card I started by stamping the large cotton candy stamp. I ink blended the sweet treat and paper pieced the cone. Next, I heat embossed the sentiment. I love how this set allows you to customize the perfect sentiment. 

I finished the card with some patterned paper and twine. I absolutely love the navy and pink color combo. 

Thanks for stopping by!
Supplies:

 
site design by designer blogs