Falling For You Week - Day 1

September 30, 2019


Hi!  How are you?  This is Nicky with you today and I'm so happy you came by the blog to read about my latest card for Avery Elle that features Falling For You from the Fall release.  The scene I created is framed out using the Dotted Frame Die.


This card started by ink blending white cardstock using Clarity Stencil Brushes.  Distress Inks used are Tumbled Glass, Carved Pumpkin and Peeled Paint.  Dots of pale gold gel pen were added for some added interest and I hand painted in tufts of grass etc.

On Bristol Smooth cardstock the images from Falling For You were hand stamped using Ranger Archival Ink in Potting Soil.  They were watercolour painted using Kuretake Zigs in Brown, Beige, Gray Brown, Dark Brown, Orange, Olive Green, Light Pink, Wine Red and a Tombow in shade 451.  Points were highlighted with a white gel pen and all images die cut.


The images were backed with dimensional foam tape and the Dotted Frame was die cut from white cardstock and also backed with foam tape.  This was all adhered to the blended card background.


To finish up I placed the panel in my Misti and stamped the sentiment twice so that it was a nice strong image and then the panel was applied to a 110lb white cardstock base and voila the card was complete.

Happy crafting and see you next time!

Nicky x

Products Used:-

Falling For You Clear Stamps
Falling For You Die
Dotted Frame Die

Avery Elle STAMPtember Exclusive

September 28, 2019


Hello!  We wanted to pop in to let you know that we have an exclusive stamp set with our friends over at Simon Says Stamp in honor of their STAMPtember event.  


Thanks for stopping by to take a peek. Have a great day!

Guest Designer Mindy from My Creative Scoop

September 27, 2019


Hi Everyone!  I am so excited to share that we have a special guest designer on our blog today.  Mindy from My Creative Scoop has created a card and video that I just know you are going to love.  Be sure to check out her blog for loads more inspiration.  She is very talented!!

Hello! It’s Mindy from My Creative Scoop and I’m so excited to be guest designing for Avery Elle! I’ve been card-making for going on 13 years! My favorite part is coloring with my Copic Markers – I just love to bring a stamped image to life. I live in Southern California with my hubby and our 3 kids, Ralphy 20, Belle 17 and Katie 12. I’m fortunate enough to have made my hobby a full-time business where I teach online and local Copic classes. Thank you so much for joining me on the Avery Elle Blog today, I hope I will inspire you to create!


Today I’m sharing a card using the new stamp set called Cocoa Stand. I adore this set – it has so much potential for many different cards. I decided to make my ‘cocoa stand’ into a Tree Farm stand – but my cute little bear is drinking some hot cocoa as you can see.
I stamped my images in Memento Blank ink and stamped onto my Copic Xpress it Blending Card. I used my Copic Markers to color all of my images and used my Picked Raspberry Distress Oxide ink to sponge my pink background.
Here are the Copic colors I’ve used on my card:
 Bear – E44, E43, E42, E41, R32, R30
Cup, Bows and Present – R35, R37, R59, BG11, BG13, BG18, N0, N3
Trees – YG61, YG63, YG67, E44, E43, E42
Stand – W00, W1, W3, W5

I had so much fun coloring all of the images. I thought it would be helpful to share how I created the texture on the Christmas Trees, so here’s a quick video on how I colored them. I hope you find it helpful.


I hope you enjoyed my post today, thank you so much for having me and thank you so much for stopping by. Have a great day!
Mindy
MyCreative Scoop.com

Thanks for stopping by to take a peek. Have a great day!

Fall Foliage Week - Day 4

September 26, 2019


Hey everyone! Heather Campbell here. Today I've got a card with the new Fall Foliage stamp set.

For this card, I thought it'd be really fun to water color in the leaves. This allowed me to really play with the colors and get some really fun fall colors. 

I stamped and heat embossed the images and then die cut them. I decided to pop a Woodland Wonders bunny in the arrangement. Finally, to pull together my card, I stamped the laurel-ish image on a rustic ivory cardstock with Avery Elle Kraft ink. Finally I assembled the images with dimensional adhesive, stamped the sentiment and then finished it off with twine. 

Thanks so much for stopping by and sharing part of your day with me! Have a great one!

Fall Foliage Week - Day 3

September 25, 2019


Hello friends,

Katie here with a card to share with you featuring the gorgeous Fall Foliage stamp set. I love fall and all the colors that burst forth from the trees. It's also an opportunity to use some Copic Marker color combinations that evoke the hues and shades of fall. With that in mind, I wanted to share with you some of my favorite Copic colors for Fall.


To create my card, I stamped the images from the Fall Foliage stamp set with Versamark ink and heat embossed the images with gold embossing powder. Next I colored the images using the Copic markers noted in the image above.  I die cut the images and arranged them in a wreath around the opening of the Quilted Frame Elle-ments die. 


I stamped and heat embossed the sentiment onto an A2 notecard. I adhered the quilted frame die and images to the notecard with foam tape and adhered a few clear droplets as a finishing touch.

Supplies

That's all for me today. I hope that these color combinations are helpful as you capture the colors of Fall on your cards. 

Thanks for stopping by!
Katie


Fall Foliage Week - Day 2

September 24, 2019


Hi there! Elena here with a fun fall card featuring Fall Foliage and one cute fox from Polar Peek-A-Boo Pals.


I wanted this card to have all the cozy fall feels, so I cut an Oval Burst layer out of kraft-colored cardstock. To break up all of the heavy brown of the kraft paper, I splattered white paint onto it before adhering it to a white card-base, propped up on foam squares.

Then, I stamped and die-cut the 2 leafy clusters from Fall Foliage. I colored them using copic markers and  positioned them to follow the curve of the oval edges.


Into the aperture, I stamped a greeting from Seasonal Simple Sentiments, and couldn't help but add the sweet little fox from Polar Peek-A-Boo Pals. I love his little paws resting on the leaf!

I hope you like it! Thanks for stopping by!

♥.


Fall Foliage Week - Day 1

September 23, 2019


Hi, it's Caryn here with a clean and simple card using the stunning Fall Foliage Stamp Set and Dies.  This was a super quick card to pull together and just by picking some fall colours from your chosen colouring medium (Copics in this case) you can create a gorgeous card in not much time.


I stamped the images from the set, coloured them, die cut them then arranged them to form a frame around the Thank You sentiment.  I adhered everything and that was it done.  


Supplies:


Christmas Kids Week - Day 4

September 19, 2019


Hi Everyone! Today I'm sharing Christmas Kids. This is such a fun, joyful stamp set. Let's take a peek...


 I created this card by stamping and die cutting the large image from the stamp set. This was so much fun to color! Next, I stamped and die cut the snow piles for the top of the tree. These are such fun details that really bring the stamp to life.


Next, I blended the background and added a die cut frame. To finish the card I added a sentiment from Polar Playtime.

Thanks for stopping by!

Supplies:

Christmas Kids Week - Day 3

September 18, 2019


Hello there!

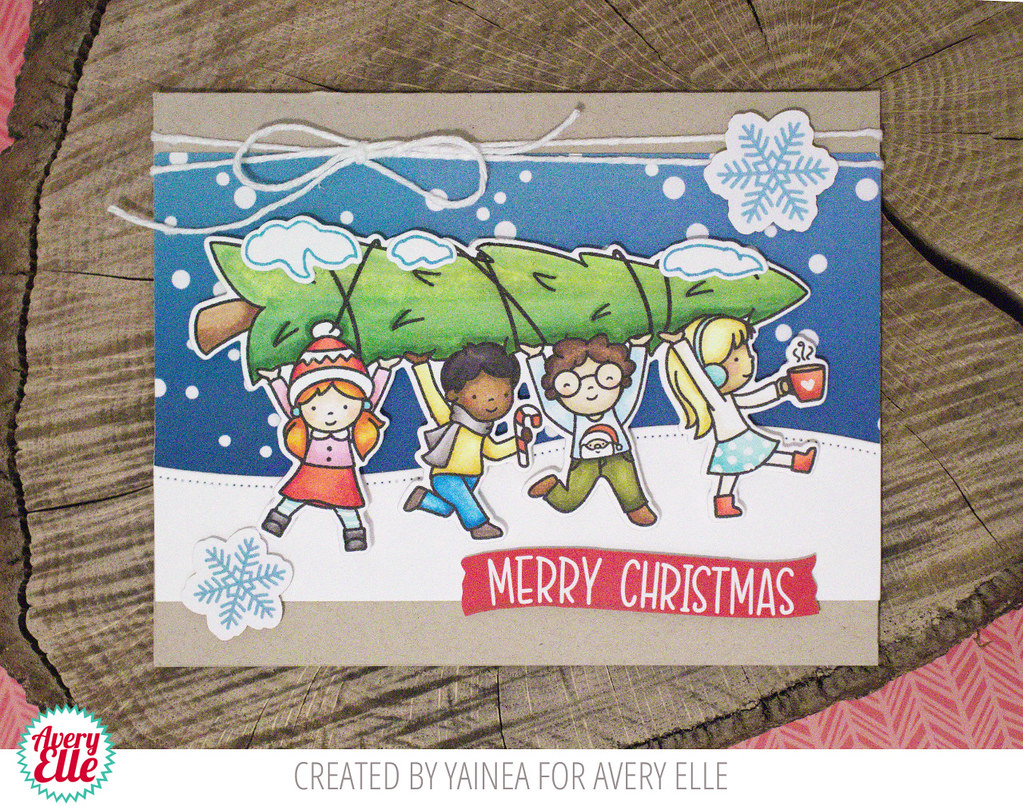
Its' Yainea here today with a Christmas card, I know we're all already making tons of Christmas card with the super cute Christmas products from the new release, aren't we? ;)

I have been playing with this amazing big stamp from the Christmas Kids set designed by my friend Elena and if you love coloring, you'll be love this stamp, it's just too fun!


I used alcohol markers to color it, then used the coordinating dies and put together this cute snowy scene with the help of Avery Elle papers and ephemera kit.


I hope you like my card for today and feel inspired to go to your crafty corner and have some fun! Thank you so much for stopping by, have a great day!!


Supply list:


Christmas Kids Week - Day 2

September 17, 2019


Hi everyone! It's Deasy here. Today I want to share my card for Avery Elle featuring Christmas Kids. Love this set because the images are super cute and so perfect for Holidays!


Avery Elle supplies that I'm using :
Christmas Kids Clear Stamps for the sentiment and images
Christmas Kids Elle-ments to die cut the images

I stamp the images, color it using COPIC then die cut it. The background is from Dye Ink Pad with blending tool then splash water with a brush. The sentiment is from white embossing powder.

Thank you so much for stopping by and happy crafting!


Hugs,


Melania Deasy

Christmas Kids Week - Day 1

September 16, 2019


Hey there, Caryn here today with a card featuring the festive and fun Christmas Kids Stamp set.  this is so fun to colour and I love the little extra touches you can add such as the piles of snow on the tree.


I started with a landscape A2 card and stamped the snow flake cluster from the set onto it as a background.  I then stamped the sentiment over the top of this. I die cut the frame using the Dotted Frame dies from the red pinstripe paper from the Holiday Collection Paper Pack.  I added a strip of snowfall paper along the bottom to ground the image once it was coloured and die cut. Everything was adhered using foam tape.


To finish I added some glitter to the snow and gave the little girl a pom pom for her her bobble hat!!!

Supplies:

Seasonal Simple Sentiments Week - Day 5

September 14, 2019


Hi Everyone! I'm so excited to share my card with you today! I used three sets from the current release. Let's take a look...


I started my card with the adorable snow person from Snow Fun. Then I stamped and die cut Cloche. I know I will use this stamp and die cut a lot this season! Next, I stamped a sentiment from Seasonal Simple Sentiments. There are so many sentiments to choose from! Finally, I die cut Star Scene and layered it in the background with some patterned paper. 


Thanks for stopping by!

Star Scene Dies

The Stamping Village Holiday Fest Video Hop

September 13, 2019


Welcome to The Stamping Village Holiday Fest Video Hop!

Every stop in this hop includes a video showing ways to use the Stamping Village Holiday Seals Stamp Set.  Avery Elle is so excited to be a part of The Stamping Village.  We are so lucky to be able to work with each and every one of the companies in this village!  They are all run by good people trying to do good things.   The village is a group of stamp companies that believe in community over competition. 

We also believe in giving back to the community.  100% of the net profits made from this collaboration stamp set will be donated to The Dreaming Zebra Foundation.  They firmly believe that all children regardless of their financial circumstances, should have art education.   They provide art and music materials free of charge to many schools and  community organizations across the country.  

If you are interested in purchasing this stamp set , it can be purchased here - https://www.averyelle.com/the-stamping-village-holiday-seals-clear-stamps/

The entire list of companies participating in this video hop is listed below.  Every company on the hop is also giving away a $50 gift certificate to their store. Just leave a comment on the YouTube videos (not this blog post) to be entered to win.  A winner will be selected randomly from the comments on each video over on YouTube.  

You can find our video here - be sure to leave comments on the video (not this blog post) to be entered to win.


Altenew - https://youtu.be/y-dRG-PmDhc
Art Impressions -https://youtu.be/oGKbWLCfYA4
Avery Elle - https://youtu.be/akuj84JOH-I
Concord & 9th - https://youtu.be/pwAGArVsJIk
Dare 2B Artzy - https://youtu.be/oIlg9bl_2_o
Gina K. Designs - https://youtu.be/r7-AeLjvxu8
Hero Arts - https://youtu.be/dakeuOkerYc
Lawn Fawn - https://youtu.be/t0-Quofg_yI
Pink and Main - https://youtu.be/VomXo0XpyJQ
Pinkfresh Studio - https://youtu.be/LSM_CZxF8A4
Studio Katia - https://youtu.be/rPmsBP4ecS4
Waffle Flower - https://youtu.be/yCV-pY-9n24
Jennifer McGuire - https://youtu.be/7h2t5slJi8c        

Happy watching and Good Luck! 
Winners will be announced on Friday, September 20th, 2019.

Seasonal Simple Sentiments Week - Day 4

September 12, 2019


Hey all! It's Heather here sharing a card using the new Seasonal Simple Sentiments stamp set.

To create my card, I stamped, die cut and colored in images from Snow Much Fun stamp and die set. Then, I accented the images with the Holiday Ephemera pack and the Holiday 6x6 paper pad

Thanks so much for stopping by and sharing part of your day with me! Have a great one!

Seasonal Simple Sentiments Week - Day 3

September 11, 2019


Hey there, Caryn here today bringing you a card featuring Seasonal Simple Sentiments and some of the other fabulous new products from the Fall 2019 Fall release.  This card was quite quick to put together thanks to the Holiday Ephemera pack - I just LOVE it!


I started with a white A2 card base and adhered one of the frames from the ephemera pack using Avery Elle liquid glue.  I then added one of the snow globe images from the pack using foam tape.
As a focal image I stamped, coloured and die cut the skate from Holiday Skates twice along with the addition of a bow from Alpine Christmas.


To finish I chose the Let It Snow sentiment from Seasonal Simple Sentiments stamped onto one of the co-ordinating dies from the matching Elle-ments and added a snowflake from the ephemera pack.


Supplies:

Seasonal Simple Sentiments Week - Day 2

September 10, 2019


Hi there! Elena here with a card featuring a few sets from our newest release.


I starting out by choosing the sentiment, from Seasonal Simple Sentiments, and then built my scene around it. I don't usually do it that way, but it was a fun challenge! I stamped and heat-embossed the sentiment onto a black banner flag, to really make it stand out.

To start decking those halls, I stamped and die-cut the green garland (x2) and hanging star from Cocoa Stand. To make the swagged garland look continuous, I simple snipped off one of the red bows and overlapped them. I adhered these near the top of a Wonky-Stitches die-cut panel.


I brought in a few cute critters to help with the decorating! They are all from Falling For You, but the little fox and hedgehog have undergone some adjusting to make them hold the Christmas decorations.

It's not very complicated, and a fun way to be able to stretch your stamps:


First, ink up the fox, but wipe off the jar portion of the image. You will lose the tips of his paws. Don't worry about that for now!


Next, die-cut the image. (ps, if you're confused by the little bit of stamped jar in this picture - it's because I loved the idea so much that I repeated it for a card you'll see in the future!) 

Then, with a pencil, draw in the missing paws, and also trace a line to guide your fussy-cutting. I tried to keep the same width of white-outline that the die-cutting would provide. The paws were then traced using a copic-friendly black pen. That's all there is to it!

I hope you are inspired to look at some of your non-Christmas stamps in a new way - I had so much fun dreaming this up!

♥.

 
site design by designer blogs