Peek-A-Boo Balloon Week - Day 5

January 31, 2020


Hi Everyone! I'm so excited to share my card today. I love the Peek a Boo Balloon so let's check it out!


I started this card with the Peek a Boo Balloon. Its such a fun stamp to color! I also stamped and die cut the clouds from the set. Next, I picked a Peek a Boo Pal to ride in the balloon. I added stars from Star Scene and embossed the sentiment.  


I love how this card came together! Thanks for stopping by!

Supplies:

Peek-A-Boo Balloon Week - Day 4

January 30, 2020


Hi friends,

Katie here with a card and video featuring the Peek-a-Boo Balloon clear stamps.  The Peek-a-Boo Balloon expands our scene and setting options for all the Peek-a-Boo Pals and it's versatile enough to accompany other stamps too. For my card, the balloon is piloted by the bunny and kitty from the Party Pals clear stamps.


I share a couple of tips in my video including how to make your fussy cutting look a bit more polished and how to make adhering lots of die-cut shapes (all these clouds!) a little less painful. I hope you'll take a peek and see how it all came together.


Supplies:


Thanks for stopping by! 
Katie

Peek-A-Boo Balloon Week - Day 3

January 29, 2020


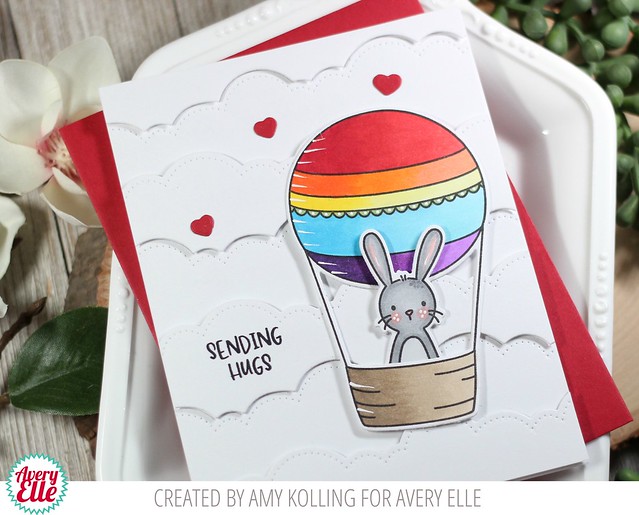
Hello!  Amy here with a card that would surely bring a smile and some hugs to a friend!

I love the Peek-a-Boo line from Avery Elle.  The addition of the Peek-a-Boo Balloon for the adorable Peek-a-Boo pals is awesome!

Peek-a-Boo Balloon

I started by die cutting a piece of white cardstock using the Pierced Clouds Elle-ments many times.  As I did this, I added every other row of clouds with foam adhesive.  My hot air balloon was Copic colored in rainbow fashion and die cut.  I added it over the raised clouds as it had a lot of dimension already.  I adhered my Peek-a-Boo bunny with foam adhesive peeking out of the basket.  A stamped 'Sending Hugs' and a few die cut red hearts finished the card.


Peek-a-Boo Balloon2 Supplies:

Peek-A-Boo Balloon Week - Day 2

January 28, 2020


Hi there!

Elena here, with a card featuring the Peek-A-Boo Balloon stamp set.


I just love it whenever Heather comes up with new ideas for her Peek-A-Boo animals stamp sets! I nabbed the sweet lamb from Peek-A-Boo Pets and had him hang over the edge of the basket. looking as lonely as possible.


Behind the air balloon and clouds, I added a piece of cardstock cut with the Waves die. I thought the wavy motion was perfect for conveying a moving sky! I used mint and pink inks to blend a soft background, and colored the balloon to (hopefully) match.

I hope you like it!


Supplies:

Peek-A-Boo Balloon
Peek-A-Boo Balloon Elle-ments
Peek-A-Boo Pets
Peek-A-Boo Pets Elle-ments
Waves Elle-ments
Plus Frame Elle-ments

Peek-A-Boo Balloon Week - Day 1

January 27, 2020


Hello, Caryn here today shining the light on another great addition to the Peek-a-Boo series designed by our lovely Heather, Peek-a-Boo Balloon.  Today we have the cat from the original Peek-a-Boo Pets set heading off into into the beyond (anyone reminded of the ending of CATS the movie here - shudder). He certainly doesn't look too sure about it, lol!!


I started with a white card base and die cut a panel from aqua cardstock using the Hatch Match die.  I splattered some white paint across it and set it aside to dry.  To frame the card I die cut the Postage Stamp Frame and adhered it to the Hatch Match panel and then added this to the card with foam adhesive..

The open space design of the balloon lends it to lots of different techniques but for this card I thought I'd do some paper-piecing.  I took a couple of papers from the Create Magic Card Kit  and pieced them onto the balloon and the basket.  I stamped, coloured and die cut the kitty and then popped them onto the card front with a couple of clouds from the Cupids die set.  To finish I added a speech bubble from Peek-a-Boo Pals stamped in Sugar Plum pigment Ink.


Supplies:

Wheelie Great - Day 5

January 24, 2020


Hello!  Amy here alongside Ashley today with more inspiration with the stamp set Wheelie Great.  What I love about this mini set is that there are so many little stamps to embellish a scene for a birthday or every day!


I created a cheerful card using the Ray Elle-ments for my background.  I ink blended some yellow Distress Inks onto a panel and then die cut using the Ray Elle-ments.  Inside the circle cut out, Tumbled Glass Distress Ink was blended.  After Copic coloring my images, they were die cut and added with foam adhesive along with a sentiment strip to ground my image.  


Supplies:

Hi Everyone! Today I'm sharing the very sweet stamp set Wheelie Great.


There are so many fun little images in this stamp set. I started by stamping, die cutting and coloring the bunny, flowers, heart speech bubble and butterflies. Next I inked up the background and die cut a wonky circle from Star Scene. Then I embossed the sentiment on colored card stock. Finally, I assembled all of the pieces with my favorite Avery Elle adhesive


Supplies:

Wheelie Great - Day 4

January 23, 2020


Hello there, friends!

It's Yainea here and today I'm sharing a card I made using the cute Wheelie Great stamp set illustrated by my DT buddy Elena Roussakis for Avery Elle. This set is absolutely adorable so it will make some one smile in any just because card :)


I used coloring pencils to color the little critters and the bicycle and some Avery Elle patterned papers on this always winner card layout (I love cards with circles!). For the sentiment I used the Modern Calligraphy alphabet stamp, it's just so beautiful!


I hope you like my card for today, thank you so much for stopping by and have a nice start of the week!

Supply list:

Supply list:
• Die: Wheelie Great Elle-ments
• Modern Calligraphy Clear Stamps
• Cherry Hemp Twine

Hey everyone! It's Heather Campbell here. 

Today, I've got a fun little project to share with you using the new Wheelie Great stamp and die set. 

For my project, I started with the stamped bicycling bunnies on my white card stock and then die cut it with the bookmark die

Once they were stamped and die cut, I went ahead and ink blended the background. I didn't bother to mask anything other than the bunny and speech bubble because I knew I'd color right over the rest of it. I love this technique! 

Check out how sweet these little bookmarks turned out!?!

Thanks so much for stopping by and sharing part of your day with me. Have a great one!

XO, Heather 


Wheelie Great Week - Day 3

January 22, 2020


Hello!

Katie here with a little Wheelie Great inspiration to share with you today. The images in Wheelie Great are so sweet. I love all the accessories and different elements that can be added to the bicycling bunny.


I stamped the bunny, mouse, flowers and cake image onto white card stock and colored the images with Copic markers. I die cut the images with the coordinating Wheelie Great Elle-ments dies. I also die cut a panel of white card stock with the Quilted Frame Elle-ments die. I blended the center oval with Distress Ink before adhering the images to the oval and attaching all the die cuts to an A-2 notecard.


I stamped the sentiment onto one of the narrow tags from the Party Tag Elle-ments die set. I adhered the tag to the card and added a light yellow button over the hole in the tag as a finishing touch. 

Supplies

Hello.  It's Caryn here again and this week the Avery Elle team are shining the light on the gorgeous Wheelie Great stamp set.  That bunny is the cutest and when I see a bunny, I just have to put a cotton tail on him!!


I started with a white card base and took one of the papers from the Create Magic card kit.  I also used a grassy border piece from the ephemera pack to set my scene.  I die cut a frame using the Dotted Frame die (which I have realised has just been retired - sorry) and then stamped and coloured the images I wanted for my card.


For the sentiment I took the smallest of the tags from the Party Tag collection and stamped on to it.  As there is a hole at the end I covered it with a wee butterfly!  All that was left to do was add the pom pom to the bunny!

Supplies:


Wheelie Great Week - Day 2

January 21, 2020


Hi there!

Elena here, with a Wheelie Great card!


I started out by stamping the bunny and mouse from Wheelie Great. The mouse is so cute riding in the front basket! I gave him a heart to hold, and gave the bunny the heart-speech-bubble. But still, not enough hearts. I added the envelope from Shark Hugs, and placed it on the back ledge of the bike. Still, not enough hearts. I die-cut the heart trail from Cupids, and placed other, die-cut hearts to fill in the trail.


With all of these hearts, the sentiment was a no-brainer! I laid down a tiny strip of gold paper to ground the images and add to the whimsy of the card.


I hope you like it!

Supplies:

Wheelie Great
Wheelie Great Elle-ments
Cupids
Cupids Elle-ments
Shark Hugs
Shark Hugs Elle-ments

Wheelie Great Week - Day 1

January 20, 2020


Hello!  This is Nicky with you today and I'm featuring the stamp set Wheelie Great for my card today.


To create this card I first created the background by ink blending to create sky and grass.  I distressed it with water splashes which I blotted up and then added a few dots of white gel pen for further interest.  This background was applied to a 110lb white cardstock base.  I then took the Dotted Frame die and die cut a panel of white cardstock.  This die cut was backed with foam tape and applied to the background.


On Copic friendly cardstock the images from Wheelie Great were stamped using Memento Ink in Tuxedo Black.   They were coloured up with Copic Markers, die cut and applied backed with foam tape.


To finish the card, points were highlighted with a white gel pen and the sentiment was stamped onto a strip of white cardstock, backed with foam tape and applied to the frame.

I appreciate you stopping by the blog today to read about this card.  Happy crafting!

Nicky x

Products Used:-

Wheelie Great (stamp set)
Wheelie Great (coordinating dies)
Dotted Frame Die

Hi there friends and happy new year 2020!!!

Wish you lots of creative crafty moments during this new year :)
Today I have a sweet card to share with you, I'm featuring the new Cloud Mat die and Wheelie Great stamps and dies.

I usually color the images of my cards with alcohol markers but I wanted to use coloring pencils on this cute bunny and his adorable mouse friend and I had so much fun!


The Cloud Mat die is amazingly designed so you can color the sky without needing to mask the clouds like I did or you can use just the clouds or just the sky without the clouds to create more dimension using a white background behing it, yes, I love it!


Oh! For the perfect banner I used one of the smaller Party Tag dies :)
I hope you like my card for today, have a great start of the year!!!

Supply list:


Shark Hugs Week - Day 5

January 17, 2020


Hi Everyone! Today I'm sharing Shark Hugs and let me tell you this shark has such a fun personality. I am excited to share my card with you!


To create my card I made stamped, die cut and colored the shark and envelope stamps. Next, I masked the background and added the ocean and sun. I used an older set to stamp the waves and used Shark Hugs to stamp the splashes. Next, I stamped the sentiment on a banner from Grand Photo Mat Dies and assembled the card.


Thanks for stopping by! I can't wait to see what you create!

Supplies:

Shark Hugs Week - Day 4

January 16, 2020


Hey everyone! It's Heather Campbell here. Today I've got a super cute card to share with you today using the new Shark Hugs stamp set. Eep, have you seen this set? It's so stinkin' cute!

For my card...
To create my card, I started with the Sea Scene die and cut from a light aqua cardstock. I used a Comic marker to color the waves a little darker and added it to my card base. I added glossy accents to the waves to make them really pop! 

I stamped, colored and die cut the shark and accessory bits from Shark Hugs. I thought it'd be fun to include the sentiment on a vellum banner using Banner Bits. Finally I assembled it all onto the card base and added a bit of twine to top it off. 

Super fun and sweet and I'm absolutely loving the vellum banner on this card. 
Thanks so much for stopping by and have a wonderful day! 
XOXO,
Heather

Shark Hugs Week - Day 3

January 15, 2020


Hi friends,

Katie here with a card and tip to share with you featuring the Shark Hugs Clear Stamps and coordinating Elle-ments dies.


The Shark Hugs shark is so dapper, and I love that you can tuck various accessories into his fins. While you can certainly use a masking technique to place items into his fins, the coordinating Shark Hugs Elle-ments dies contain a special fin flap die that makes it so simple to tuck items into his fins.

I follow some easy steps to align the fin flaps die with the stamped image.


Once the fin flaps are cut, proceed as usual with coloring and die-cutting the shark image. I colored my shark with Copic markers and chose to tuck the bitten heart into his fins. For the background, I die-cut a panel of white card stock with the Three Hearts Elle-ments die. I blended a panel of watercolor card stock with a few shades of Distress Oxide Ink and spattered it with water to lift off some of the ink. 


 I placed the Three Heart panel on top of the blended panel. I die cut the Heart Frame Elle-ments die from gold card stock and placed the shark on top. I stamped the sentiment with black ink and attached the finished panel to an A-2 notecard. 

Supplies:

I hope that you will invite this handsome shark into your crafty collection and give the fin flap die a try! 

Thanks for stopping by!

Katie

Shark Hugs Week - Day 2

January 14, 2020


Hi there!

Elena here, with a fun card featuring the hilarious Shark Hugs stamp set!


Isn't it so fun? I stamped the shark, colored it with copic markers, and then gave him a rose to hold. I love how there is a little optional die that allows you to cut around his fins!


I placed the shark on the side of the oval frame, making room on the left for the sentiment strip and the little heart bait. For a little extra touch, I punched a hole through the top of the hook, and attached some embroidery floss through it. I adhered the other end behind the oval frame.

I hope you like it!


Supplies


Shark Hugs Week - Day 1

January 13, 2020


Hey there Avery Elle fans!  It's Caryn here today with a card featuring a handsome lil' shark that just wants to find love!  How are going to resist that cheeky wee grin?  He definitely doesn't want to eat you, he just wants to cuddle ;)

I've created a video to share how this card came together but be warned, it's not for the faint of heart!!


I stamped the images from the Shark Hugs set and coloured them using Copics.  To give the shark some texture, I used the colourless blender (0) and a white gel pen to add some detail.  Included in the die set is a small die that cuts around the fins so that his little offerings can be held in his hands (um, fins)!


For the background I die cut the Three Hearts die from the card base and adhered some red spotty paper from the Holiday Paper Pad behind it with foam tape.  I added the sentiment and a few heart and finished by adding some Glossy Accents to the rose and the tiny heart on the envelope.


Here's another sample using the Shark Hugs stamp set.  This time I stamped Hug Me in the centre of the bitten heart and coloured it red with drops of blood falling from it!  Perhaps a card for the couple with a slightly darker sense of humour (cough, me, cough!!) ?? 


Supplies:


Cupids Week - Day 5

January 10, 2020


Hello friends!

I'm here today to share a Valentine's day featuring the cute Cupids stamp set and coordinating dies. I love the Three Hearts die and tought they would look great with a pair of Cupids floating around so that's what I went with!


I used an ombre paper sprinkled with white ink for the background, then I die cut the hearts on white cardstock and adhered the Cupids and tag on top.
The cupids were stamped with black ink and colored with alcohol markers. The tag is from the Party Tags die set, also from the Winter release.
As a finishing touch, I added some golden string and a bunch of little stars.


Thank you so much for stopping by today, have a great day and happy crafting!


Supplies:
Cupids Clear Stamps
Cupids Dies
Three Hearts Dies
Party Tag Dies

Hi Everyone! Today I'm sharing the adorable Cupids stamp set. Let's take a look...


I stamped, die cut and colored several images from the Cupid stamp set. They are so fun to color! Next I blended stripes on my back panel and die cut the Star Scene to create a wonky circle window. Behind the window I water colored a soft sky. Finally, I assembled all of the pieces and stamped the sentiment.

Thanks for stopping by!

Supplies:
 
site design by designer blogs