Some Bunny Week - Day 4

January 31, 2019


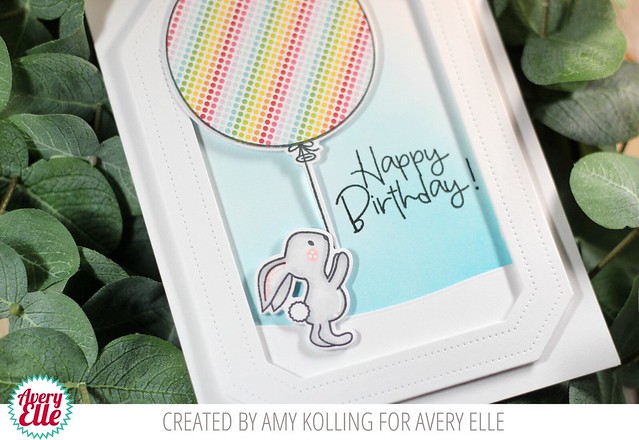
Hi Everyone! It's been a cold week but I can feel spring coming...it's just around the corner! Spring reminds me of cool days, filled with sunshine, green grass, new flowers and new life.

Some Bunny captures all that spring is and I can't wait to share it with you! 


To create my card, I started by stamping the large balloon stamp. Next, I colored it and used the coordinating die to cut it out.

Then I created the background. First, I blended Distress Ink around the top and sides. Then I stamped the bunny. I brushed in grass with Copics along the bottom and around the bunny. I love how this turned out! I'll be drawing more grass in the future. It was fun!

Finally, I lightly colored the bunny and stamped the sentiment. 


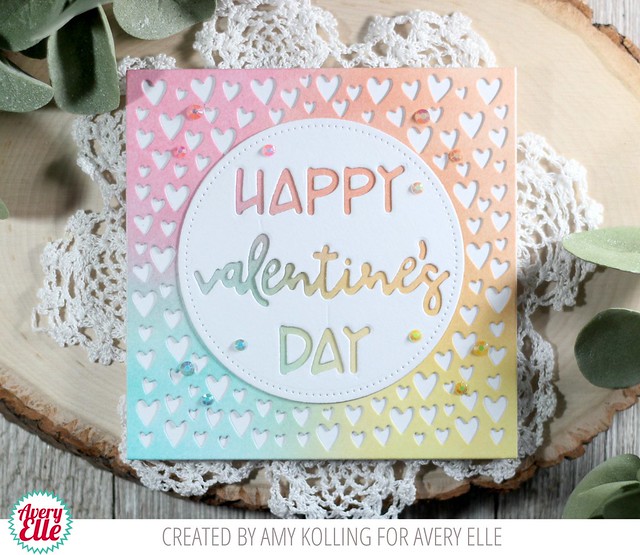
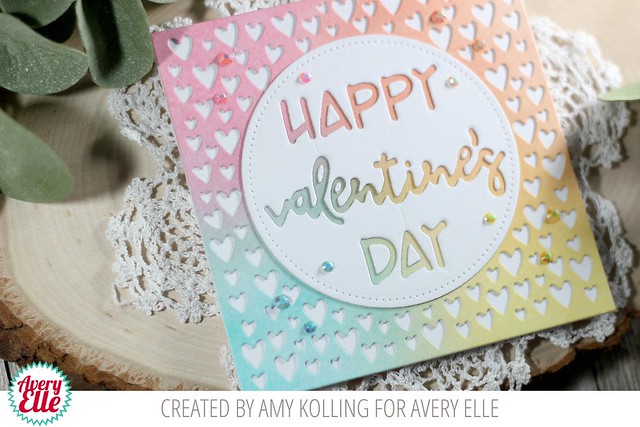
Such a fun, easy card. Thanks for stopping by today!

Supplies:


Some Bunny Week - Day 3

January 30, 2019


Amy here sharing a card using the adorable Some Bunny set.  Who doesn't love a cute bunny and a big balloon?

Some Bunny

I thought it would be fun to go back to some of my roots with this card......Paper Piecing.  I wanted to add some color with pattern paper.  You can do this with ANY pattern paper in your stash.  I used a rainbow pattern from The Everyday Collection by stamping the balloon onto the pattern, hand trimming out the shape, and adhering it to the balloon die cut.  

To create my scene, I used the Pierced Mat Elle-ments to die cut a white frame.  Behind the frame, I ink blended Broken China Distress Ink and stamped my sentiment in New Moon Dye Ink.  I added my frame with foam adhesive as well as my Copic colored bunny and big balloon.

Some Bunny2

Supplies:

Some Bunny Week - Day 2

January 29, 2019


Hello friends,

Katie here with a card to share with you today featuring the sweet Some Bunny stamp set. 


First, I stamped the bunny, balloon, and hearts onto white card stock using Avery Elle's New Moon dye ink.  I colored the images with Copic markers and die cut them using the Some Bunny Elle-ments dies.

Next, I cut a panel of watercolor card stock with the Wonky Stitches Elle-ments die and used Distress Oxide Ink to create a blended panel.  I spatted the blended background with water and gold Color Shine.


Finally, I adhered the images to the background and stamped the sentiment with black ink before adhering it to a white A2 notecard.


Supplies

I think it was Winnie the Pooh who said, "No one can be uncheered with a balloon."  I hope this card and sweet stamp set brings a little cheer to your day.  Thanks for stopping by!

Katie

Some Bunny Week - Day 1

January 28, 2019


Hey there, it's Caryn here with a cute little card using the gorgeous Some Bunny stamp set. 


To start I used a pink card base and die cut a panel using Wonky Stitches and the large frame from Wonky Circle Frames.  I laid the elements out so I would know where I wanted to blend my ink and then used a blending brush to add some soft colour (Magenta and Orchid pigment ink) to the centre of where I planned to put my Wonky Circle Frame die cut.


I stamped the bunny and balloon in Fog dye ink and then blended Sea Glass ink into the balloon and added a tiny bit of grey to the bunny using  Copic markers (C0 and C2 and R81).  I used a heart from the Some Bunny dies and adhered it onto the balloon then assembled my card using foam tape for the bunny and balloon.  


To give the card a little more texture I used Unicorn White paint from Hero Arts and splattered it over the card front.  I added some Diamond Glaze to the heart and finished it all off with a cute little pom pom on the bunny's tail!!

Supplies:


Simple Sentiments Week - Day 4

January 26, 2019


Hey everyone!  Heather Campbell here.

Today, I've got a card to share using the new Simple Sentiments stamp set. I paired it with Peek-a-Boo Pals, Starry Scene and Photo Mat dies.
First, I stamped the background using Starry Scene in Avery Elle Aquamarine ink and then die cut it out with the coordinating die.  Then, I stamped the images from Peek-a-Boo Pals, colored them in and then die cut them out.  Finally, I die cut the polaroid shape from Photo Mat dies.

I assembled the card and then heat embossed a sentiment on black cardstock to add to the card. 

Thanks so much for stopping by and sharing part of your day with me.  Have a great one!
XOXO, Heather

Simple Sentiments Week - Day 3

January 25, 2019


Melania - Simple Sentiments  

Hi everyone! It's Deasy here. Today I want to share my card for Avery Elle featuring Simple Sentiments. I love this stamp set because it's so versatile, perfect for any themes and you can combine it with other stamp set.


Avery Elle supplies that I'm using :
Simple Sentiments Clear Stamps for the sentiment
Simple Sentiments Elle-ments to die cut the sentiment
Hummingbird Clear Stamps for the images
Hummingbird Elle-ments to die cut the images
 
I stamp the images using gold embossing powder, color it using watercolor then die cut it. The sentiment is from white embossing powder. To color the background, I'm using Dye Ink with blending tool then splash watercolor with a brush. I add some clear sequins for the embellishment.

Thank you so much for stopping by and happy crafting!

Hugs,

Melania Deasy

Simple Sentiments Week - Day 2

January 23, 2019


Katie - Simple Sentiments w/ technique/tip


Hello friends,

Katie here with a simple tip using the Simple Sentiments stamp set.

Stacking sentiments can help small, simple sentiments make a big impact, and I have a tip to share to easily create a stockpile of these sentiments so they are ready for your next card project.


We're going for minimal effort here, so to stamp the sentiments at once, I kept all the stamps on the carrier sheet and taped the sheet to my MISTI using washi tape.


These sentiments are spaced out evenly- so that you can die cut around the sentiments you want to use with the Simple Sentiments Elle-Ments die.


I used light tack tape to hold the dies in place while I ran them through my die cut machine.


You can keep the sheet intact and die cut additional sentiments as the need arises, but I decided to use my trimmer to cut up the rest of the sentiments.  I'll be all set to add a simple sentiment or two to my next card!


I added three of the simple sentiments to a card featuring the Toucan Party stamp set.  I think the sentiments compliment the Toucan scene perfectly!


Supplies:

Thanks for stopping by!
Katie

Simple Sentiments Week - Day 1

January 21, 2019


Hey everyone this is Nicky with you today and I'm sharing a card that puts the new Simple Sentiments stamp set front and centre.  Simple Sentiments comes with coordinating Elle-ments which makes your sentiment strips incredibly simple to make!


To create my card I ink blended my background using Distress Inks and then splashing a watered down amount of the ink into each colour zone to distress it a little further.  I dotted in some silvery gold gel pen dots and then die cut the panel to give it the subtle stitched edge.


I adhered the panel to the card base.  I die cut a whole bunch of the Simple Sentiments Elle-ments and then chose a few of the stamp sentiments that would say what I wanted them to declare and then stamped them in Versamark Ink and heat embossed in Antique Gold embossing powder.  I masked a line down the left hand length of my card and aligned my sentiment strips along it and adhered them with foam tape before removing the mask.


On Bristol Smooth cardstock I stamped the foxes from Party Fox, I watercolour painted them using Kuretake Zigs then die cut them using the Party Fox Elle-ments.  These too were adhered with  foam tape and the final touch for the card was the addition of a generous amount of flat, gold, micro star embellishments for a celebratory twinkle!

Thanks for stopping the Avery Elle blog today - happy crafting everybody!

Nicky x


Products Used:-

Party Fox
Party Fox Elle-ments
Simple Sentiments
Simple Sentiments Elle-ments

Check Us out On Instagram at Creativation 2019!

January 18, 2019


We are busy getting ready for Creativation this weekend.  Be sure to check us out on Instagram for behind the scenes action and sneak peeks of our upcoming February 7th release!

Have a great weekend!
x-Jamie

Tons of Hearts Frame Week - Day 4


Hi Everyone! It's Ashley here today sharing the Tons of Hearts Frame. I've added a few of my other favorite stamps to today's card too! Let's take a look...

I started my card by water coloring a panel and placing it behind the Tons of Hearts Frame. Next, I die cut a circle and stamped a sentiment from And Then. I ended up masking the sentiment to take out the "O" and widen the gap between the "Y" and "U". 

In the gap, I adhered a die cut cat from Party Pals. Isn't he cute?!

I finished the card with a heart speech bubble. I made this with a word bubble from the Photo Mat dies and a heart die from Otterly Fantastic.

Thanks for stopping by today!

Supplies
Hi Everyone!  Jamie Here. I am popping in quickly with a cute card for you today.  I hope that you enjoy it.


Have a great weekend!
x-Jamie

Tons of Hearts Frame Week - Day 3

January 16, 2019


Hello!  Tis the season for LOVE and friendship.  Amy here with a clean and simple card using some ink blending and the amazing Tons of Hearts Frame Elle-ments.

Tons of Hearts

 I've ink blended a panel and then die cut using the Tons of Hearts Frame Elle-ments.   For a different look, the background was left with all the white hearts from my notecard!  To tie in the white from my notecard, I die cut the sentiment dies 'Happy Valentine's Day' from a white Double Pierced Circles Elle-ments.  When layered over the ink blended panel, the colors show through the sentiment!  As a finishing touch, matching gems to each color were added.

Tons of Hearts2

Supplies:
Double Pierced Circles Elle-ments


Thanks for sharing a part of your day here!

Tons of Hearts Frame Week - Day 2

January 15, 2019


Hello!

It's Yainea here today with another Valentine's themed card featuring the Tons of Hearts Frame Die. I paired it with the Cool Beans set because what says love better than coffee? ;)


So, I started with a pink base, sprinkling some different shades of pink ink on top to give it some texture. Then I die cut two pieces out of Tons of Hearts Frame Die, using one of the Double Pierced Circles Elle-ments dies on the center to create a hole. I adhered them together, and then on the card base, placeing a bow of twine around one of the sides.

Finally I stamped, colored and die cut the image, stamped the sentiment on the card base and adhered the coffee vase with dimensional adhesive. As a little final touch I placed one of my wooden hearts on top.

I hope you like it! Thank you so much for stopping by and have a great day!

Supply list:

Come See Us At Creativation In Phoenix This Weekend!

Tons Of Hearts Week - Day 1


Hey there.  Caryn here today sharing a cute card I made using the gorgeous Tons of Hearts Frame die.  One of my favourites from the Winter 2018 release is the Stuck on You set so I couldn't help but grab these guys for this card.  I started with a 4" square card so it's just the right size for the Lots of Hearts die cut which I cut from red cardstock and adhered to the front.


I used a circle die cut that I had left over from a previous card using the Horizontal Stripes die and blended some Lemon Grass (my favourite Avery Elle Pigment ink colour by the way!) around the edge.  I stamped the cute sentiment in black and then placed the cacti that I stamped, die cut and coloured with Copics on to the front with pop up foam tape.


To finish I added a wee bit of shine to the flowers on the cacti using glossy accents.

Supplies:

And Then Week - Day 5

January 11, 2019


Hi Everyone! It's Ashley here today. Sharing the amazing sentiment stamp set And Then.

Although I'm featuring this stamp set today, I've used it several times this release! It's a winner!


I always enjoy my creative time after the holidays. The season right after the holidays brings freshness and openness to creativity. Today I went a little crazy and made a Polaroid panda card. :) 

I started by blending stripes with Distress Ink. Next I stamped the sentiment from And Then. I finished the sentiment by heat embossing "heart happy" on top of the inked sentiment slightly offset. 

I created the Polaroid camera from a piece of card stock with rounded edges. The Simple Sentiment Dies were the perfect fit to make the slot opening. 


I added a little fun with the panda bears from Party Pals. The card was finished with a few hearts from Otterly Fantastic.

Thanks for stopping by!

Supplies:

And Then Week - Day 4

January 10, 2019


Hey all!  Heather here.
Today I've got a fun card using the amazing new And Then sentiment stamp set.


To create my card, I decided to have some fun with the sentiment and create a really cool splash of color behind it. To do this, I followed a few easy steps.


 First, I positioned my stamp on my MISTI and then inked the stamp with a few colors of water reactive ink (distress inks). 


Next, I spritzed the inked up stamp with water.


Quickly, I stamped the spritzed stamp onto my card.


Finally, once it was dry, I stamped the sentiment in black ink onto the card and ta-da done!  I love the look of this.  So fun too! 

Once I had the sentiment assembled, I positioned a few Peek-a-Boo Pals behind the largest Wonky Scallops frame die to finish my card.  
Thanks so much for stopping by and have a great day!
XO, 
Heather 

And Then Week Day 3

January 9, 2019


Hello friends,

Katie here with a quick and cute little card to share with you featuring the And Then stamp set.  And Then is a wonderful sentiment set.  It's perfect for your all the loves in your life, from family and significant others to kiddos and special friends.

I adore the "You make my Heart Happy" sentiment and it takes center stage on the Tons of Hearts Frame Elle-ments die.  I stamped the sentiment with Versafine Black Onyx ink and heat embossed it with Avery Elle's clear embossing powder.


I backed the hearts frame die that with a panel of blended Distress Oxide inks (Picked Raspberry, Festive Berries, Spiced Marmalade, and Wilted Violet).  I attached the panel to a white notecard trimmed down to 4.25" square.


Supplies: 


I hope this little card made your heart happy!  It makes my heart happy that you shared part of your day with Avery Elle!  Thanks for stopping by!

Katie

And Then Week Day 2

January 8, 2019


Hi there!

Elena here with a card featuring the sweet hand-lettered set, And Then. I love every sentiment in the set, it was hard to choose just one for this card!


I stamped the sentiment onto a sheet of pink paper - I really wanted to highlight that sentiment!  I colored a cat couple, from Party Pals, in different shades of grey. I added little stripes to each kitty in a darker grey.  Then, I cut a Pierced Clouds layer for them to hang out on, and framed everything out using the Horizontal Stripes cover-plate.


When everything was assembled, I was regretting my decision to stamp the sentiment in a black ink. I wish I would have embossed it in white! To lighten up the pink layer a bit, I drew in some dreamy dots using a white gel pen. I thought that helped a bit.

I hope you like it! Thanks for stopping by!

♥.


And Then With Nicky

January 7, 2019


Hello everybody!  This is Nicky with you today and I'm sharing a card using the new And Then  sentiment stamp set from the most recent Avery Elle release.


Since the sentiments in this set are slightly chunky/oversized I decided I'd do a larger than normal card and I'm pretty much addicted to 'Slimline' cards right now.  The finished dimensions are 3 1/2" x 8 1/2", so cut an A4 panel of cardstock at 7 inches then score and fold in half (4 bar).  My panel was cut from the remainder of the sheet and is sized 3.2" x 8.2".  These cards fit a standard 'slimline' envelope which is easily found in online searches.


I ink blended my panel using Distress Ink in Mermaid Lagoon.  I then took a couple of different stencils that I had and used different sized circles from each, moving it about and ink blending using White Pigment Ink to create a bubbly or bokeh affect.  I stamped the sentiment with black archival ink and dotted in a few spots using a Uni-Ball Signo white gel pen.


On Bristol Smooth cardstock I stamped my images from Swans and watercolour painted them using Kuretake Zigs.  I fussy cut the images out and adhered them using foam tape for dimension.  I backed the panel with white craft foam and stuck it to the card base.


The final touch was to draw the ripples of water around the swans again using the Uniball Signo White gel pen.

Card complete!  Thanks for stopping by the Avery Elle blog today, I'll see you next time .......

Nicky x


Items Used:-

And Then Clear Stamps
Swans Clear Stamps


site design by designer blogs