Layered Holiday Truck Week - Day 3

September 30, 2021


Hello! I am popping in today to share this fun card that I created using our Layered Holiday Truck Stamp and Die set.  I just love the way these images look stamped on the card front.


Thanks for stopping by to take a peek. Have a great day!

Layered Holiday Truck - Day 2

September 29, 2021


Hello!  

Amy here with a darling new set called Layered Holiday Truck.
  Since it is officially fall, my truck is blue with some festive fall pumpkins!   


To highlight this adorable truck, I used the Quilted Frame Elle-ments.  To the oval behind the truck, the orange dusky sky was ink blended with orange ink.  To keep it simple, a sentiment, from Fall Picnic, was curved onto a block and stamped in black ink.  To keep this masculine, I layered my frame and scene onto kraft cardstock with no embellishements!  BUT I can't wait to use this truck done in RED for the holidays! 


Supplies:


Layered Holiday Truck Week - Day 1

September 27, 2021


Hi there, Caryn here today with a couple of cards and a video sharing some tips on using the Layered Holiday Truck stamp set.
I love this vintage style set and once you get everything lined up it creates a fun, retro look perfect for the holidays.


I made two cards - one Fall themed and one Christmas themed.  I love how they both turned out.
I pulled out some older die sets to create today's cards.  The first uses the gorgeous Quilted Frame Elle-ments in a dark, pine green. and layered some snowy hills behind the oval aperture using the Slimline Borders Elle-ments  


The little holly flourish is from the Prosecco-ho-ho stamp set and I created the sentiment banners using the wavy banner from the Easy Layers 1 Elle-ments set.


For the second card I created a simple Thank You card by stamping the truck in two shades of blue and then loading it up with the little pumpkin stack from the set.  I die cut the Star Scene elle-ments and then finished it off with the sentiment from the Invitation Frame Elle-ments.


Supplies:


Layered Pine Week - Day 5

September 24, 2021


Hi Everyone! I'm excited to share a Layered Pine and Layered Stars today! 

I started by stamping and embossing the pine branches on coordinating colored card stock. I especially love the white embossed pine branches! Then I stamped the pink start that hangs from the blue branches. Next, I die cut Merry from two shades of card stock and layered them. Finally, I adhered all of the elements to a few layers of card stock and stamped the remaining sentiment from Layered Stars. 
 

Thanks for stopping by!

Supplies:


Layered Pine Week - Day 4

September 23, 2021


Hello! I am popping in today to share two cute cards that I created using our Layered Pine Stamp Set.  I just love how these turned out.  I hope that you do too! :)

Thanks for stopping by to take a peek. Have a great day!

Layered Pine Week - Day 3

September 22, 2021


Hello!  
Amy here today with a fun layered set called Layered Stars.  


I decided to use this set in a non-holiday fashion.  This card could be sent to anyone needing encouragement, birthday, or congratulations!  

Using the Easy Layers 1 Elle-ments, the gray background and the banner shape were die cut.  The gray cardstock was stamped with the star stamp in Versamark ink for a tone on tone look to create a non-distracting background for my star banner.  The stars are SO easy to line up and make for a quick and effortless card!  My final layer of stamping on these stars was done in Versamark and silver heat embossed (as well as the sentiment).  For a final touch, some dimension was added with foam adhesive and some silver pearls for shine!


Supplies:

Layered Stars
Layered Stars Elle-ments
Easy Layers 1 Elle-ments


Layered Pine Week - Day 2

September 21, 2021


Hello friends, 

Katie here with a dreamy holiday card to share with you today featuring two of the new layered stamp sets: Layered Pine and Layered Stars.  I have really enjoyed using these new layered designs. It's absolutely thrilling to watch an image come to life before your eyes with such simple supplies like stamps and ink!


First I stamped the layered pine branch and shiny foil stars using complimentary shades of dye ink. Next I began work on the background by die cutting a panel of Distress Heavystock paper with the stitched rectangle die from the Easy Layers 1 Elle-ments set. 


I blended the Heavystock with Distress Oxide ink in Salvaged Patina and spattered the panel with water to lift the ink in spots. I arranged the stamped elements on the panel and then stamped the sentiment with Versamark ink before heat embossing it with silver embossing powder. 

With the sentiment in place, I adhered the other elements to the panel, affixed the completed panel to an A-2 card base and added a few flat sequins as a finishing touch. 

Supplies:


Thanks so much for stopping by! Have a great day!

Katie


Santa Paws - Day 6


Santa Paws is coming to town?! I LOVE creating for the holidays! Here is a fun card to add to my Christmas stash...


I started the card by stamping, die cutting and coloring the cute dogs from Santa Paws! There are four in the set and I love ALL of them! Next, I inked up the background and added 3 card stock strips. Finally, I stamped the sentiment and adhered all of the fun images on the card base!


Thanks for stopping by! I can't wait to see what YOU create! - Ashley

Layered Pine Week - Day 1

September 20, 2021


Hey there, it's Caryn here today sharing a card using some new products from the fall 2021 release as well as a couple of older ones! 

I've been having so much fun designing and using the layered stamp sets we have at Avery Elle.  Today I'm showcasing 2 of them - the Layered Holiday Truck and the Layered Pine stamp sets.  


A few tips I often use when creating with these sets is to use the MISTI and load all the layers of the image onto one platform.  This helps to stamp several images at a time.  For example, the Layered Pine set consists of two images so I put them into my stamping platform and make sure to use the exact same size piece of card each time.  You can use a square or rectangular die to be extra precise! In this case I cut squares of 9mm length.


To help line up the second layer of the stamp I sometimes use the printed carrier sheet that the stamps live on.  This can really help if the images are a bit more difficult to see through.


I used the same techniques when stamping the truck and the trees  It can take a bit of trial and error but once you have everything lined up you should get great results.

Once I stamped all images I die cut the Snow Scene Elle-ments in white and blended some aqua blue ink over the top half of it.  I used the wavy banner from the Easy Layers 1 Elle-ments and stamped the sentiments from the Layered Holiday Truck set onto them.  

Here's a wee tip when you want a curved sentiment but the stamp is straight.  Die cut the piece you want to stamp onto.  The flip it over so the front side is facing down and put a clear stamping block on top of it.  Curve your sentiment to the shape you want it to stamp onto then turn the die cut back over and ink up your stamp and it will be lined up to the shape of the die cut! 


I made the wee Happy Holidays flag from the same wavy banner die but snipped it in half and added a slither of card for the the stick!

Supplies:


An Avery Elle Stamptember Exclusive at Simon Says Stamp

September 18, 2021


Hello!  We wanted to pop in to let you know that we have an exclusive stamp set with our friends over at Simon Says Stamp in honor of their STAMPtember event.  


This stamp set is only available at Simon Says Stamp while supplies last so be sure to head on over there if you want to get it.   We hope you LOVE it!

I created this pretty card using this set.  It was so fun to color and create!


Thanks for stopping by to take a peek. Have a great day!
Jamie

Santa Paws Week - Day 5

September 17, 2021


Hi all! It's Deasy here. Today I want to share my card for Avery Elle featuring Santa Paws. This stamp set is so cute, full of adorable dogs and they are ready for Holiday. I have so much fun play with it!

Avery Elle supply that I'm using : 

Santa Paws Clear Stamps for the images and sentiment

Santa Paws Elle-ments to die cut the images

Easy Layers 1 Elle-ments to die cut the frame and banner for the sentiment

The Spring Collection Paper Pad for the patterned paper


I stamp, color the images using copic then die cut it. The sentiment is from white embossing powder. .

Thank you so much for stopping by and happy crafting!


Hugs,


Melania Deasy

Santa Paws Week - Day 4

September 16, 2021


Hello!

It's Yainea here today featuring the super cute Santa Paws stamps and coordinating dies. Each one of the puppies are adorable! So I created a Christmas card using the little and happy dachshund and I loved coloring him so much hehe.

I used Distress inks to color the sky background and alcohol markers for the puppy. Then I put together the scene with some vellum paper and created the snow with white enamel liquid dots. Finally, I added some sequins.

Thank you so much for stopping by, have a wonderful day!

Supply list:


Santa Paws Week - Day 3

September 15, 2021


Hello!  Amy here featuring the cute Santa Paws set.

This card was started by ink blending the background with Distress Inks and ink splattering with metallic watercolors (blue and silver).  The snow hills were done using the Slimline Borders Elle-ments and glitter was added to the edges.  The hills were added to a panel die cut using the Easy Layers 1 Elle-ments.


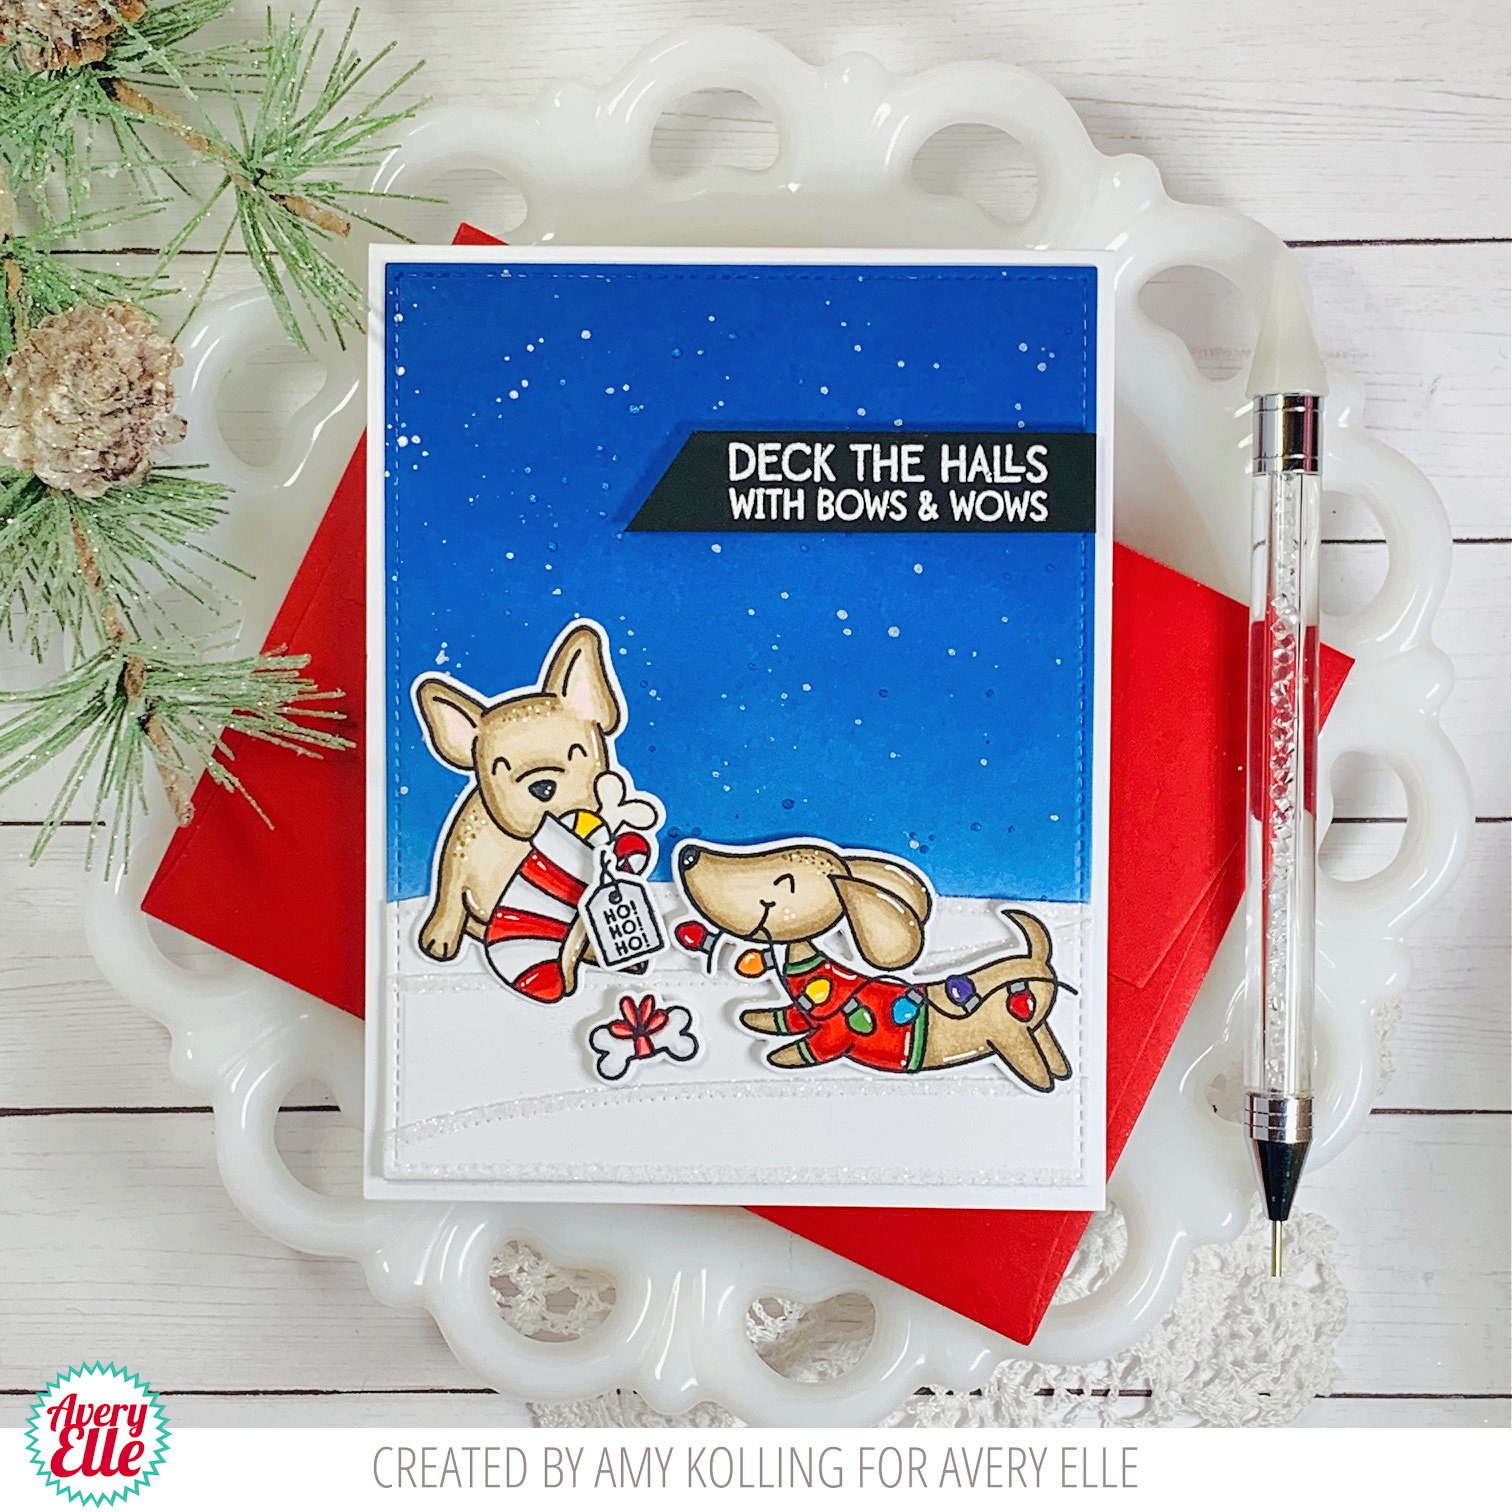
How adorable are these puppies getting all ready for Christmas??  They were Copic colored, die cut, and added to the card with foam dimension.  The sentiment was white heat embossed onto a black sentiment strip with foam dimension.  


Supplies:

Slimline Borders Elle-ments
Easy Layers 1 Elle-ments
Santa Paws
Santa Paws Elle-ments

--Amy ♥


Santa Paws Week - Day 2

September 14, 2021


Hello friends, 

Katie here with a video to share with you today featuring the Santa Paws clear stamps. These dog images are the cutest, and I had so much fun creating a few scenes for our festive pooches featuring colorful backgrounds. 


I used some post-it notes to mask off the rectangles and added Distress Oxide ink using blending brushes. 


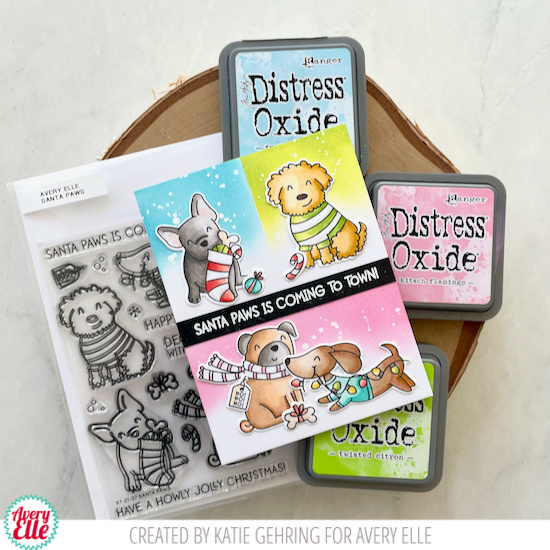
I hope you will take a peek at my video to see how it all came together!


Supplies: 
Santa Paws Clear Stamps
Die: Santa Paws Elle-ments

Thanks for stopping by! Have a great day!

Katie

Santa Paws Week - Day 1

September 13, 2021


Hi there!

Elena here with a fun card featuring the cute puppies from Santa Paws:


I stamped and colored my favorite dog of the bunch - I just love him running with his cute sweater on and the string of lights in his mouth!

I gave him a bird friend to frolic in the snow with - from the previously released Snow Fun - and set them against a striped blue sky. I framed them out with a scalloped piece from the Holiday Ephemera pack and added a sentiment to finish things off. 

I hope you like it!

Supplies:


Merry Circle Tags Week - Day 5

September 10, 2021


Hi Everyone! Today I'm sharing Merry Circle Tags. There are so many fun images and sentiments in this set! Let's look how I used this set on a card...

This card all started with the fun "No Peeking!" sentiment. I hide a dog from Santa Paws in a die cut circle and layered strips of cardstock across the top. I added a few details like the pom pom santa hat (stamp from Mr. and Mrs. Clause), glitter on the light pink strip and twine!


Supplies:

Santa Paws Stamps

Santa Paws Dies

Merry Circle Tags

Mr. and Mrs. Clause Stamps


Merry Circle Tags Week - Day 4

September 9, 2021


Hi everyone! Heather Campbell here. 

Today, I'm playing with the new Merry Circle Tags stamp set. I originally thought I'd make a set of tags with these but I thought it would be fun to show how this set is versatile to cards too! 

For my card, I stamped the circle tag outline 3 times. Then, I masked the outside of the circle and stamped the inside with critters from Christmas Critters. Once those were stamped, I masked the inside of the circles and added ink blending and LOTS of shimmer and white ink spray. 
I think this card is so fun! 

That's it from me today. Thanks for stopping by! 


Merry Circle Tags Week - Day 3

September 8, 2021


Hello! I am popping in today to share these cute tags I created using our new Merry Circle Tags stamp set.  I love them so much!


Thanks for stopping by to take a peek. Have a great day!

Merry Circle Tags Week - Day 2

September 7, 2021


Hi there!

Elena here, with a fun card featuring some products from our newest release:


I love the new Merry Circle Tags stamp set! It is so versatile and the sentiments are so great! I combined it with another new set, Mr. & Mrs. Claus. I stamped and colored the happy couple, and then stamped the circle frame from Merry Circle Tags overtop. I die-cut it using the circle and scalloped circle dies from Holiday Circle Tags.


To hide the fact that Santa and Mrs. Claus are riding a tandem bike, I used a bright red sentiment strip from the Holiday Ephemera pack, and also added a piece of striped patterned paper from the Holiday Collection Paper Pad. I love the extra pop of holiday red!

To finish off, I stamped a greeting from Merry Circle Tags just below the focal image.

I hope you like it! Thanks for stopping by!


Supplies used:


Merry Circle Tags Week - Day 1


Hey there, Caryn here today sharing a card using the Merry Circle Tags stamp set.  Instead of creating tags, I decided to showcase how great a set this is for creating backgrounds or patterns using all the tiny images.


I started by stamping the larger sentiment image in red ink in the bottom right corner of a panel cut using the Double Pierced Rectangle die collection.  I then selected the small holiday images one by one and stamped them in green until I had filled the rest of the panel 
To add a little contrast and "pop" I added a piece of red card to the back of the front panel using foam adhesive.and tied some twine around the panel.


To add a little bit more interest I added colour to the berries on the holly images and added a red heart bubble onto the twine.  
I love how clean and simple this design turned out!

Supplies:


site design by designer blogs