Brring On The Joy Week - Day 4

August 31, 2017


Hey everyone!!!  It's Heather Campbell here and I've got a card with the new Brring On The Joy stamp set!  These penguins absolutely crack me up and I just love all the elements that accompany these skating penguins!


You can see the entire card making process in the video below! 


I don't normally share videos of the entire card making process but just couldn't resist here! :)

I used the Wonky Stitches die to create a background and cut stars from the new Cityscapes die.  The banner is from Woodland Wonders and of course all of the penguin elements are from Brring On The Joy!

Thank you so much for stopping by and sharing part of your day with me!

Brring On The Joy Week - Day 3

August 30, 2017


Hello friends,

Katie here today to some inspiration featuring the Brrring On The Joy stamp set.  Below you can find a list of all the Avery Elle supplies that I used on my card.


I stamped the penguins, wreath, lights, gift and ice drift onto white card stock with Avery Elle's New Moon dye ink and colored in the images with Copic markers.  I die cut all the images using the coordinating Brrring on the Joy Elle-ments dies.


I adhered the images to a panel cut with the Wonky Stitches Elle-ments die and stamped the snowflakes from the stamp set with a light aqua ink.  Below the images, I stamped the sentiment in black ink.  I love a good pun and this one just makes me laugh!


As a finishing touch, I added a drop of Glossy Accents to each of the bulbs in the holiday light strand. The bulbs look so shiny and bright! 


Supplies: 


Be sure to watch the Avery Elle blog this week for even more inspiration and ideas featuring Brring on the Joy! 


Thanks for stopping by!
Katie


Brring On The Joy Week - Day 2

August 29, 2017


Hi everyone! Elena here, with a fun card featuring the new set, Brring On The Joy:


This set makes me giggle. I really love the way they can be positioned in different ways. This is like penguin-capades, with the one being tossed in the air!

I started out with a piece of mint cardstock, cut to fit the card-front (4.25in x 5.5in.) I then layered a Waves Elle-ments die cut over that. I love the interest and movement that it creates!


The penguins were colored with copic markers. I used T0, T1, and T4 to color the grey penguins, and B34, B37, and B39 to color their navy scarves.

To finish off the card, I cut stars (using dies from the new Festive Wreath Elle-ments) to fill the space above the penguins, and added a punchy black sentiment banner with a white-heat-embossed greeting.

I hope you like my card, and thanks for stopping by!

Supplies:

Brring On The Joy
Brring On The Joy Elle-ments
Waves Elle-ments
Festive Wreath Elle-ments
Pierced Banner Layer Elle-ments


Brring On The Joy Week - Day 1

August 28, 2017


This week we are featuring products from our Brring On The Joy stamp and die set.  This set is SOOO cute!  We hope that you enjoy the projects everyday this week.


Hello everyone!
It's Yainea here brrringing on the joy with a Christmas card that features the fun and cute Brring On the Joy stamps and dies. I love these penguins, they look like they're rushing to have all the Christmas preparations ready, haha.

I colored the images in my card with watercolor markers and then I used the coordinating dies and my die cutting machine to die cut them.
Then, I prepared my card base: I used an acetate piece where I adhered a pair of stripes of red paper from the Jewel Collection paper pad and another stripe, colored with Distress inks and a blending tool to create a "water" panel to place my penguins.


On the inside, I adhered a panel of white cardstock where I stamped my sentiment and some snowflakes.
Finally, I created my scene, adhering all the images to my card and added some shine and sparkle (this is a Christmas card after all, hehe) with some glossy accents on the candy cane and Christmas lights and some wink of stella touches on the present :)


I hope you like my card for today! Don't forget to keep checking out the Avery Elle blog during all this week for more inspiration using this fun set!

Have a nice day!

Supplies:
The Jewel Collection Paper Pad

I created this quick card and video as well.  Check it out below.


Supplies:

Thanks for stopping by to take a peek. Have a great day!

Warm Wishes Week - Day 5 & Video

August 25, 2017


Hi Everyone!  Have you enjoyed our Warm Wishes inspiration this week?  I have LOVED all of the design team's projects.  They are all SOOO fabulous!  I have a quick card and video for you today using this set.  I hope that you enjoy it!


 Supplies:


Thanks for stopping by to take a peek. Have a great weekend!

Warm Wishes Week - Day 4

August 24, 2017


Hi Everyone, Ashley here! I LOVE all of the holiday products right now and am super excited to share Warm Wishes with you today. One of the joys of Avery Elle stamps and dies is how well they work together. I'm going to share a fun combo with you today!


To create my card I stamped the large jar from Warm Wishes. Next I masked the bottom and stamped the ice burg from Brring on the Joy. Next I stamped the inside images, the tree from Warm Wishes, the penguin from Brring on the Joy, the lights from Sledding Critters and the star from Festive Wreath. See how well they all work together!


After I colored and die cut the images and die cut the back frame with Diagonal Stripes and Double Pierced Rectangles. The sentiment was embossed on black card stock to finish the card.


Thanks for stopping by!

Products used:


Warm Wishes Week - Day 3

August 23, 2017


Hi everyone!  Amy K. here sharing a tiny bit of inspiration using the new Warm Wishes stamps and coordinating Warm Wishes Elle-ments.  I am totally smitten with jars right now.  How cute is this new set?  You can customize the jars for the holiday or for everyday!  This is a set I will use all year round!

I love making mini cards and the jar die lends itself to a perfectly shaped mini card!  I started by creating my card by folding a piece of cardstock and placing the jar die (with the top cutting edge) just over the fold of the paper.  When die cut, this will create the top fold of the card!  

Warm Wishes

I created my mini scene by coloring the tree images and winter sky with Copics.  I added some "snow" with a glue pen and Prisma Glitter.  Then, I added my die cut trees with foam adhesive.  I die cut the santa's sleigh and reindeer (from Cityscape Elle-ments) from black cardstock and added them over a small standard die cut circle.    To finish, I stamped the bow from Warm Wishes in Cherry Pigment Ink and die cut.  The bow was added and topped off with one tiny rhinestone!  For a sentiment, I stamped the Warm Winter Wishes on the inside of the card.  This would be a perfect gift tag or just use as the mini card it is!  Either way, I have one tag/card done for the holidays!

Thanks so much for sharing part of today with me!

Supplies:
Warm Wishes
Warm Wishes Elle-ments
Cityscape Elle-ments
Cherry Pigment Ink

Warm Wishes Week - Day 2

August 22, 2017


Hi everyone! It's Deasy here. Today I want to share my card featuring Warm Wishes stamp set. I combine it with Winter Woodland Wonders to make an adorable shaker card and they look perfect each other!


Avery Elle supply that I'm using : 
Warm Wishes Clear Stamps for the images and sentiment
Warm Wishes Elle-ments to die cut the images and white landscape inside the jar
Winter Woodland Wonders Clear Stamps for the critters image
Winter Woodland Wonders Elle-ments to die cut the critters images

I stamp, color the images using copic then die cut it. I color inside of the jar using Distress Ink Tumbled Glass with blending tool then cut it with my scissor. The sentiment is from silver embossing powder. To color the background, I'm doing some masking and using Dye Ink with blending tool then splash water with my brush.

Thank you so much for stopping by!

Hugs,

Melania Deasy

Warm Wishes Week - Day 1

August 21, 2017


Hello and Happy Monday!  Thank you so much for all of your sweet comments last week for our Bewitching and Bad Kitty projects.  You guys are the best and your kind words put huge smiles on our faces!! This week we are featuring our new Warm Wishes Stamps and Dies.  


Caryn is kicking off the week for us.  Take a peek!

"Hey there Avery Elle fans.  It's Caryn here today sharing a card using this week's featured stamp set from the latest release.  All this week the design team will be sharing what we've created using the Warm Wishes stamp set and dies along with many other fabulous products from the Avery Elle arsenal!

The Warm Wishes stamp set contains 2 jar images which would make great gift tags but for my creation I went with a card.  I decided the North Pole image from Frosty Friends would fit perfectly inside the larger jar so with the addition of the snowbank and little tree my winter scene came together in no time.


 I used to really struggle with trying to colour something that's white or clear (snow, glass, polar bears, etc).  I would overcomplicate things trying to shade with different colours and depths but then I decided to chill out (pardon the pun) and discovered that it's actually really easy to get the feeling of snow or ice very simply.  For the glass jar and snow in my card I chose a pale, aqua Copic marker (in this case BG11) and just added highlights here and there around the edges of the images.  This gives the hint of light that is reflected from something bright white like ice.  To make it even frostier I used a Quickie glue pen on the snowy parts and sprinkled over them with some very fine crystal glitter.  In this case the background patterned paper panel (from the Sorbet Collection paper pad) acts brilliantly to draw the eye in to the focal image and add even further to the winter colour scheme.


Supplies:
New Moon Dye Ink


Thanks so much for stopping by today."


Bewitching & Bad Kitty Week - Day 5

August 18, 2017


Hi Everyone! It's Ashley here and today I'm featuring the new Bad Kitty stamps and dies.


To create my tag (perfect for Halloween treats!), I stamped and die cut the cat and pumpkin from Bad Kitty and colored them with Copics. Next I cut the tag from Shaker Tag Dies, the fench from Picket Fence Dies and the moon & cloud from Cityscapes Dies. I added the background color with Distress Inks and then assembled by tag. 


Thanks for stopping by!

Products used:

Bewitching & Bad Kitty Week - Day 4

August 17, 2017


Hey everyone! It's Heather here and today I'm playing with the new Bewitching stamp set and coordinating dies.

I love all things Halloween so I'm thrilled to have this new set.  I can tell you I will be using this set a lot come October to make some spooky treats for the neighbor kids!

First, I used this little witch and made her the star of the show in a spooky ink blended night sky!  The houses, moon and clouds are die cut from the new Cityscapes die. The frames is from the Scalloped Pierced Rectangles die.

I added a good amount of sparkle to her cape and hat.  I love adding details like this!

Since I had all of the images from Bewitching stamped and ready to go, I decided to create one more card with the ghosts!  I had the hardest time choosing which face to put on my ghost but I'm pretty happy with how they turned out.   

I used the Cityscapes die to create a city in the background and then added the path to show the trail to the spooky city in the night.  I'm not exactly sure which of the dies in this Cityscapes die set is my favorite - because I know I'm going to get a lot of use of that city die... but... I love these stars!  I simply added yellow behind the cardstock to create colorful stars. 

Thanks so much for stopping by and sharing part of your day with me! 
I hope you have a wonderful day! 
 :), Heather

Bewitching & Bad Kitty Week - Day 3

August 16, 2017


Hello friends,

Katie Gehring here to share some inspiration featuring the Bad Kitty stamp set and coordinating Elle-ments dies.  A list of the Avery Elle products that I used on this card (with links) can be found at the end of my post.
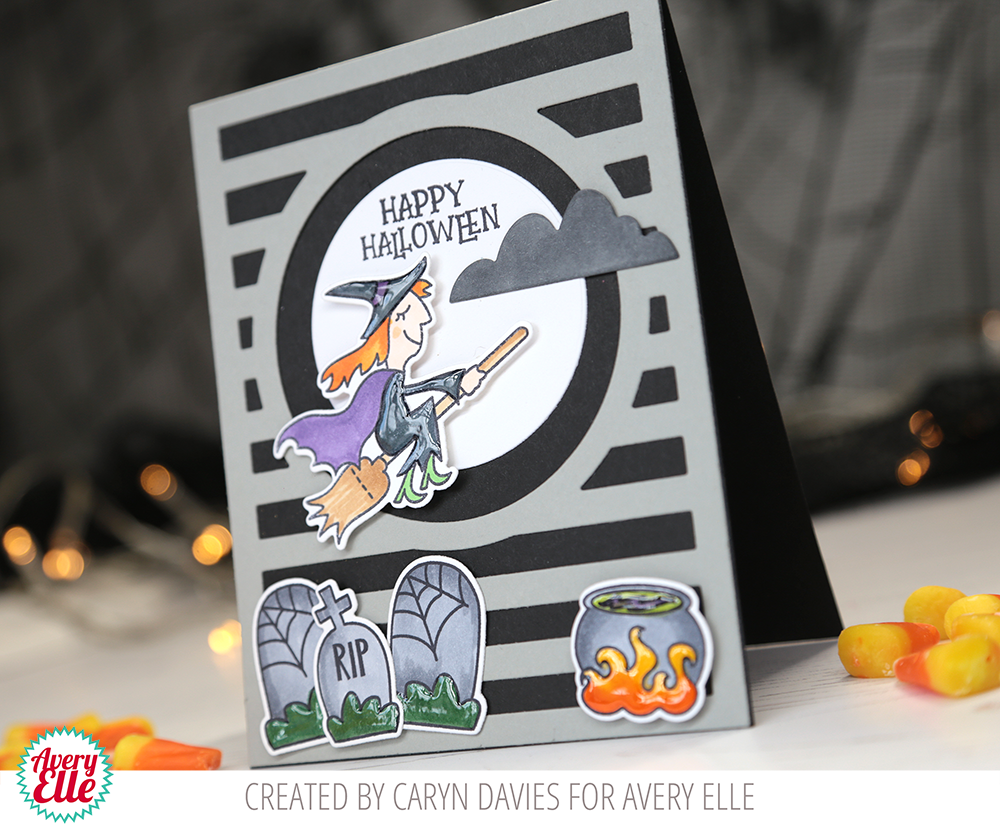

This bad kitty rules the night, especially around Halloween.  I stamped, colored and die cut the kitty and her witches hat from white card stock.  Next, I set about building the background for the card.  

First, I inked a panel of watercolor card stock with three shades of Distress Oxide inks- Faded Jeans, Wiled Violet and Picked Raspberry. I sprayed the panel with water and blotted the droplets to create the starry night effect.   Once the panel was dry, I highlighted a few of the stars with a white colored pencil to help them stand out a bit more against the background. 


I die cut some of the elements from the new Cityscape Elle-ments die.  I adore this set of dies as it has features that make it perfect for both Halloween and Christmas! After die-cutting the moon from yellow card stock, I sponged some Distress Oxide ink in Fossilized Amber along the one edge and I stamped the "Happy Halloween" sentiment in black ink in the center of the moon. 

Once the background was complete, I used the Double Pierced Rectangles die to trim the panel and create a border around the edge of my A2 note card. 

Supplies: 

Thanks so much for stopping by!
Katie

Bewtiching & Bad Kitty Week - Day 2

August 15, 2017


Hey there!  It's Caryn and today I'm sharing a fun and spooky little number I created using some of the AHHHH-mazing new products from the brand new Fall 2017 release.  I won't lie, after Christmas, Halloween is my favourite of all the holidays.  As much as Summer is great, I can't wait for the shops to start displaying their Autumn/Fall wares.  In fact I was in Costco a couple of weeks and they were already starting to bring out their new Halloween goodies - woohoo!!


So onto today's card.  I've used the fabulous Bewitching stamp set (that little witch is a hoot) and thought it would pair great with the Horizontal Stripes frame die from the Summer release and a couple of the elements from the new Cityscape (swoon) die set..


I started with a black A2 card base and die cut the frame from grey cardstock.  I stamped (using the New Moon Dye ink from Avery Elle (perfect with alcohol markers) and die cut the witch, tombstones and cute little cauldron from the Bewitching stamp set and coloured them with Copic markers.  The sentiments in the set were slightly too large for this card so I took the Happy Halloween from Bad Kitty and it fit just perfectly!  For some extra bling I added touches of Glossy Accents here and there which is a great way to lift the card and give more interest.  The circle (moon) and the cloud are from the Cityscape die set which I know has gone straight to the top of my favourites list!


Supplies:

Thanks so much for stopping by today xxx

Bewitching & Bad Kitty Week - Day 1

August 14, 2017


Hello everyone!  I wanted to let you know that we are changing up the way we present inspiration here on the Avery Elle blog and social media sites.  Starting this week we will now be featuring one (sometimes two) stamp sets for the whole week!! You will get loads of inspiration projects each week.  This week we are featuring our new Bewitching and Bad Kitty Clear Stamps.  I hope you love what you see as much as we do!!


Yainea is kicking off the week with this fun card.  Take a peek.

"Hello everyone!  It's Yainea here and today I'm sharing a fun Halloween card featuring Bewitching stamps and dies from the amazing and brand new Fall 2017 release.

Even if Halloween is not very popular here in Spain, it has been growing a lot in the last years and I must say it's one of my favorite holidays! I love the color combos, all the spooky-cute decorations and, of course, making Halloween cards!

I love that this set has a bunch of different elements that are perfect for creating different kinds of cards. I wanted to use those fun ghosts so I created a little scene combining them with the picket fence and grass border dies from Picket Fence Elle-ments.


I colored the background with water and ink, letting it dry between layers and colored the images with alcohol markers. I used a banner die from Pierced Banner Elle-ments and used a Double Pierced Rectangle die to cut my base and match the banner.
As a final touch I tied some Midnight twine on the top of the card and, to add a little interaction, I put an action wobbler on the back of one of the ghosts, so fun!


Thank you so much for visiting us today, have a nice day!"


Supply list:

I have also created two quick videos showing how I made these cards using our Bewitching and Bad Kitty clear stamps and dies.  Check it out.


One last thing...The winner of our blog hop from last week is Rebecca Ednie.
Rebecca Ednie said...
I love the snowflakes and snowmen.
 Congratulations!!!  Please send us an email to customerservice at averyelle dot com so that we can get your prize to you.

Thanks for stopping by to take a peek. Have a great day!

Avery Elle Fall 2017 Design Team Blog Hop

August 10, 2017


I am so excited because our Fall 2017 Release is finally here!!  We have an amazing blog hop full of inspiration today and we are so glad that you are here. Thank you so much for all of your comments and likes during our previews this week.  We read each and every comment and it really makes our day!!

For a summary of all of our new products that are available for purchase right now check out this section in our store .  Be sure to scroll all the way to the end of this post to read about the fun giveaway we are having.  We will be showcasing projects using our new sets starting today and will continue to show them throughout the next few months.  I can't wait!

 Let's get to the hop.  I have a ton of projects to share with you today!


Avery Elle / Jamie - YOU ARE HERE
Karolyn Loncon
Caryn Davies
Heather Campbell
Yainea
Melania Deasy
Katie Gehring 
Amy Kolling 
Ashley Marcu
Elena Roussakis

To celebrate our Fall 2017 Release Blog Hop, Avery Elle is giving away a $25 Gift Certificate to one random winner.  To enter to win just comment on this post.  There is no purchase necessary and you must be 18 years of age or older to enter.  This giveaway is void where prohibited.  You can also do options 2, 3, 4, 5 or all 6 of the following to increase your chances of winning. You have until midnight Sunday, August 13th to enter.  The winner will be announced on the Avery Elle Blog on Monday, August 14th .  All products are available for purchase in the Avery Elle store right now.
To enter to win you can do 1, 2, 3, 4, 5 or all 6 of the following to increase your chances:
  1. Comment on any of the design team's posts and/or here on the Avery Elle Blog
  2. Follow us on Twitter and tweet the contest (we are @averyellestamps )
  3. Follow us on Instagram (we are @averyellestamps).  Comment on the Avery Elle blog if you already belong
  4. Follow us on Facebook (we are www.facebook.com/AveryElle ) and share us with your friends - make sure they tell us you sent them.
  5. Follow us on Pinterest
  6. Become a blog follower through email (comment on the Avery Elle blog if you already follow us)
  7. Join our Flickr group (comment on the Avery Elle blog if you already belong)
 Thanks for stopping by to take a peek. Have a great day!
 
site design by designer blogs