Starry Scene Week - Day 4

August 31, 2018


Hi Everyone, Ashley here! Have you started making your holiday cards? I love making them one at a time and starting early then I have a fun collection for the holidays!

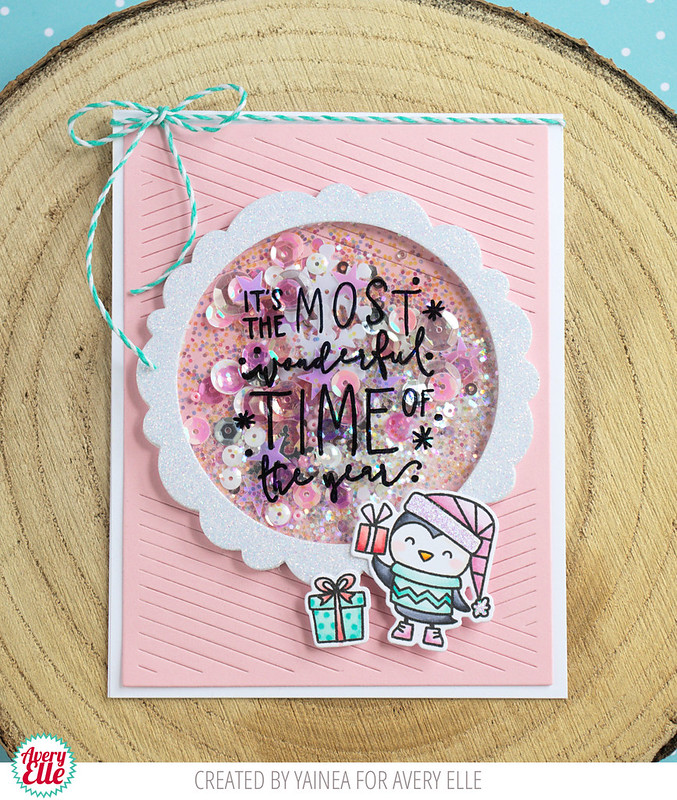
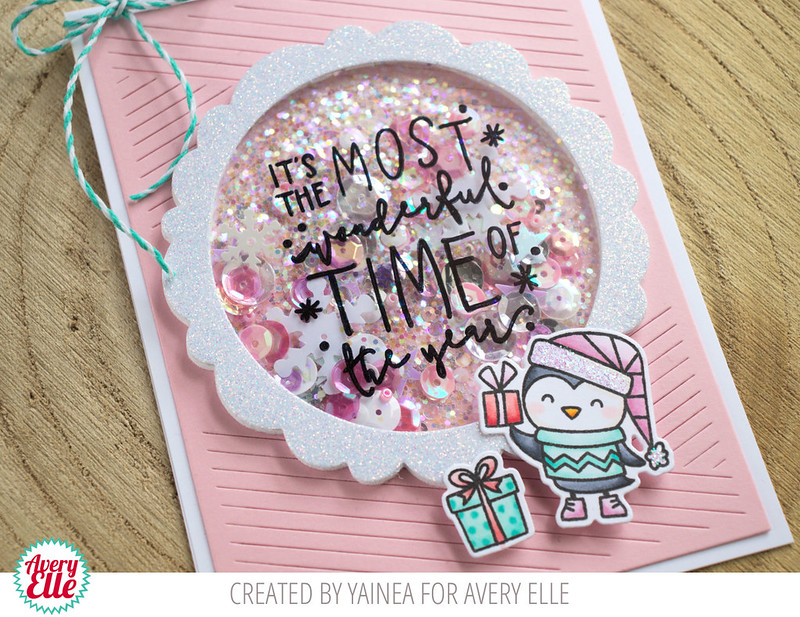
Today I created my card using Starry Scene and Polar Peek a Boo Pals. Let's check it out!


I started this winter scene with the background. I stamped the star sky with Distress Oxides. I tried MANY different kinds of ink for this look and Distress Oxides ended up being my personal favorite. I found applying the ink to the stamp with an ink blender gave the best results. I also had my stamp and paper set up in a Misti so I could easy stamp it several times. 

Next I stamped the mountains, bear and fox and colored them with Copics. I hand cut the hills and added Coarse Glitter to the tops. I finished the card with a sentiment from Fireside.


Thanks for stopping by!

Supplies:

Starry Scene Week Card & Video - Day 3

August 30, 2018


Hey y'all!  Heather Campbell here with a card and a video to share today!


Curious to see how I created my card?  Check out the video below...


Supplies: 

Starry Scene Week - Day 2

August 29, 2018


Hello friends,

Katie here with a card to share with you featuring the Starry Scene stamp set. This stamp set creates a dreamy backdrop for holiday cards and more.


For my card, I inked the starry sky image with Avery Elle's pigment inks in Orchid and Sea Glass.  I applied the inks to the stamp with a foam ink blender to help join the inks without a harsh line between the two colors.  I stamped and colored the mountains and and trees with Copic markers. 


To complete the scene, I added the little snowman and one of the sentiments from the Christmas Magic stamp set. The snowman looks so cute against the starry mountain scene!


Supplies:


Thanks so much for stopping by!

Wonky Circles Frames With Yainea

August 28, 2018


Hello!!

It's Yainea here today featuring the new super cool Wonky Circle Frames- I love these kind of dies that are so versatile. It's perfect to frame a sentiment, a scene, an image, create a shaker...

Every year I love to create at least a Christmas card with a pink color combo, this time I combined it with aqua to create this little shaker card.

I kept the design very simple but I added lots of sparkle :)


I used the pretty Hatch Mat die to add texture to my background, then I created my shaker with the biggest die of the Wonky Circle Frames, cutting one layer of white glittery cardstock and another from foam. I stamped the sentiment from Comfort & Joy on acetate and filled the skaker with a mix of sequins and some Avery Elle Coarse Glitter.


Finally I added the cute penguin from A Merry Little Christmas set (which I previously colored with alcohol markers and die cut) and tied some Aquamarine Hemp Twine on top.

I hope you like it!! Have a wonderful day! :)

Supply list:

Starry Scene Week - Day 1

August 27, 2018


Hello everyone!  Nicky here with you today sharing my card featuring 'Starry Scene' a new stamp set from Avery Elle.


First of all I stamped out the background in navy Memento Ink, the background features star shapes which remain white (they haven't photographed well but in person you can see them through the micro stars I applied playfully over the top).  This backdrop was applied over an ink blended A2 panel.


On Bristol Smooth cardstock I stamped out the mountains and fir trees which I then watercolour painted and die cut.  I layered them into the scene with varying amounts of dimensional foam tape.  I then reached for the super adorable moose from 'Polar Peekaboo Pals' and similarly stamped, painted and die cut and then tucked him behind the trees to have him peeking out.


Finally I stamped the sentiment in navy Memento ink and applied it.

This is a very dimensional and weighty card and I hope you have enjoyed it.

Until the next time, Nicky x


Grateful With Caryn

August 25, 2018


Hey there, Caryn here with a card I created using the gorgeous new Grateful stamp set and co-ordinating dies.  This is only a small set (3x4 ") but it certainly packs a punch and you can create so may different looks.  I stamped the oak leaves a few times with Avery Elle Truffle dye ink so I could use some warm, fall colours from my Copics collection.  By using a brown ink rather than a black or grey, it helps to give an overall Autumnal tone to the colour scheme.


I stamped and die cut the little acorns and added some little dots of colour which adds a bit more texture than just colouring a solid blend.

For the card base I opted for a stone colour, again to bring in some warmth and then die cut a panel using my all time favourite Avery Elle background die, Horizontal Stripes Elle-ments from white card.  If you haven't added this die to your collection yet then you must - it is SO useful.  
To bring everything together I arranged the leaves into a kind of swag or wreath on the front of the panel and then stamped the "thankful" sentiment from the set (SO happy that this sentiment has a co-ordinating die) and die cut it and finished off with a small banner with the "for you" stamped on to it.


Supplies:

Thanks so much for stopping by.

Grateful Card & Video with Jamie

August 24, 2018


Hello and Happy Friday!  I am popping in today with a quick card and video to share with you.  I hope that you enjoy!


Thanks for stopping by to take a peek. Have a great weekend!

Grateful With Ashley

August 23, 2018


Hi Everyone, it's Ashley! Today I'm excited to share the Grateful stamps and dies. I've also used a few other stamp sets in this release because they are so fun to mix and match!


I created the background with Starry Scene and Sapphire Pigment Ink. Next I used the Photo Mat dies to create the ink blended scene. The beautiful sentiment is from Grateful. I LOVE having the die set to match. Adding the gold shadow was so easy. Finally, I added a few trees from Starry Scene.


These stamp and die sets are so fun. I can't wait to see what YOU create.

Grateful With Amy

August 22, 2018


Hello!  Amy K. sharing a fall inspired card even though I'm not ready for summer to be over!  I'm using the new Grateful stamps and Elle-ments.

Grateful

I created a loosely colored fall wreath out of the Wonky Circles Frames Elle-ments.  I watercolored the "wreath" by mixing Cherry and Celery watercolors until they turned brown.  I I loosely colored the leaves from this set as well.  I did 2 layers of watercolor for some depth.  Cherry, Fizz, and Celery watercolors were all I used!  

Grateful2

To create the background, I adhered 1/2 inch strips of white cardstock across my top folding notecard.  I added the wreath wtih liquid glue.  For the sentiment, I stamped and die cut (several times and stacked them) the thankful word along with a small sentiment strip.  To finish, I added some sparkling clear sequins.

Supplies:
Grateful Clear Stamps
Grateful Elle-ments
Wonky Circles Frames Elle-ments
Cherry Watercolor
Celery Watercolor
Fizz Watercolor

A Merry Little Christmas with Melania

August 21, 2018


Hi everyone! It's Deasy here. Today I want to share my card for Avery Elle featuring Let it Snow Dies. I love this dies because it's so versatile and super fun for any themes you can imagine!


Avery Elle supplies that I'm using :
Let It Snow Elle-ments to die cut the snow and the window background, the snowflakes and sentiment on silver glitter card stock
A Merry Little Christmas Clear Stamps for the images
A Merry Little Christmas Elle-ments to die cut the images

I stamp the images, color it using Copic then die cut it. To color the background. I'm using Distress Ink Tumbled Glass and Mermaid Lagoon with blending tool then splash water and white watercolor with my brush.

Thank you so much for stopping by and happy crafting!

Hugs,

Melania Deasy

Designer Blog Hop Winner

August 20, 2018


Hello! I am popping in today to announce the winner of our Designer Blog Hop.  Congratulations to Cristina!

Cristina said...
These are adorable!! Just when I thought I was all set for Christmas... but I cannot resist these stamps! :)
 Please email us at customerservice at averyelle dot com so that we can get your prize out to you.

Thanks for stopping by to take a peek. Have a great day!

Sending Peace Week - Day 5

August 17, 2018


Hi Everyone! Ashley here sharing Sending Peace along with the incredibility cute animals from Polar Peek-A-Boo Pals.


This cards all started with the sentiment "joy to the world". I love the font, isn't it the best? I heat embossed the sentiment and fit it in to a circle die I hand on hand. I blended Distress Ink and splattered it with water from a paint brush.


Next I stamped, die cut and colored a few animals from Polar Peek-A-Boo Pals. It was so hard to choose which animals I wanted to included! I love them all!


Finally, I blended a few sun rays on a card base using Post-it tape and adhered the card together.

I'm having a great time creating my first holiday cards! What are you working on?

Thanks for stopping by!

Supplies:

Sending Peace Week - Day 4

August 16, 2018


Hey everyone!  It's Heather Campbell here.  How are you enjoying the new release?  I'm having so much fun playing with each and every one of these sets. :)
For my card today, I paired the beautiful sentiments from Sending Peace with some Christmas critters from A Merry Little Christmas

To create my card, I ink blended a background and then spritzed it heavily with some shimmer spray.    Then, I heat embossed the sentiment.  Then I cut my white piece of cardstock and adhered Avery Elle coarse glitter to it!  I love this look!  Finally I stamped, die cut and adhered the writers to my card with dimensional foam.  Lastly, I accented the sky with snow made with a white gel pen! 

Thanks so much for stopping by and sharing part of your day with me!  Have a great one!

Sending Peace Week - Day 3

August 15, 2018


Hello friends,

Katie here with a sweet and simple card to share with you today featuring the Sending Peace stamp set.


I really adore the beautifully styled Peace Love and Joy words in this stamp set, so I stamped the sentiment in bold black ink.  Next, I stamped all the small images in green, red and yellow inks clustering them around the sentiment.


I die-cut the stamped panel with the Double Pierced Rectangles die, and adhered it to a green A2 notecard. As a finishing touch I adhered some flat sequins to the card. 

Supplies

Thanks for stopping by!
Katie

Sending Peace Week - Day 2

August 14, 2018


Hey there, Caryn here sharing a card using the gorgeous new holiday set, Sending Peace.  I thought I'd go for non-traditional colours for this one and used some of my favourite Avery Elle Pigment Inks - Sugar Plum, Magenta and and Raspberry.  I blended the inks onto some white card (smooth Bristol card is good for this, the inks blend beautifully) and then used the new Three Stars Elle-ments to die cut the stars. 


I used my MISTI to stamp the three sentiments stamps in a graduated colour from purple to pink to match in with the colour on the stars.  To finish I added a spritz of shimmer to the stars before adding them onto the card.


Supplies:

Pigment Inks: Sugar Plum, Magenta and Raspberry

Sending Peace Week - Day 1

August 13, 2018


Hello everyone, Nicky here with you today and sharing a card using 'Sending Peace' from the brand new Avery Elle release.  This stamp set would work well both on its own or in conjunction with your other Avery Elle stamps since it consists of mostly words together with a few mini images.


My card/giant gift tag started with an A2 panel of Bristol Smooth cardstock which I ink blended using Distress Oxide Inks in Worn Lipstick and Twisted Citron.  I then splattered on some water and blotted it up to distress it.  I thoroughly wiped the surface with my embossing buddy and then placed the panel in my Misti, laid out the word stamps and stamped with Versamark Ink then heat embossing in silver.  Next the panel was die cut using the Avery Elle die called A Tag For All.  I die cut the matching back piece with another piece of white cardstock and the little silver binding piece for the top was die cut in glittering silver cardstock.


On a little piece of white cardstock I stamped and embossed the other little sentiment words and the dove and applied after die cutting with dimensional foam tape.   I scored the back panel about a half inch from the top so that it could be flexed to have the card stand up and adhered it to the front panel and bound the top with the glittered piece.


The finishing touches were the application of a few sparkling clear sequins and I tied some cream/silver baker's twine through the hole at the top.

Thank you for stopping by the blog today, see you next time!

Nicky x


Fall 2018 Release Designer Blog Hop

August 9, 2018


I am so excited because our Fall 2018 Release is finally here!!  We have an amazing blog hop full of inspiration today and we are so glad that you are here. Thank you so much for all of your comments and likes during our previews this week.  We read each and every comment and it really makes our day!!

For a summary of all of our new products that are available for purchase right now check out this section in our store .  Be sure to scroll all the way to the end of this post to read about the fun giveaway we are having.  We will be showcasing projects using our new sets starting today and will continue to show them throughout the next few months.  I can't wait!

 Let's get to the hop.  I have a ton of projects to share with you today!


Supplies:

Supplies:
Let It Snow Die Set
New Moon Dye Ink
A Merry Little Christmas Stamp & Die Set 


Supplies:
Three Stars Die Set
New Moon Dye Ink
Merry Merry Clear Stamps
A Merry Little Christmas Stamp & Die Set


Supplies:
Oval Burst Die Set
Christmas Magic Stamp & Die Set
New Moon Dye Ink
Coarse Glitter


Supplies:
Corner Sentiments Holiday Stamp Set
Polar Peek-A-Boo Pals Stamp & Die Set
New Moon Dye Ink
Pure White Embossing Powder
Wonky Scalloped Frames Die Set


Supplies:
Fireside Clear Stamps & Dies
New Moon Dye Ink
Pierced Mat Die Set
Rich Gold Embossing Powder


Supplies:
Gift Box Card Holder Die Set
Snow Tags Clear Stamps & Dies
Pure White Embossing Powder
The Happy Collection Patterned Paper Pad
Aquamarine Hemp Twine


 Supplies:
Horizontal Stripes Die Set
Grateful Clear Stamps & Dies
New Moon Dye Ink
Rich Gold Embossing Powder

 Supplies:
Peaceful Pines Clear Stamps & Dies
New Moon Dye Ink
Celery Pigment Ink
Cherry Pigment Ink
The Jewel Collection Patterned Paper Pad
Cherry Hemp Twine


Supplies:


 Supplies:
Horizontal Stripes Die Set
Sending Peace Clear Stamps & Dies
Pure White Embossing Powder
New Moon Dye Ink


 Supplies:
Burst Die Set
Photo Mat Die Set
New Moon Dye Ink
Snow Tags Clear Stamps
Polar Peek-A-Boo Pals Stamps & Dies
Strawberry Hemp Twine


 Supplies:
New Moon Dye Ink
Polar Peek-A-Boo Pals Clear Stamps & Dies
Wonky Square Frames Dies
3D Wonky Bow Dies
Strawberry Hemp Twine


 Supplies:
Wonky Circle Frames Dies
Starry Scene Clear Stamps & Dies
Quirky Christmas Clear Stamps
A Merry Little Christmas Stamps & Dies
New Moon Dye Ink
Pure White Embossing Powder


Supplies:


Supplies:
Polar Peek-A-Boo Pals Clear Stamps & Dies
Wonky Circles Frames Dies
Wonky 3D Bow Dies
Strawberry Hemp Twine
New Moon Dye Ink


Avery Elle / Jamie - YOU ARE HERE


Caryn Davies
Heather Campbell
Yainea
Melania Deasy
Katie Gehring 
Amy Kolling 
Ashley Marcu
Elena Roussakis
Nicky Meek


To celebrate our Fall 2018 Release Blog Hop, Avery Elle is giving away a $25 Gift Certificate to one random winner.  To enter to win just comment on this post.  There is no purchase necessary and you must be 18 years of age or older to enter.  This giveaway is void where prohibited.  You can also do options 2, 3, 4, 5 or all 6 of the following to increase your chances of winning. You have until midnight Sunday, August 12th to enter.  The winner will be announced on the Avery Elle Blog on Monday, August 20th .  All products are available for purchase in the Avery Elle store right now.
To enter to win you can do 1, 2, 3, 4, 5 or all 6 of the following to increase your chances:


  1. Comment on any of the design team's posts and/or here on the Avery Elle Blog
  2. Follow us on Twitter and tweet the contest (we are @averyellestamps )
  3. Follow us on Facebook (we are www.facebook.com/AveryElle ) and share us with your friends - make sure they tell us you sent them.
  4. Follow us on Pinterest
  5. Become a blog follower through email (comment on the Avery Elle blog if you already follow us)
  6. Join our Flickr group (comment on the Avery Elle blog if you already belong)

Thanks for stopping by to take a peek. Have a great day!

 
site design by designer blogs