Sledding Critters Week - Day 5

September 29, 2017


I am popping in quickly with a card and video using our new Sledding Critters Stamp & Die set.  Check it out. I hope you like it.


Thanks for stopping by to take a peek. Have a great weekend!

Sledding Critters Week - Day 4

September 28, 2017


Hello everyone!!!  It's Heather Campbell here.  Today I'm playing with the new Sledding Critters stamp and die set today!  I love this little stamp because it's relatively easy and already pre-assembled but there are so fun elements that you can add to your sleigh and tree that make it a lot of fun!

To create my card, I colored and die cut the sleigh, string of Christmas lights and the reigns for the sleigh (hint: the curved line that's in this stamp is the designed to be the reigns of the sleigh!)  I added the circles to the tree to make them into ornaments!

Then, to create my background, I used the new Winter Borders die to cut the dots for the snow and the trees for the background.  I stamped my sentiment on the banner is from Wonky Stitches and popped up all of the images on some dimensional foam.  Then, to top if all off, I added some Citrus twine to the top of my card!

Thanks so much for stopping by and sharing part of your day with me!  I hope you have a great day!

Sledding Critters Week - Day 3

September 27, 2017


Hello friends,

Katie here with more Sledding Critters inspiration to share with you!  This collection of critters in a winter sleigh is so adorable!  If you loved the Birthday Bus stamp set, you will certainly want to add its wintery counterpart to your collection.


I stamped the sled image from the Sledding Critters stamp set and colored it with Copic markers.  Next, I die cut the image using the coordinating Sledding Critters Elle-ments die


For the background, I die cut the snow balls and tree line images using the Winter Borders Elle-ments die from a panel of light gray card stock.  Next I die cut the panel using the Pierced Rectangles Elle-ments die and adhered the die cut panel to a white note card.  I adhered the sled image, stamped the sentiment with black ink and added a few clear droplets as a finishing touch. 


Thank you so much for stopping by!  Be sure to check back every day this week for even more ideas using the Sledding Critters stamp set!

Katie

Sledding Critters Week - Day 2

September 26, 2017


Hi there!

Elena here, with a fun card featuring Sledding Critters.


I loooved the critters found in the previously-released Birthday Bus, and this one features a few of the same characters. I was so excited to ink them up and start coloring! The bear with the snow goggles? I die.

I colored and die-cut the main image and stamped a greeting from Brring On The Joy directly onto the sled.

To back the critters, I grabbed a sheet of minty cardstock and ran it through the die-cutter using the Falling Snow die. I used it a ton last year and don't see myself putting it out of reach for this holiday season either. 


To frame the snow and sledding animals, I layered a Horizontal Stripes die-cut over my white card base. The tone-on-tone isn't busy, but is so much more interesting than just layering onto a plain folded card.

Finally, I stamped a few strings of lights to go across the top, and in the center, a wreath (from Brring On The Joy.)

I hope you like it!

Thanks for stopping by!

♥.

Sledding Critters Week - Day 1

September 25, 2017


This week we are featuring projects using our adorable Sledding Critters stamp & die sets.  The projects this week are amazing so be sure to stop by each day to see what our amazing design team has for you.  Today Yainea has the cutest card and tip on how to make a custom stencil as well.  Check it out!


Hello there!

It's Yainea here to share a card and a little tip on how to stretch your supplies!
Today I'm sharing a card featuring the cute Sledding Critters stamps and dies.
I started by stamping them on Bristol smooth cardstock with a waterproof ink and then used my Zig Clean Color Real Brush markers and a waterbrush to color them.

Because the image is full of critters and I used bold colors for my coloring, I decided to keep the rest of the card simple. I created a little scene with some favorite dies: the new Cityscape Elle-ments and the super versatile Picket Fence Elle-ments. And because it's  Christmas scene card, I wanted to add some snow. I love adding texture to my cards and a stencil seemed a great option to do that so I decided to create my own!


This is something really easy to do, you just need a piece of acetate and a die. I used the Falling Snow die, running it on top of my acetate piece several times until I have it completely covered of "snow holes". Then I placed my custom stencil on top of my piece of cardstock and applied some snow  embossing paste.


Once the background is covered with snow, make sure to clean everything with water so you can keep using your new stencil forever :) Then let the snow dry and you're ready to finish your card!

I adhered my scene panel to a kraft card base where I heat embossed the sentiment of the card and,
as a little detail, I used some Glossy Accents on the bear glasses, several colors of Nuvo drops on the Christmas lights and some twine for the top of the card :)


I hope you like my project and give a try to my little tip. You can create your own stencils using a lot of different big and small dies from different sets, just have fun!

Thank you so much for stopping by, have a great day!

Supplies:

Sledding Critters Clear Stamps
Sledding Critters Elle-ments dies
Cityscape Elle-ments dies
Picket Fence Elle-ments dies
Falling Snow Elle-ments dies
Double Pierced Square Elle-ments dies
Pure White embossing powder
Cherry Hemp twine

An Exclusive Set for Simon Says Stamp


Hello!  We wanted to pop in to let you know that we have an exclusive stamp set with our friends over at Simon Says Stamp in honor of their STAMPtember event.  

This set is only available at Simon Says Stamp while supplies last.  Check it out here!    We hope you LOVE it!
 I created this quick card using the set.  Isn't this the cutest?!

Supplies:

Thanks for stopping by to take a peek. Have a great day!

Winter Woodland Wonders Week - Day 5

September 22, 2017


Hi, it's Caryn here kicking off a week of Winter Woodland Wonders inspiration!  This set is packed full of cute festive critters and makes scene-building a breeze!

I started with a cream card base and cut a panel using the larges of the Double Pierced Rectangles Elle-ments.  I blended my background using Distress Oxide inks and then splattered a little shimmer spray on it for some subtle texture.


I stamped the robin, polar bear and trees in New Moon Dye Ink and coloured with Copics and added a few details here and there with Nuvo Glitter Drops in White Blizzard.  Finally I stamped the sentiment in black and popped my die cut pieces onto the card using foam tape.


Supplies:

Thanks so much for stopping by.

Winter Woodland Wonders Week - Day 4

September 21, 2017


Hi Everyone! Ashley here sharing a few tips using the new Winter Wonderland Wonders stamp set and dies. I love creating layered scenes and I'm going to share how easy it is with you today!


To 
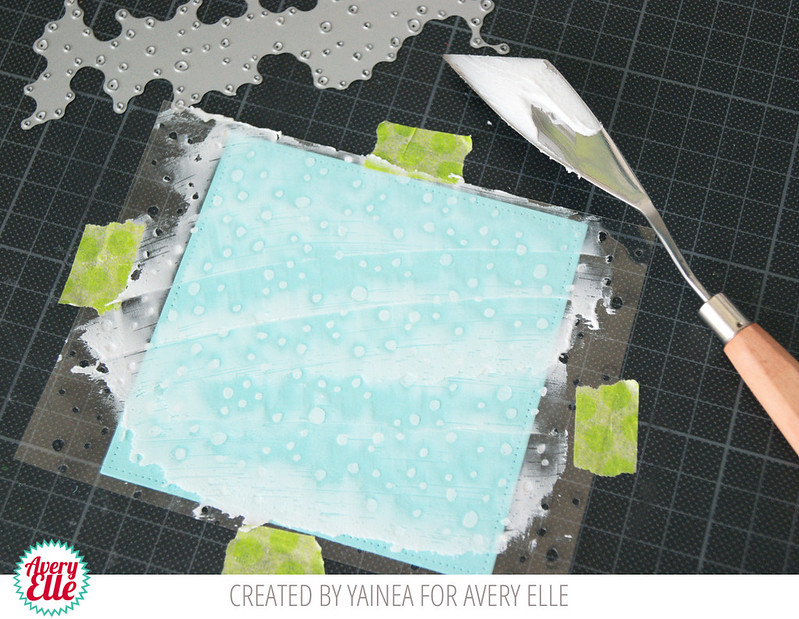
create my card I started by cutting a piece of Post it Tape in the shape of a hill. You can free form cut this or use a die like Picket Fence. I like to add a piece of copy paper to the side of the tape I want to mask so I have great coverage on my card. Next, lay the mask on your 
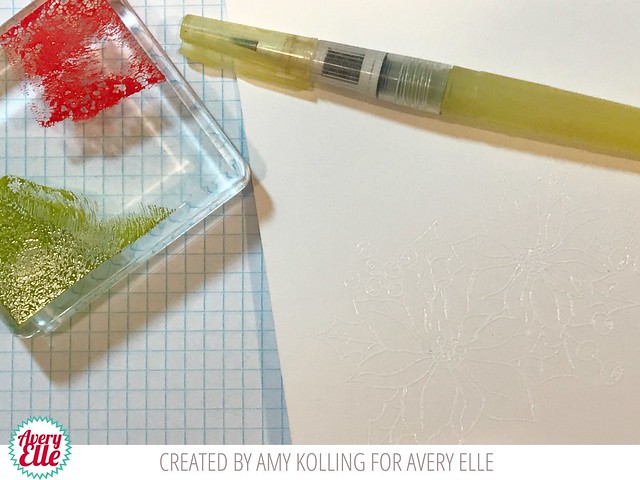
card surface and add ink. Tip: concentrate the ink close to the mask and then fade it out. Move your mask up our card and turn it slightly, layering a background of hills. I created 3 hills but you can created as many as you'd like!


Next, stamp a tree at the top of your hill. This adds fun depth and interest. 
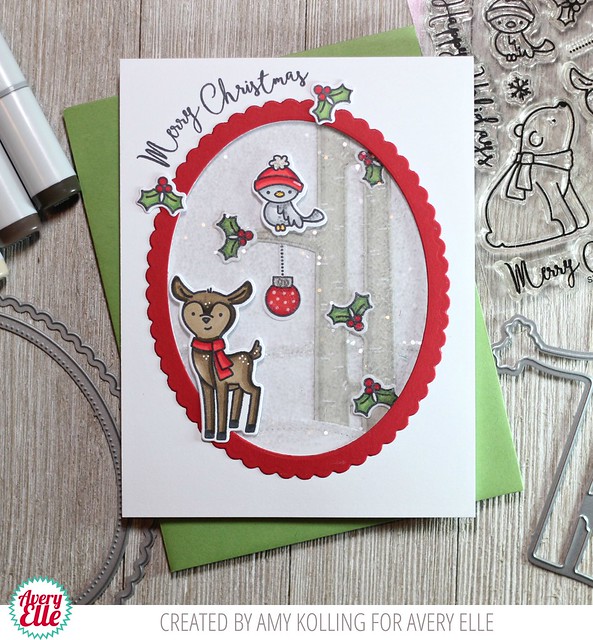
Next, stamp and die cut the animals you want in your scene. I chose the bear, bunny and deer. Aren't they cute?

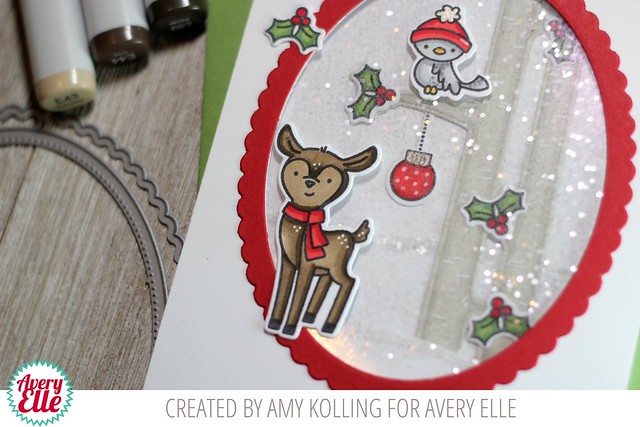
Place the animals on each hill, varying their position on the card. Tip: put the animals below the hill line for a more realistic look. 


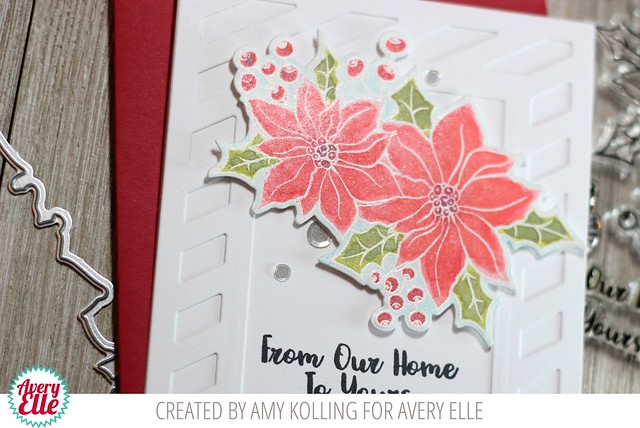
Finally, stamp the sentiment and add sequins, patterned paper or any other embellishment you'd like. 

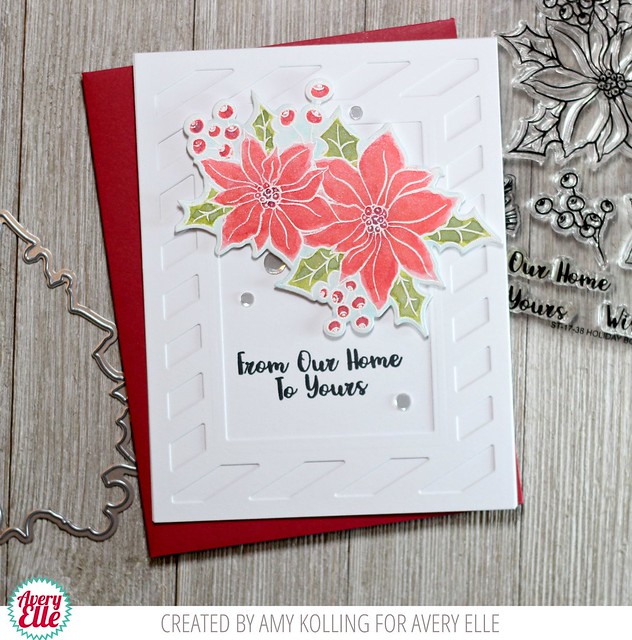
Tip: when I find a layout like this that I like, I often repeat it. HERE is another card I created using the layered scene. 

Thanks for stopping by! I can't wait to see what you create!

Winter Woodland Wonders Week - Day 3

September 20, 2017


Hello!  Amy K. here with a layered Christmas shaker card that is full of glittery fun!
It was time to get out my coarse "chunky" Martha Stewart glitter for a winter wonderland scene.

Winter Wonderland Wonders


Using the Winter Wonderland Wonders stamp set and coordinating Winter Wonderland Wonders Elle-ments, I stamped, Copic colored, and die cut my main images.  For my birch tree, I actually stamped it onto some light gray cardstock and did some no line coloring to make it appear like a birch tree.  It's hard to see but I did create layers of snow banks inside my shaker card using the Picket Fence Elle-ments.  My shaker card was created with the help of the Sweet Scallops Elle-ments.    

Winter Wonderland Wonders2

Little extras were adding the white dots to my images using a white pigment pen.  It gives that perfect little touch!

Supplies:


Thanks for sharing a part of your day with me!

Winter Woodland Wonders Week - Day 2

September 19, 2017


Hi all! It's Deasy here.Today I want to share my card for Avery Elle featuring Winter Woodland Wonders to make a cute Christmas card scene. They look so adorable together!


Avery Elle supply that I'm using :
Winter Woodland Wonders Clear Stamps for the critters image and sentiment
Winter Woodland Wonders Elle-ments to die cut the critters image
Brring On The Joy Clear Stamps for the gift image
Brring On The Joy Elle-ments to die cut the gift image
Falling Snow Elle-ments to die cut the snow on the background
Pierced Banner Layers Elle-ments to die cut banner for the sentiment
Picket Fence Elle-ments to die cut the landscape

I stamp, color the images using copic then die cut it. The sentiment is from silver embossing powder. To color the background, I'm using Dye Ink with blending tool.

Thank you so much for stopping by and happy crafting!

Hugs,

Melania Deasy

Winter Woodland Wonders Week - Day 1

September 18, 2017


Hello!  This week we are featuring projects using our new Winter Woodland Wonders Stamp & Die Set.  I just adore the cute critters and fabulous trees!  I have posted an introduction video to the set as well as a quick project I made with it and a video of that process as well.  Enjoy!!


Supplies:


Thanks for stopping by to take a peek. Have a great day!

Merry Flowers Week - Day 5

September 15, 2017


Hi Everyone! Ashley here sharing Merry Flowers. Sometimes Christmas crafting is a good time to be reminded to keep it simple. That can be hard, right? In today's card I only used 6 Copic colors and NO shading. I love coloring like anyone else but every once in a while it's okay to slow down and stick to the basics. ;)


I started my card with the beautiful flowers from Merry Flowers. I colored them with red, green and light blue. Any shade of those colors you have on hand will work! Next, I added the deer from Winter Woodland Wonders, The deer is only colored with tan, blue and light pink. That's it!


I finished the card with the sentiment from Merry Flowers, mounted on patterned paper and added twine.

Thanks for stopping by!


Merry Flowers Week - Day 4

September 14, 2017


Hey everyone, it's Heather Campbell here!  I'm super excited to be here today sharing a project using the new Merry Flowers stamp set.

I adore this little mini stamp set!  These flowers are so wonderful and they completely remind me of my personal decorating Christmas style!

For my project I decided to make some tags!  I simply never have enough tags at Christmas and I thought this stamp would be perfect!
I die cut some tags in white cardstock using the new Shaker tags dies.  Then, I stamped and colored in each of the Merry Flower bouquets.  I looped some ribbon and tie it with Cherry Avery Elle twine (I LOVE THIS STUFF)

Simple and elegant and I love how it turned out!
It's hard to see but I colored in around the flowers with my lightest blue Copic ink.  Then, I gradually faded the colors so the bottom of the tag is white!

Thanks so much for stopping by and sharing part of your day with me!  Have a lovely day!
XOXO,
Heather

Merry Flowers Week - Day 3

September 13, 2017


Hello lovelies,

Katie here today with you to share a bit of inspiration with the Merry Flowers stamp set and coordinating die.


The large floral image featured in this stamp set is absolutely stunning.  I stamped the flowers twice onto white card stock and colored the images with Copic markers.  Instead of coloring the centers of the flowers with markers, I added drops of glue with a glue pen and sprinkled the centers with gold glitter.


I stamped the sentiment onto a strip of white card stock, mounted it with gold card stock and adhered it at an angle onto a black note card.  I adhered the two floral clusters on either side of the sentiment.  I love the contrast between the florals and the black card stock and the touches of gold lends a festive feel!

Thanks so much for stopping by!  
Katie

A HUGE THANK YOU!

Merry Flowers Week - Day 2


Hello!  I have a quick card and video today using our new Merry Flowers and Shaker Tags sets.  I hope that you enjoy!!

 Supplies:

 
Thanks for stopping by to take a peek. Have a great day!

Merry Flowers Week - Day 1

September 11, 2017


This week we are featuring our Merry Flowers stamp and die set.  This is a lovely set at a great price point!  I have linked an intro video to the set below.  We hope that you enjoy the projects our fabulous design team are going to showcase throughout this week. Check out the gorgeous card that Yainea has created below!!!  x- Jamie


"Hello and happy Monday!

It's Yainea here and today I'm sharing an elegant Christmas card featuring the gorgeous Christmas Flowers stamps and coordinating dies.

Even when my usual style is cheery and cute, every year I love to create something more classic and elegant so when I saw this stamp set Í knew it would be perfect for that.

I started with a piece of patterned paper from the Neutral Collection to add a nice but simple background to my card and then I used several Ditress inks to color a rectangular panel in red with an ombrè effect.


These flowers are perfect for coloring but I decided to stamp them with embossing ink and heat emboss them using Pure White Fine embossing powder. I used the same technique to stamp the sentiment on the red panel.
Finally, I put everything together, using liquid glue and dimensional adhesive and placed a grey stripe of paterned paper, also from the Neutral Collection, between the red stripe and the background.

As a little finishing touch, I added some sparkling to the flowers with my Wink of Stella pen and a bunch of adhesive pearls.


I hope you like my project for today and feel inspired to create some Christmas cards, if you are like me, it's never too soon to start! haha
Thank you so much for stopping by!! Have a nice day :)"

Yainea

Supplies:


Holiday Bouquet Week & Video - Day 5

September 8, 2017


Hi Everyone!  Happy Friday!  I created this quick card and video using our new Holiday Bouquet stamp set.  I just love how gorgeous the flowers in this set are.  Check it out below!


Supplies:

Thanks for stopping by to take a peek. Have a great weekend!

Holiday Bouquet Week - Day 4

September 7, 2017


Hi Everyone! Ashley here sharing the amazing poinsettia stamp set Holiday Bouquet. One of my favorite holiday traditions is looking at poinsettias at my local nursery. I couldn't wait to bring my favorite poinsettia color to this stamp!


I started the card by coloring and die cutting the main image from Holiday Bouquet. I love the new Shaker Dies and decided to use the circle die to add a tag shape behind the focal image. I kept the background simple with some Distress Stain and sequins. The card was finished with twine and a stamped sentiment. 


Thanks for stopping by! I can't wait to see what YOU create!

Holiday Bouquet Week - Day 3

September 6, 2017


Hello!  
Amy K. here sharing more inspiration with this week's set Holiday Bouquet.  

Holiday Bouquet


I am sharing my favorite technique right now, watercoloring with Distress Oxides.  I start by smooshing the ink pad onto an acrylic block.  You don't need much!  TIP:  There's no easier and fun way to watercolor than to use white heat embossing.  It makes it so easy to "stay in the lines"!


Holiday Bouquet Technique

I started by white heat embossing onto Bristol Smooth watercolor paper.  This paper makes all the difference in the world when watercoloring and it very inexpensive!  First, I spritzed it lightly with some water and then using Candied Apple and Peeled Paint, I simply used my waterbrush to drop color to the areas of the poinsettias.  I colored the image several times, drying between.  As a last touch, I spritzed the image with shimmer spray and let dry.  My card was assembled using the Diagonal Stripes Elle-ments.  There's something to be said about a white on white holiday card with poinsettias!

Holiday Bouquet2


Supplies:
Holiday Bouquet Clear Stamps

Have a wonderful day!
 
site design by designer blogs