Showing posts with label White Ink Spray. Show all posts

Ho-Ho-Holidays Week - Day 3

October 19, 2022


I have some fun projects that I created using our new Ho-Ho-Holidays stamp and die set to share with you today.  I love how adorable this Santa is!


Thanks for stopping by to take a peek. Have a great day!

Floating Lanterns - Day 3

March 30, 2022


Hello! I am popping in today to share this cute card with you.  I had so much fun creating it!! These critters are too cute!


Thanks for stopping by to take a peek. Have a great day!

Look For Rainbows and Happy Birthday Week -Day 4

March 18, 2021


Hey everyone! It's Heather here. Today I've got the super cute card to share using the new Look For Rainbows stamp set. I love this little bunny. 

To create my card, I ink blended a background and stamped/die cut my images. 

I added the sentiment to a cloud and thought that was fun to pop up with dimensional foam. 

Thanks so much for stopping by and have a great day!
Thanks, 
Heather 

--

Hi there,

 Caryn here with a rainbow-filled card featuring the Happy Birthday die.  This die is great when you want to create a focal point but allow the background to centre-stage at the same time!  


I started by using Distress oxide inks to create a rainbow background then spritzed it with a little white ink spray.  I then die cut the Happy Birthday die 4 times and stacked them up for a look of dimension.  
I added a strip of vellum behind the die cut and added them to the card front.  To finish I added a few enamel dots here and there.


Supplies:


Two Cute Projects By Guest Designer Noga

October 24, 2020


We are excited to have guest designer Noga here on the blog today.  Check out her cute projects!

Hi crafty friends!

It's Noga here today and I am so excited to share with you a Christmas project showcasing the super adorable O Tiny Tree and Winter Friends stamps and dies.
I really enjoyed creating this slimline card and shaker tag :)


To make this card I took a slimline panel of bristol smooth cardstock. I used  tumbled glass distress oxide ink to blend a sky and used the new White Ink Spray to create a snow look on it.
The sweet images were colored with copic markers and were glued with foam tape for dimension.
I added Cherry Hemp Twine for a final touch.

To make the shaker tag I used patterned paper from the Holiday Collection and die cut it using the new Holiday Circle Tags Elle-Ments. The cute image was colored with copic markers and I filled the shaker with white flakes and glued the image using nuvo crystal glaze.
I added Cherry Hemp Twine for a final touch.

I hope you enjoy this project I created and feel inspired to create some fun Christmas projects!
Thank you so much for stopping by today! Have a great week!

Supply list:

Jingle & Aw, Nuts - Day 2

October 5, 2020


Hey there!   Caryn here today sharing a couple of cards featuring some gorgeous new products (and a couple of my favourite oldies too!).  

For my first card I paired (again) the Aw, Nuts! set from the brand new release with the Fall Foliage set from last year.  I shared a card last week HERE showing how beautifully this year's Fall sets co-ordinate with stamps you probably already have in your collection.


On this card I stamped the images onto white card using Truffle Pigment Ink which works great for watercolouring.  I pulled out my Zig Clean Colour Markers and water brush and coloured my images in rich, Autumn colours - I can't get enough of these colours right now!


I used a kraft A2 card base and using an oval stencil and a blending brush I created a focal point on the centre of the card and then used the Avery Elle White Spray to add a subtle speckling of white before adding my coloured images using foam adhesive.

Supplies used:


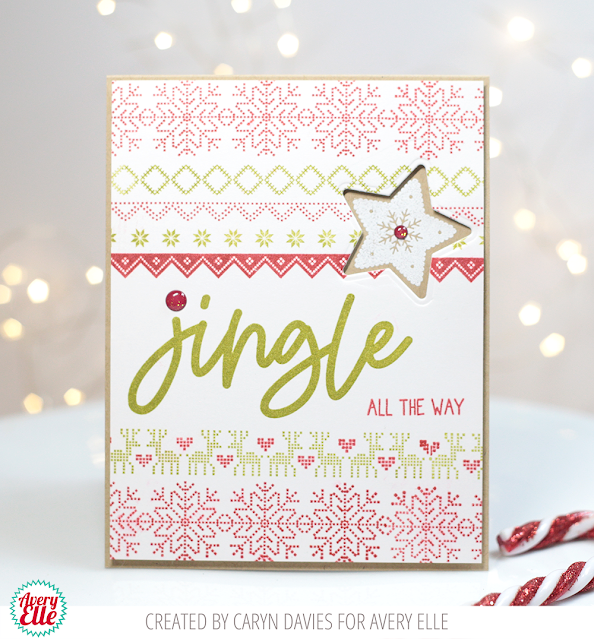
I am also sharing a card using the great new sentiment set, Jingle.  I love big sentiments like these, they make it so easy to rustle up cards and tags in no time!


I started by cutting a panel from white card slightly smaller than my A2 kraft card base.  I then took different stamps from the Nordic Patterns set and stamped a design in red and green inks.  In the middle of the pattern I stamped the Jingle and All The Way sentiments then continued to build up the pattern.

Once I was happy with that I used the star cookie die from Christmas Cookies and cut an aperture on the panel and then used that to place the co ordinating stamp onto the kraft card underneath.


I stamped the star cookie image through in Versamark and heat embossed it in white.
I then adhered the the panel using foam tape and finished off with a couple of enamel dots.

Supplies Used:


site design by designer blogs