Showing posts with label Peek A Boo Pets. Show all posts

You Rock Week - Day 1

July 12, 2021


Hello friends, 

Katie here with a tip to share with you featuring the You Rock stamp set. The You Rock set has such a fun, retro feel. You can expand the fun by using the elements in You Rock to set and share the scene with other stamp sets. 

My first card features the milkshake image. The milkshake is sweet on its own, but the sweetness gets amped up when the kitty from the Peek-a-Boo Pets stamp set is enjoying the treat. The dotted banner from the Easy Layers die frames the scene perfectly. 


My second card uses the awesome jukebox paired with the Oh Snap set for a little Crocodile Rock. The Ray die background draws the eye to the party. 


When combining stamp sets, think about the following: 

Scale- Will the size and scale of the two sets make visual sense? If not, consider playing with placement and perspective to help create the right scale. 

Style- Do the styles of the sets work together. I love the distinctive, fresh and modern designs created by Avery Elle and so many of the sets go so well together. Using a cohesive color palette can really help the two sets blend together. 

Scene- Think about making a scene. Can one set create a backdrop for other images to take center stage? Will the sets compliment each other to tell a story or make a visual statement that you are trying to achieve? 

I hope these tips and ideas will help you look at your stamps in new ways and think about all the fun combinations that you can create! Thanks for stopping by!

Katie


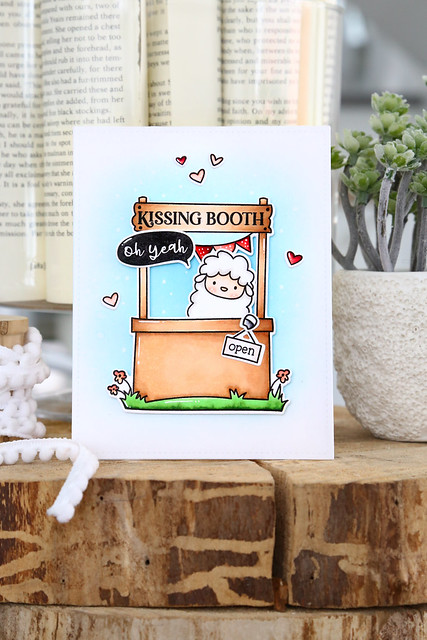
A Cute Kissing Booth by Elena

June 8, 2020


"I'm showing off Peek-A-Boo Pets, as well as the Market Stand stamp sets. I love them both so much!

kissing booth (Avery Elle Spring release blog hop)

I get the feeling this fluffy sheep is a real ladies man, haha. With his one hoof hanging over the front of the kissing booth stand, highlighting the "open" sign. I was giggling to myself when I glued down that "oh yeah" speech bubble.


- Elena"

Supplies:
Market Stand Clear Stamps
Market Stand Dies
Peek-A-Boo Pets Clear Stamps
Peek-A-Boo Pets Die

Peek-A-Boo Pets With Heather

May 22, 2020


We are featuring another cute project by Heather today.  How sweet is this card?  I love it! - Jamie

"Hey everyone! I'm so thrilled to be here today because I get to share one of my favorite cards I've ever made.

I'm having so much fun with the Peek-a-Boo series and these Peek-a-Boo Pets are just too much fun. 

To create my card, I stamped and die cut the pig, sheep, cow and chick (omg, that chick!!!) and their coordinating feet/wings.  I also stamped and die cut the sentiment bubbles and stars.  I colored them in and set them aside.  To work on the card base, I ink blended a background and then adhered some clouds from Photo Mat.  I used the Oval Burst die to create a mat and then just popped the images behind it.   

Thanks so much for stopping by and sharing part of your day with me!  Have a great one!
XOXO, Heather "

An Adorable Journey by Ashley

May 20, 2020


I had to share one more cute card by Ashley today.  I just love these little critters popping out from behind the car! - Jamie


"Hi Everyone! Today I'm sharing Journey and a few other fun Avery Elle favorites!

Let's get started, shall we?


I started this card with the large car and balloon stamp from Journey. I colored it with Copics and added the "hooray" sentiment to the license plate. I love adding little details! 

Next I stamped a few of my favorite animals from Peek a Boo Pets and a Peek a Boo Pal. Finally I stamped a sign from All of Us.


I love that I can use this card for several types of occasions. It can be a birthday card, congratulations or graduation. All I need to do is add a sentiment inside once I know where it's going and it will be ready!

Thanks for stopping by today!"

Supplies:

Market Stand With Ashley

May 19, 2020


I am going through our Design Teams' work from last year and love looking at all of their creations. This card by Ashley is so cute!  I love it! - Jamie

"Hi Everyone! Ashley here today! I'm looking forward to sharing Market Stand with you! I was SO excited to create with this stamp set! Let's get started!


This card was SO much fun to create! I started by stamping, die cutting and coloring all of the pieces for my scene. I used Market StandLlamazing and Peek a Boo Pets. Next, I water colored the background. Finally, I adhered all of the pieces in to place!


I love how Market Stand can take on so many looks. Check out this card I made a few weeks ago HERE for a completely different look. I can't get enough of this stamp set and I know you will enjoy it too!

Thank for stopping by!"

Peek-A-Boo Balloon Week - Day 2

January 28, 2020


Hi there!

Elena here, with a card featuring the Peek-A-Boo Balloon stamp set.


I just love it whenever Heather comes up with new ideas for her Peek-A-Boo animals stamp sets! I nabbed the sweet lamb from Peek-A-Boo Pets and had him hang over the edge of the basket. looking as lonely as possible.


Behind the air balloon and clouds, I added a piece of cardstock cut with the Waves die. I thought the wavy motion was perfect for conveying a moving sky! I used mint and pink inks to blend a soft background, and colored the balloon to (hopefully) match.

I hope you like it!


Supplies:

Peek-A-Boo Balloon
Peek-A-Boo Balloon Elle-ments
Peek-A-Boo Pets
Peek-A-Boo Pets Elle-ments
Waves Elle-ments
Plus Frame Elle-ments

Peek-A-Boo Balloon Week - Day 1

January 27, 2020


Hello, Caryn here today shining the light on another great addition to the Peek-a-Boo series designed by our lovely Heather, Peek-a-Boo Balloon.  Today we have the cat from the original Peek-a-Boo Pets set heading off into into the beyond (anyone reminded of the ending of CATS the movie here - shudder). He certainly doesn't look too sure about it, lol!!


I started with a white card base and die cut a panel from aqua cardstock using the Hatch Match die.  I splattered some white paint across it and set it aside to dry.  To frame the card I die cut the Postage Stamp Frame and adhered it to the Hatch Match panel and then added this to the card with foam adhesive..

The open space design of the balloon lends it to lots of different techniques but for this card I thought I'd do some paper-piecing.  I took a couple of papers from the Create Magic Card Kit  and pieced them onto the balloon and the basket.  I stamped, coloured and die cut the kitty and then popped them onto the card front with a couple of clouds from the Cupids die set.  To finish I added a speech bubble from Peek-a-Boo Pals stamped in Sugar Plum pigment Ink.


Supplies:

Peek-A-Boo Car Week - Day 2

June 25, 2019


Hi there!

Elena here, with a fun card featuring the Peek-A-Boo Car stamp set:


I decided to throw it back to the Peek-A-Boo Pets stamp set and put a cat and dog duo into the car. Of course the cat is driving, and of course the dog has both paw through the windshield  and his whole head out.

I colored the car a bright red, and stuck the cute siren on top. I think that takes this set over-the-top with cuteness!


To create some depth to the entire scene, I placed the present in the back seat, and then backed the car in a piece of vellum. I colored that vellum using a dark grey marker so that it looked more shadowed. 

The background was created using the round sun from the Summer Scenes die set, and the polaroid-looking layer that comes with the cute clouds (Grand Photo Mat die set.)

I made sure that the background was as punchy as the bright red car! I selected a vibrant yellow and a vivid blue to make sure that everything really popped against the white polaroid layer. 

To ground the card, I adhered everything onto a kraft colored base layer.

I hope you like it! Thanks for stopping by!


Supplies:


An Absolutely Adorable Card by Elena!

May 3, 2019


Hi there!

Elena here with a simple and cute card featuring the Ray Die, and images from Polar Peek-A-Boo Pals and Peek-A-Boo Pets.


I started out by die-cutting the Ray die, and coloring that with some bright yellow ink. I used an oval makeup brush to do this - it's foolproof! I get no harsh sponge marks ever. I think flicked on some darker mustard ink for some added interest.


Next, I stamped the bear and matching paws from Polar Peek-A-Boo Pals and colored him using copic markers. I used my favorite brown copic trio: E30, E31, E34. I also gave him rosy cheeks using R02, and added a few highlights using a white gel pen.

Then, I stamped the speech bubble from Peek-A-Boo Pets, and adhered everything to the card. A tiny heart was the perfect finishing touch.

I hope you like it! Thanks for stopping by!

♥.

So Kind Week - Day 4

May 2, 2019


Hi!  This is Nicky back with you today and I'm sharing a cute card that puts the sentiment set So Kind front and center.  I combined my sentiment with the Peek-A-Boo Pets stamp set and coordinating Elle-ments and I used the Arrow Mat Die to frame out my scene.


To make this card I first ink blended two panels of cardstock so that they sort of matched.  I used Distress Oxide in Shaded Lilac and Distress Ink in Tattered Rose and I also splattered a little Shaded Lilac using a wet paintbrush.   One panel was attached to my card base and the second was die cut using the Arrow Mat Die.


I applied the frame to the card base backed with dimensional foam tape to lift it up.  The negative cut was stamped with the sentiment from So Kind using Versamark Ink and heat embossed in white.  Since I used my Misti and this is a chunky sentiment I like the ultra embossed look and so I re-stamped and heat embossed so it stood out even more - you could even go back a third time!   I adhered this panel back through the space in the frame.

On Bristol Smooth cardstock I stamped my images from Peek-A-Boo Pets using Ranger Archival Ink in Potting Soil.  I watercolour painted the cuties using Kuretake Zigs in the following colours - Oatmeal 064,  Mid Gray 096, Flesh Color 071, Light Pink 026, Pale Pink 028, Warm Gray(2) 900 and finally Pale Orange 054.  Each image was then die cut.  They were applied to the scene with more dimensional foam tape.


Points on the pets were highlighted using a Uni-ball Signo White gel pen and I found some toning jewel embellishments to dot around the scene which I adhered with Ranger Multi Medium Matte.

Hope you like the card and I look forward to seeing you next time with something new!

Nicky x


Products Used:-

So Kind Clear Stamps
Peek-A-Boo Pets Clear Stamps
Peek-A-Boo Pets Elle-ments
Arrow Mat Die


So Kind Week - Day 3

May 1, 2019


Hello!  Amy here sharing a card using the So Kind sentiment stamps.  This is a fabulous bold scripty sentiment set perfect for lots of occasions!

I knew I wanted to pair this fun sentiment 'thank you for being so kind' with the adorable Peek-a-Boo Pets.  I love a shaped card so using the Pierced Mat Elle-ments, I created this card.  Using the largest 2 dies, I die cut a frame for my card.  Then using the largest die, I aligned the cutting edge just above the fold on my notecard and ran it through my die cutting machine.  

So Kind


The sentiment was white heat embossed using Pure White Fine Embossing Powder from Avery Elle onto my shaped card.  Using Worn Lipstick, Dried Marigold, and Dusty Concord Distress Inks, they were blended over the sentiment using the emboss resist technique.  My white frame was added with foam adhesive.  Lining the bottom of my frame are the critters that were Copic colored and die cut.  The last detail are all the paws and hoofs!  

So Kind2


Supplies:
So Kind Clear Stamps
Peek-A-Boo Pets Clear Stamps
Peek-A-Boo Pets Elle-ments
Pierced Mat Elle-ments
Pure White Fine Embossing Powder

Market Stand Week - Day 5

April 12, 2019


Hi Everyone! Ashley here today! I'm looking forward to sharing Market Stand with you! I was SO excited to create with this stamp set! Let's get started!


This card was SO much fun to create! I started by stamping, die cutting and coloring all of the pieces for my scene. I used Market StandLlamazing and Peek a Boo Pets. Next, I water colored the background. Finally, I adhered all of the pieces in to place!


I love how Market Stand can take on so many looks. Check out this card I made a few weeks ago HERE for a completely different look. I can't get enough of this stamp set and I know you will enjoy it too!

Thank for stopping by!

Market Stand Week - Day 4

April 11, 2019


Hey everyone! It's Heather Campbell here. How are you all doing today?


I'm so excited to be here sharing my latest card using the new Market Stand stamp set.  Don't you jut love this market stand?  It's so fun, especially with the Peek-a-Boo Pals line.


For my card, I thought it'd be fun to share how I add a pattern to the base of the market stand.


First, I took post it notes and placed them strategically along the stamped line of my die cut image.  Then, I stamped the inner images. 


As you can see, once I remove the post it notes, the lemons are perfectly masked and appear as part of the lager set. I love using accessory images in just this way! 


Supplies:
Market Stand Clear Stamps

There you have it!  Thanks so much for stopping by and sharing part of your day with me!  Have a great one! 
XO, Heather 


Market Stand Week - Day 3

April 10, 2019


Hello friends,

Katie here with a fun card to share today featuring the Market Stand stamp set.  I just love the Market Stand stamp set.  It features so many great images and accessories that make it truly versatile; plus it pairs so well with the all the adorable Peek-a-Boo animal sets.


I stamped the images with Avery Elle's dye ink and colored them with Copic Markers.  I die cut the images using the coordinating dies and arranged them on a panel that I colored using two shades of Distress Oxide inks (Dried Marigold, Squeezed Lemonade).  


I framed the scene using the Reverse Pinked Elle-ments dies, which happens to be on sale right now in the Avery Elle store!  A speech bubble from the Peek-a-Boo Pets stamp set finishes off the card.

Supplies

Thanks for stopping by!  Have a great day!
Katie


Market Stand Week - Day 2

April 9, 2019


Hi there!

Elena here, with a card combining images from both Market Stand and Peek-A-Boo Pets. I can't get enough of these 2 sets together!


I couldn't decide which critter I would want a hug from, so I crammed 3 of them in there. ha. I stamped, and die-cut all of my images (Market Stand dies and Peek-A-Boo Pets dies) and then colored everything using copic markers. I've had a few die misshaps in the past, where my die shifted in the machine, so I always color after I've die-cut. 

Isn't it so cute how you can change the personality of these critters by how you decide to position their hands? (paws, hooves, whatever.) The cow with his one hoof slung around the pole of the stand... so cute!

Once I figured out my layout, I matted the focal images using rectangle dies, and added a strip of patterned paper to the left side of the card (from the Sorbet paper collection.)


I just love the sheep peeking up from the top of the "free hugs" stand! I hope you like it too! Thanks for stopping by!

♥.

Market Stand Week - Day 1

April 8, 2019


Hello!  This is Nicky back with you today and I'm sharing a card made using Market Stand which comes with coordinating Elle-ments.  I also used the new Ray Die for my background panel.  Tucked into the scene is the cow from Peek-A-Boo Pets.  I also converted the word LEMONADE into LEMOONADE because I can never resist a good pun!


To make this card I ink blended a panel of cardstock using Distress Oxides in Squeezed Lemonade and Cracked Pistachio.  I then squished a little of the Cracked Pistachio onto my craft mat, spritzed some water next to it and using an old toothbrush I mixed the solution picking it up on the brush and then splattered it onto the panel softly blending some of the green into the yellow.  I then die cut the panel using the Ray die and I put the pieces back together on the reverse with tape and secured it to my card base.


I stamped my images from Market Stand and Peek-A-Boo Pets onto Bristol Smooth cardstock and it was at this point that I masked the word LEMONADE to convert it to the punny LEMOONADE.  Images were die cut using the Elle-ments that coordinate and then I watercolour painted everything using Kuretake Zigs in the following colours - Yellow 050, Haze Blue 302, Green Shadow 049, Pale Yellow 055, Beige 072, Light Pink 026, Warm Gray(2) 900 and Mid Gray 096.  You can decorate the front of your farm stand however you like but I chose to draw in a whitewashed boards look!  All images were adhered to the scene using dimensional foam tape.


My final touch was to add a few sparkling clear sequins as a final embellishment.  This summery card could be used for all number of occasions especially with a sentiment stamped inside.

Thank you for stopping by the blog today to read about my card, see you next time!

Nicky x


Products Used:-

Market Stand Clear Stamps
Market Stand Dies
Peek A Boo Pets Clear Stamps
Peek A Boo Pets Dies
Ray Die


Journey Week - Day 4

April 4, 2019


Hi Everyone! Ashley here today! I'm sharing Journey and a few other fun Avery Elle favorites!

Let's get started, shall we?


I started this card with the large car and balloon stamp from Journey. I colored it with Copics and added the "hooray" sentiment to the license plate. I love adding little details! 

Next I stamped a few of my favorite animals from Peek a Boo Pets and a Peek a Boo Pal. Finally I stamped a sign from All of Us.


I love that I can use this card for several types of occasions. It can be a birthday card, congratulations or graduation. All I need to do is add a sentiment inside once I know where it's going and it will be ready!

Thanks for stopping by today!

Supplies:


Cake For All Week - Day 5

March 29, 2019


Hi Everyone! Ashley here! Today I'm sharing the new Cake for All stamp set! I've combined it with a few of my favorite stamp sets. Let's take a look...


I started my card by stamping the cake and a few flowers from Cake for All. I colored them with Copics and die cut them. Next I picked an animal to peek out of the cake. I used the panda from Peek a Boo Pals. Next I assembled my stamps. 


I just love the panda with a flower on her head! She looks ready for spring. I decided on a sentiment from Peek a Boo Pets. I love that I can use this card for a bridal shower, wedding or even a new baby.

Finally, I created the background with Distress Oxides, then I assembled the card.

Thanks for checking out my card! I can't wait to see what YOU create!


Supplies:
Peek a Boo Pals Clear Stamps


site design by designer blogs