Cloud Mat Week - Day 2

December 31, 2019


Hi there!

Elena here, with a card featuring the amazing Cloud Mat. It was begging to be paired with a cute cupid!


I decided to go bold with a bright red sky! My favorite Valentine combo is a classic red and pink, so once I removed the die-cut clouds from the mat, I traced around the negative areas with a light pink marker.


Before adhering the red sky piece to the base layer, I flecked some white paint onto it. I love how this adds interest and helps to break up the heavy red layer.

I then added a cupid, a pair of sweet birdies and a whole slew of hearts.

I hope you like it!

Supplies:


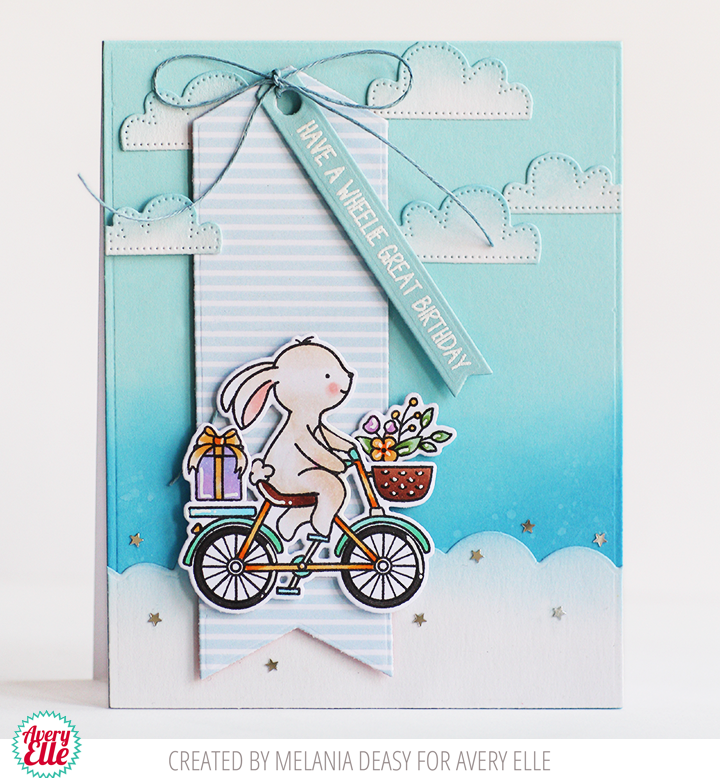
Hi everyone! It's Melania Deasy here. Today I want to share my card for Avery Elle featuring Cloud Mat Die. This die are so versatile for any themes! I make a romantic card and combine it with Cupids stamp set.


Avery Elle supplies that I'm using :
Cloud Mat Elle-ments to die cut the clouds
Cupids Clear Stamps for the sentiment and images
Cupids Elle-ments to die cut the images

I stamp the images, color it using COPIC then die cut it. To color the background, I'm using Dye Ink Pad with blending tool then splash water and white watercolor with a brush.

Thank you so much for stopping by and happy crafting!

Hugs,


Melania Deasy

Cloud Mat Week - Day 1

December 30, 2019


Hi!   Nicky back with you today and I'm gearing up for Valentine's Day with my latest card for Avery Elle Stamps.   My card today features the new Cloud Mat Die together with the new Cupids stamp set.


I die cut an A2 panel of white cardstock using the Cloud Mat Die and adhered it to a white cardstock base.  I die cut a panel of pale pink cardstock using the Postage Stamp Die, I backed this die cut with foam tape and applied it to the background.


I die cut the Cloud Mat one more time from 110lb white cardstock.   I chose some of the clouds this created and applied Versamark Ink to these and then dunked them in Wow! Embossing Powder in 'Salsa' and heat embossed using my heat tool.  The clouds were backed with foam tape and applied to the scene.

On Bristol Smooth cardstock the Cupids and sentiments were stamped using Ranger Archival Ink in  Potting Soil.   They were watercolour painted using Tombow ABT's in 977 and 772 and Kuretake Zigs in Light Beige, Pale Pink, Haze Blue, Warm Gray 2 and Orange.  They were die cut and applied to the scene with more foam tape.


I felt no other embellishment was required given how glittery the clouds are so I just highlighted a few points with a white gel pen and then the card was complete.

Thanks for stopping by the blog today, happy crafting!

Nicky x

Products Used:-

Cupids
Cloud Mat Die
Postage Stamp Die


Holiday Schedule & Happy Holidays

December 21, 2019


Happy Holidays from all of us at Avery Elle!
We wish you and your families a happy holiday season 
and healthy and happy New Year!


Thanks Thanks Week - Day 5

December 20, 2019


Hi Everyone! It's the perfect time of year to stock up on thank you cards! Thanks Thanks stamp set is the perfect set to get you started.


I started my card with the Grand Photo Mat die. It fits the Thanks Thanks sentiments perfectly! Next I stamped and die cut images from Cupid and Wheelie Great. These images are so fun to color! Then I assembled my card. Simple but so cute!


Thanks for stopping by!

Supplies:

Thanks Thanks Week - Day 4

December 19, 2019


Hey everyone! It's Heather here. Today I've got a fun card using the new Thanks Thanks stamp set.

For my card, I decided to stamp the background of the card with the Avery Elle Layered Rose stamp set. 

Then, once my background was complete, I added the sentiment from the Thanks Thanks stamp set. Finally, I looped a piece of twine and called it good. 

Simple but break taking. Just my style. 

Thanks so much for stopping by today. Have a great day! 
XO, Heather 

Thanks Thanks Week - Day 3

December 18, 2019


Hello friends,

Katie here with a colorful card featuring the Thanks Thanks clear stamps.


I wanted to incorporate a lot of the great sentiments included in the Thanks Thanks set, so I paired colored card stock with heat embossing to make a simple and graphic card. 


I stamped each of the sentiments with Versamark on colored card stock, and I heat embossed each sentiment with the Rose Gold Embossing Powder. I trimmed each piece of card stock into strips and lined up the strips to create the striped design.

Supplies

That's all for me today, but you are in for a treat today- more Thanks Thanks inspiration from Amy Kolling!

****************************

Hello!  Amy here with a card for the upcoming holidays.  We all have so much to be thankful for during the holidays.  I already have someone in mind for this card!

Using the Holiday Bouquet set from a few years ago, the large poinsettia image was Copic colored with light pink color.  Glossy accents were added to the flower centers and the tiny tips of the berries.

Thanks Thanks

My holiday flower was added with foam adhesive to a side folding note card that was stamped with the sentiment from Thanks, Thanks in bold black ink.  I surrounded the sentiment with the frame from Plus Frame Elle-ments in white.  As a final touch, I added a few pink gems.

Thanks Thanks2

Supplies:
Thanks, Thanks
Plus Frame Elle-ments
Holiday Bouquet


Thanks Thanks week - Day 2

December 17, 2019


Hi there!

Elena here, with a card that mixes the new Thanks Thanks set with a few images from a previous release:


I just love the fonts in the Thanks Thanks stamp set! I chose the medium weight "thanks" and paired it with the delicately scripted "so very much." I just adore how they fit together! The fonts all mix-and-match so well, but I like thinking about a very weight with a lighter weight font, as well as a block and a script font. So great that the work is all done for you!


When you get a new stamp set, the first thing you should do is look in your stash to see what other sets could work with it! I grabbed, if you could believe it, a fall and a Christmas set, and mashed them together into this more spring-time feeling card.

The bunny is from Santa Bear, and the mushrooms are from Falling For You. I did reach for the tiny heart-in-a-speech-bubble from Wheelie Great, and that one is from the newest release.

I hope I've inspired you to look into your stash and see how you could stretch your fall and holiday stamp sets!

Supplies:


Thanks Thanks Week - Day 1

December 16, 2019


It's Caryn here today with a card that is always useful to have in your stash - a thank you card.  I've used the new Thanks Thanks stamp set which has a great selection of sentiments in a large scale which is perfect for the focal point of a card.

Those of you with an eagle eye will remember I used the Cloud Mat die on THIS card in the Winter release blog hop.  As I mentioned in that post, I saved the "negative" part of the patterned paper From the Create Magic Card Kit) and the positive part of the white card (the clouds) and have created a second, reversed card (two for the price of one)!


I pieced the clouds into the patterned paper and adhered them for the background of the card.  I cut a strip of vellum and stamped the second of the THANKS sentiments in versamark and embossed it in silver embossing powder.  I then stamped the "for your kindness" and embossed in New Moon pigment ink and embossed it in clear embossing powder.  I then wrapped the vellum strip around the front of the card and adhered it on the inside so there is no need to hide and adhesive on the front.


To finish I added a few enamel dots in silver sparkle  below the banner, I thought they looked a wee bit like rain drops!!

Supplies:

Create Magic Card Kit (for the star patterned paper)
Silver Embossing Powder (retired)


Hooray Week - Day 5

December 13, 2019


Hi Everyone! Today I'm sharing the Hooray stamp set. I love these big bold sentiments! Let's take a look...


First, I started my card by stamping "thanks" several times in the background. Repeating the sentiment adds interest and color to the card. Next, I have a fun little tip!


 I die cut the new large tag die and I heat embossed the "thanks" sentiment. Then I turned the die around and cut off the end top of the tag and it makes a big banner! Fun right? Next, I added the smaller sentiment to the small tag die from the same set and added it to the card. I finished the card with the dolphin from Peek a Boo Summer Pals.


Supplies:

Hooray Week - Day 4

December 12, 2019


Hey everyone! It's Heather here and I've got a super fun project using both Hooray stamp set and the Party Tags die set.

As soon as I saw the Hooray stamp set and the Party Tags die set I knew I absolutely wanted to make wine bottle tags.

To start, I die cut the larger tag from patterned paper. Then, on vellum I stamped and heat embossed the sentiments. Finally I tied a bow around my wine bottles and then looped my Hooray stamped Party Tags with bakers twine and hid that in the bow. 

Super fun and I absolutely can't wait to use this duo for many, many occasions to come! 

Thanks so much for stopping by and sharing part of your day with me! Have a great one! 
:), Heather 

Hooray Week - Day 3

December 11, 2019


Hello!  Amy here sharing a colorful THANKS card that was super quick to make using the amazing pigment inks from Avery Elle!

Inks used:
Magenta
Aquamarine
Lemon Grass
Fizz
Orchid
Pixie
Mimosa
Strawberry

Thanks

The 'thanks' stamp, from Hooray, was stamped repeatedly down a panel of white cardstock, moving the paper up 3/4" each time.  This panel was adhered to white note card that was lined on the left side with a strip of black/white striped paper from The Neutral Collection.

To finish, the sentiments from Hooray were stamped onto Simple Sentiment Elle-ments and adhered with foam adhesive.

Thanks2

Supplies:
The Neutral Collection paper pad (retired)
Pigment Inks (listed above)

Over to Caryn....

I have a very festive take on Hooray stamp set and have paired the "Merry" sentiment with and "oldie but goodie" stamp set, Holiday Bouquet.  This is still one of my go-to sets for Christmas cards, I love to colour the poinsettias in different colours for unique looks.  

I stamped and embossed the "Merry" in gold embossing powder then fussy cut around it.  I picked out the Merry Christmas from the Quirky Christmas set (retired) and stamped it in Truffle pigment ink and cut it into a banner.


For the flowers I stamped them in a very light brown ink and then coloured them with Copics for a "no-line" effect and then die cut them using the co-ordinating dies.


To finish I added some shimmer to the flowers and added a splatter of white paint.

Supplies:


Hooray Week - Day 2

December 10, 2019


Hi there,

Elena here, with a fun card using the Hooray stamp set, as well as images from Wheelie Great.


I started out by stamping the bunny, the little bird, and the flowers for the basket. I die-cut them all and colored in the images using copic markers. I also stamped some clouds from another new set, Cupids.

I cut the largest Wonky Stitches rectangle, and did some soft blue ink blending in the center, leaving the edges all white.


Then, I stamped the large Hooray sentiment right where I wanted it, and stamped it again onto the edge of one of the clouds so when I adhered everything, it would look continuous. I also die-cut the edges of the clouds with the Wonky Stitches rectangle, to maintain the look of that edge.

I finished off the card with a secondary greeting underneath the bunny. I like to ground the images on my cards, and this small, straight sentiments did just that.

I hope you like it!

Supplies: 

Hooray Clear Stamps
Wheelie Great Clear Stamps
Cupids Clear Stamps

Hooray Week - Day 1

December 9, 2019


Hey everybody this is Nicky with you today and I have a new card for Avery Elle Stamps that puts the new Hooray sentiment set front and center.


This great sentiment set will be a set you reach for time and time again for all manner and style of cards.  I chose to layer it over a now discontinued background die but there's nothing this wouldn't work with.


To create this card I die cut (embossed) the background panel then ink blended with Distress Ink blending to a lighter focal point.   I coloured the balloons and stars with Copic markers and adhered it to a 110lb white cardstock base.  Points were highlighted with a white gel pen.

To create the large 'hooray' I  stamped the sentiment with archival ink on to white cardstock.  I then fussy cut the word and used a craft knife to remove the centres.  This sentiment was backed with foam tape and applied over the scene where it appears to float.  I then used Glossy Accents glue to apply a glossy layer over the top.  The smaller sentiment was stamped and the card set aside to fully dry.


Finally, I reached into my stash of embellishments and selected various sizes of Sparkling Clear Sequins  to add a celebratory sparkle.

Thank you for stopping by and I'll see you next time!

Nicky x

Product Used:-

Hooray (sentiment stamp set)


Party Tags Week - Day 5

December 6, 2019


Hi Everyone! I'm sharing Party Tags today and I can't wait to share them with you!


To create these tags, I die cut the large tag twice, once with white card stock and once with colored. Next, I used Distress Oxide to add color to the tag, then heat embossed the sentiment. Next, I die cut the smallest tag and heat embossed the small shapes from a Hooray  Finally, I added some of my favorite critters from Polar Peek A Boo Pals and tied them together with twine.


I can't wait to add these to gifts!

Thanks for stopping by!

Supplies:

Party Tag Week - Day 4

December 5, 2019


Hello friends,

Katie here with a little project to share with you today featuring the Party Tag Elle-ment dies. The Party Tags are wonderfully versatile. I adore the size and fun fishtail design of these tags. With Valentine's Day coming up, I thought the tags were perfectly suited for creating bookmarks for a classroom Valentine exchange or to give the special readers in your life.


I die cut the largest tag from water color card stock and a second layer from pale pink card stock. Onto the water color tag, I created a cloudy background using a DIY cloud stencil and Distress Ink. I stamped the images from the Cupids stamp set onto white card stock and colored the images with Copic markers. I adhered the images to the tag.


I stamped the sentiments onto white card stock with clear Embossing ink and heat embossed the sentiments with Avery Elle's Rose Gold fine detail embossing powder. Finally I attached all the tags together using Raspberry Hemp Twine.


Supplies


Thanks for stopping by!

Katie

Alright everyone, it's Heather here and I've got a super fun & easy variation for you on the new Party Tag Elle-ments dies. I love this shape so much and thought it'd be fun to share how you could use it without stamps but instead use wrapping paper you have to make coordinating tags for your gifts! Fun, right?!

To start, I die cut the party tag twice - once with white cardstock and another time with patterned paper. Then, I fussy cut a penguin from my wrapping paper scraps and added it to the front white piece. Finally, I die cut the words to add to the front. 

Super easy and I love how it coordinates! I'll definitely be using the tip a whole lot!

Have a great day!
XOXO, Heather 


Party Tag Week - Day 3

December 4, 2019


Hello!  Amy here sharing a masculine project using the newly released Party Tags.  I have a special birthday in my family this month so I was glad to use these tags for something other than holiday.  

I chose a color palette with cardstocks and started die cutting the two smaller tags at the same time.  This made it super quick!  Using Pure White Embossing Powder, sentiments from Simple Sentiments were stamped on two of the tags.  Once done, all the tags were adhered to a white note card and the edges trimmed neatly.  

Party Tags

For my gift tag, the largest tag was die cut with white cardstock and another with the green pattern card stock from The Harvest Collection.  The large sentiment from Hooray was stamped in Jungle Pigment Ink onto the tag along with the 'happy birthday' from Simple Sentiments.  To finish, the tags were tied off with twine.


Party Tags2 

Supplies:

Hi everyone! It's Deasy here. Today I want to share my card for Avery Elle featuring Party Tag Elle-ments. This dies are so versatile! For my project today, I make it as tags on a card.


Avery Elle supplies that I'm using :
Party Tag Elle-ments to die cut the tags
Wheelie Great Clear Stamps for the sentiment and images
Wheelie Great Elle-ments to die cut the images
Cloud Mat Elle-ments to die cut the clouds then color it using Distress Ink Tumbled Glass with blending tool
The Holiday Collection Paper Pad for the patterned paper
 
I stamp the images, color it using COPIC then die cut it. The sentiment is from white embossing powder. To color the background, I'm using Dye Ink Pad with blending tool then splash water with a brush.

Thank you so much for stopping by and happy crafting!

Hugs,


Melania Deasy

Party Tag Week - Day 2

December 3, 2019


Hi there!

Elena here, with a cute birthday card, featuring the new Party Tag die set.


I create a scene using the Wheelie Great stamp set - I fit the little mouse into the front bike basket and had him reaching for the little birdie (from the Cupids stamp set.) The clouds are also from the Cupids stamp set - I just love how fluffy they look!

I then die-cut pieces from the Grand Photo Mat die set. I discarded the sky part, since I opted to use stamped clouds, and colored the rolling hills with copic markers.


Once everything was assembled, I stamped the sentiment onto the smallest Party Tag flag. I tied on a sunny yellow and white twine and adhered it to my card using foam adhesive.

I hope you like it!

Supplies:


site design by designer blogs