Sweet Swines Week - Day 2

March 31, 2020


Hi there!

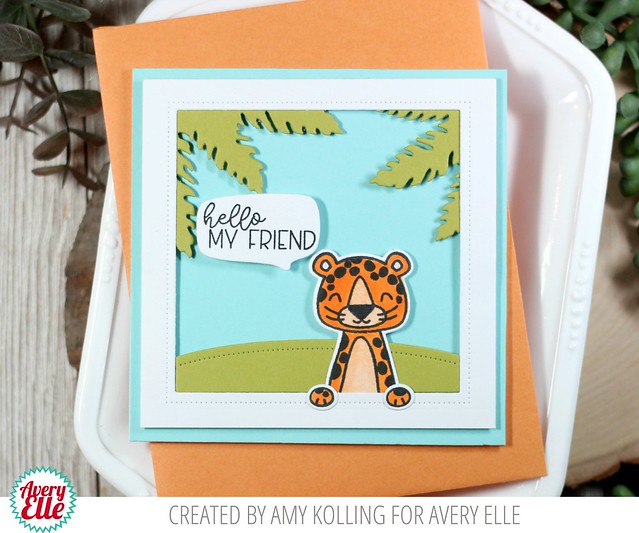
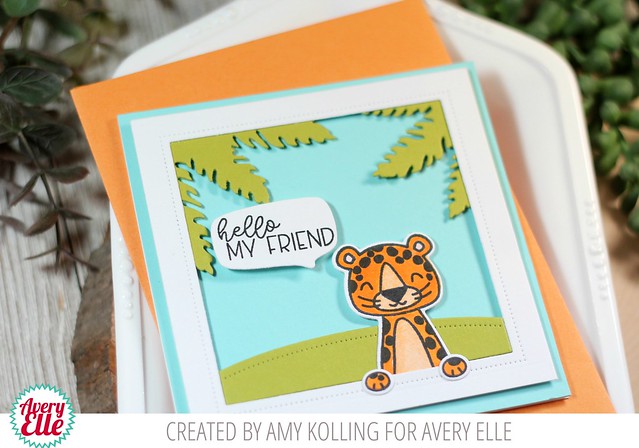
Elena here with a card featuring the hilarious pig-on-a-scooter from Sweet Swines:


Isn't he the cutest? So many people fell in love with these piggies at our Creativation booth! I gave the pig a bouquet of flowers, and tucked an envelope at his feet. Everything was colored with copic markers, and I used a white gel pen to add highlights to the images at the end. I love how this makes everything really pop!

To ground the pig, and create a scene, I used the Grand Photo Mat dies - I love the look of this big polaroid frame! The die itself cuts out clouds for you, and I added some white clouds on top also, giving the background more dimension. 

The large white area at the bottom was begging for a huge sentiment so I obliged with a greeting from Gifted. I colored the little heart at the end to match the swine!


I hope you like it! Thanks for stopping by!


Sweet Swines Week - Day 1

March 30, 2020


Hello Avery Elle friends!

Katie here with a festive card to share with you featuring the Sweet Swines clear stamps.

This little piggy is ready for a party, so I set a celebratory scene using the Ray Elle-ments die. I blended some yellow ink and added some ink spatters before cutting the white card stock with the Ray die. I also created a little shaker window by sandwiching some flat sequins and glitter between two panels of clear acetate. I adhered the shaker element behind the circle opening.


I stamped the pig and party accessories, colored them with Copic Markers and colored pencils and die cut the images using the coordinating Sweet Swines Elle-ments die. For color inspiration I looked no further than Avery Elle's red and aqua logo. Along with the yellow background, a color scheme featuring primary colors is always a winner.


I adhered the stamped images to the Ray background to set the party scene and tucked a sentiment from the Speech Bubble clear stamps behind the party pig's ear. As a finishing touch, I added some of the small stars included in the Sweet Swines set.

Supplies:


Thanks for stopping by! I hope you week is off to a great start!
Katie

Speech Bubbles Week - Day 5

March 27, 2020


Hi Everyone! Today I'm sharing Speech Bubbles along with some other really fun products from the latest release.


To create my card I stamped two animals from Peek a Boo Jungle. I placed them in the middle of the circle Leafy Frames Die. Then I added a fun sentiment word bubble from Speech Bubbles. Finally, I added all of the elements to a fun patterned paper from the Spring Collection .

Thanks for stopping by!

Supplies:

Speech Bubbles Week - Day 4

March 26, 2020


Hello Avery Elle friends,

Katie here with a quick tip to share with you today featuring the Speech Bubbles Clear Stamps.

Speech Bubbles is a smaller set that pairs really well with so many other stamp sets giving voice to critters and characters and providing the perfect spot for a sentiment or tiding.

Even supporting players can take the main stage. By using repetition and using the same visual images over and over again, even small elements can create a big statement.


For my card, I stamped the speech bubbles onto a rainbow of assorted card stock colors and die cut the shapes using the coordinating Speech Bubbles Elle-ments die. Next, I stamped "Thank you" onto 5 of the bubbles and "you are the best" onto the other bubble.


I arranged the bubbles in rainbow order, and before adhering them to the card, I added a frame to help connect and contain all the smaller images. The Plus Frame die is discontinued, but you can substitute it for any other frame die that you like. I used foam dots to pop up the "you are the best" bubble and added a couple sequins as a finishing touch.


Supplies: 
Die: Plus Frame Elle-ments

I hope this tip encourages you to make a big statement with small images. Thank you, thank you, thank you for stopping by today!


Be well, 
Katie

Speech Bubbles Week - Day 3

March 25, 2020


Hey everyone! It's Heather here. Today I've got a card for you with the new Speech Bubbles stamp set and I thought it would be super fun to pair it with last years Pool Party stamp set.

I love love love this speech bubble stamp set. I love the fonts and the witty sentiments and how they coordinate with just about every stamp set!


For my card, I ink blending and splattered a custom background. 


Then, I stamped, colored and die cut the images from Pool Party stamp set and coordinated it with a Speech Bubbles and added them to my card front. 

Thanks so much and have a great day!
Thanks!
Heather 


Speech Bubbles Week - Day 2

March 24, 2020


Hello!  Amy here with a clean and simple scene card using mainly dies from Avery Elle.  

My card measures 4.25" x 4.25".  I created a scene using several dies:  Leafy Frames Elle-ments and Grand Photo Mat Elle-Ments (retired but an alternative is the Photo Mat Elle-ments).  I trimmed down the photo mat die and layered the Leafy Frames behind it.  

Speech Bubbles 

My scene frame was adhered with foam adhesive.  I added the cute Leopard from the Peek-A-Boo Jungle set and a speech bubble.  The new Speech Bubbles set has so many perfect sentiments to use with 2 different speech bubbles!! 

Speech Bubbles2 
Grand Photo Mat Elle-ments (retired)
Photo Mat Elle-ments (alternative for the Grand Photo Mat)

Thanks for sharing a part of your day with me!

Speech Bubbles Week - Day 1

March 23, 2020


Hello Avery Elle friends.  Caryn here with a cute card which pairs up a few of the new Spring 2020 release products for a fun birthday card.  I started with a white card base and cut a smaller panel and adhered a strip of paper from the Spring Collection Paper pad down the centre.  I then die cut a small panel out of woodgrain cardstock onto which the elements of my card will go using the Double Pierced Rectangle die collection. 


I then stamped one of the cute dogs from the Hot Dog stamp set and coloured him with Copics and die cut the Speech Bubble and stamped Make a Wish onto it. 
I finished off by die-cutting a number 8 from the Party Numbers die set and adhered it onto my panel.


Supplies:


Hot Dog Week - Day 5

March 20, 2020


Hi Everyone! Today I'm sharing the adorable Hot Dot stamp set!


To create my card I stamped three of the images from Hot Dog. Then I colored and die cut them. Next, I die cut the window in the card from Constellation Scene and added the background. The grass hill was even cut using Constellation Scene!


Finally, I added all of the images to my card and stamped the sentiment. 

Thanks for stopping by!

Supplies:

Hot Dog Week - Day 4

March 19, 2020


Hi everyone! It's Deasy here. Today I want to share my card for Avery Elle featuring Hot Dog. This stamp set is super cute, full of dog images and they are ready to party!


Avery Elle supply that I'm using : 
Hot Dog Clear Stamp for the sentiment and images
Hot Dog Elle-ments to die cut the images
The Spring Collection Paper Pad for the patterned paper
Pierced Clouds Elle-ments to die cut the clouds

I stamp the images, color it using COPIC then die cut it. The sentiment is from white embossing powder. To color the background, I'm using Dye Ink Pad with blending tool on card stock.

Thank you so much for stopping by and happy crafting!


Hugs,


Melania Deasy

Hot Dog Week - Day 3

March 18, 2020


Hello!  It's Hot Dog week on the Avery Elle blog!  Amy here with a card using Hot Dog and an older die called Circle Frames Elle-ments.

Hot Dog

I thought I would show off these cute images from Hot Dog all colored up with Copics.  A great way to keep a card clean and simple is to use a "window".  I used the Circle Frames Elle-ments and ink blended some Squeezed Lemonade Distress Ink behind each of the circle openings to really make my images pop.  The Circle Frames Elle-ments panel was trimmed down, edges 1/4" rounded, and adhered to the ink blended note card with foam adhesive.

All my images were added with a double layer of foam adhesive for more dimension.  I added two white heat embossed black sentiment strips across one of the circle windows and finished my card off with a few black gems.

Hot Dog2

Supplies:

Hot Dog
Hot Dog Elle-ments
Circle Frame Elle-ments

Thanks for sharing a part of your day with me!

Hot Dog Week - Day 2

March 17, 2020


Hi there!

Elena here, with a card featuring the cute pups from Hot Dog:


Here's a little card-making tip for you: add a vintage quality, or extra interest to a piece of patterned paper (this starry one is from the current Spring Collection Paper Pad,) by grabbing a coordinating ink and sponging the edges. I love how it throws a spotlight on the sweet doggies.

I stamped and die-cut 3 out of 4 of the dogs in the stamp set, and arranged them onto the card. Everything was colored using copic markers. I then borrowed the speech bubble image from Speech Bubbles and stamped a greeting into it. The other half of the greeting was stamped onto the white cardstock layer at the bottom.


I added some pieces of confetti all around, and a floating dog balloon. 

I hope you like it! Thanks for stopping by!


Hot Dog Week - Day 1

March 16, 2020


Hello Avery Elle friends,

Hot Dog! It's Hot Dog inspiration week on the Avery Elle blog. I have a card to share with you today featuring the pups from this adorable stamp set along with some of the patterns from The Spring Collection paper pad.

 I wanted to feature as many of the dogs from the Hot Dog set as I could on my card, so I set a scene using the Party Tags Elle-ments dies. I used the second largest die to cut tags from some of the fun patterned paper in The Spring Collection paper pad. After die-cutting the tags, I trimmed off the top of each tag creating a straight edge at the end to align with the edges of the card. 

I stamped the dog, bone and balloon images onto white card stock and colored the images with Copic markers before die cutting the images with the coordinating Hot Dog Elle-ments dies.


I place the main images onto each of the tags that I arranged on a white A-2 card base. I added polka dots with a white gel pen to one of the party hats and stamped the sentiment onto the purple tag with black ink.  I chose to keep my card flat for easy mailing, but you could totally add some sequins or enamel dots to really amp up the party fun!

Supplies:

Thanks so much for stopping by! 
I hope you have a wonderful day!
Katie

Loads Of Happy Week - Day 4

March 12, 2020


Hi Everyone! Ashley here sharing Loads of Happy  paired with a few other sets! 


I started this card with the unicorn and bumper car from Peek a Boo Fair. I knew I wanted to use a Loads of Happy sentiment but by starting with the images I was able to establish colors and layout. Next, I heat embossed the large happy birthday sentiment from the Loads of Happy stamp set. The font style is perfect and trendy and the size is so fun to work with. The card needed a little bit more so I added the balloons from Sweet Swines. Finally, I stamped a few starts from Peek a Boo Fair. 


I'm so glad I have a card to add to my Birthday card stash. I love having several available for all of the upcoming birthdays!

Thanks for stopping by!

Supplies:

Loads Of Happy Week - Day 3

March 11, 2020


Hello everyone! I'm here with a super fun Loads Of Happy card!


For my project, I first created an ink blended background. Then, I added a heavy dose of Avery Elle Shimmer Spray and some ink splatters. Once it was dry I added the awesome chunky Loads Of Happy sentiments. 


Finally, to create my card, I added a little piggy from Sweet Swines and frame from Wonky Scallops.

Thanks so much for stopping by and have a great day! 

Loads of Happy Week - Day 2

March 10, 2020


Hi there!

Elena here, with a card that shows off Loads of Happy and Hot Dog:


I started out by stamping and die-cutting the dog and confetti images from Hot Dog, and then I colored them using copic markers.

Then, I cut a piece of white cardstock for the card-base, and used a blending brush and an aqua-colored ink to add color to the background. I created an ombré effect by heavily saturating the top of the card, and blended it down to almost white at the bottom. It's a fun and easy way to add color and interest to a card base in only a few minutes!


Then, once I planned out my sentiment placement, I heat-embossed the large happy birthday greeting (from Loads of Happy) in white, so that it would really pop! I stamped the secondary greeting, from Hot Dog, in black ink at the bottom. 

To finish off, I added the gift-bearing dog to the empty corner, and adhered party confetti all around. To fill in some of the blank spaces, I added dots using a white gel pen.

I hope you like my card for today! Thanks for stopping by!

Supplies:


♥.

Loads Of Happy Week - Day 1

March 9, 2020


Hey there.  Caryn here with a look at the awesome Loads of Happy stamp set and co-ordinating dies I love the scale and font in this set and how the set includes the shadow die as well as the regular word die.  Instead of creating a mat with it I used it to create a negative space on the white die-cut layer on my card front and put the Happy die cut into it.  I love how this technique gives a look of depth without adding any actual thickness to the card. 


To create more dimension I die cut the word Happy twice from white cardstock, then once from red and adhered them together.  I then added some Diamond Glaze onto that for some gloss.


I haven't played with the Hello Chum set in a while so thought this would be a good opportunity to grab one of my favourite sharks and add him to the card.


Supplies:


Astronauts Week - Day 4

March 5, 2020


Hi Everyone! Today I'm sharing Astronauts! I love this set and the dies that coordinate with it. 


To create my card I stamped, die cut and colored images from Astronauts. Next, I die cut pieces from the Constellations Scene. I really like how you can customize these dies. The wonky circle, constellations and stars can all be cut separately which make this set SO much fun. I added the scene to a water colored background and added a sentiment from Fairy Ephemera and Midnight Twine.


Thanks for stopping by!

Supplies:

Astronauts Week - Day 3

March 4, 2020


Hi everyone! It's Deasy here. Today I want to share my card for Avery Elle featuring Astronauts. This stamp set is so fun, cute and versatile because it's also perfect for boys and and girls!


Avery Elle supply that I'm using : 
Astronauts Clear Stamps for the sentiment and images
Astronauts Elle-ments to die cut the images
Constellation Scene Elle-ments to die cut background

I stamp the images, color it using COPIC then die cut it. The sentiment is from white embossing powder. To color the background, I'm using Distress Ink Tumbled Glass, Spun Sugar and Shaded Lilac with blending tool then splash watercolor with a brush.

Thank you so much for stopping by and happy crafting!


Hugs,


Melania Deasy

Astronauts Week - Day 2

March 3, 2020


Hi there!

It's Yainea here to share with you a card featuring the fantastic Astronauts stamp set and coordinating dies. Galaxy and starry skies on cards are always a favorite of mine so I enjoyed so much creating this card.


I started by created the background with watercolors, mixing different shades of blues and purples. Than I sprinkled some watercolor and white paint on top.


The images were colored with alcohol markers and the sentiment heat embossed with Avery Elle white embossing powder. When all the elements on the card were put together, I applied some glossy accents on the rocket window and helmet to add more intrerest. It's hard to see on the picture but it looks very cool in real life.

I hope you like my card and feel inspired to create something today! Have a wonderful day! :)


Supply list:


Astronauts Week - Day 1


Hey there, it's Caryn here today with a one-layer card using the fabulous Astronauts stamp set. 

I wanted the little space folk to pop off the card without adding any thickness as this card will be posted.  I achieved a LOOK of dimension (without the bulk) by using some ink blending techniques with some masking.


I started by stamping the moon, astronauts, stars and rocket onto my base card then stamped again on masking paper and then covered up the images on the card.

I used Distress oxide inks to add a "glow" to the moon and stars using Squeezed Lemonade ink.  I then blended (avoided the yellow as much as possible some Blueprint Sketch and Tumbled Glass to create my galaxy background  To add more texture I splattered the whole card using both Avery Elle Shimmer spray and Picket Fence Distress Spray.  

Once I was happy that was all dry I removed the masks and added a small amount of colour to the images just to give some shadows and highlights.


Supplies:


site design by designer blogs