Christmas Magic Week - Day 3

October 31, 2018


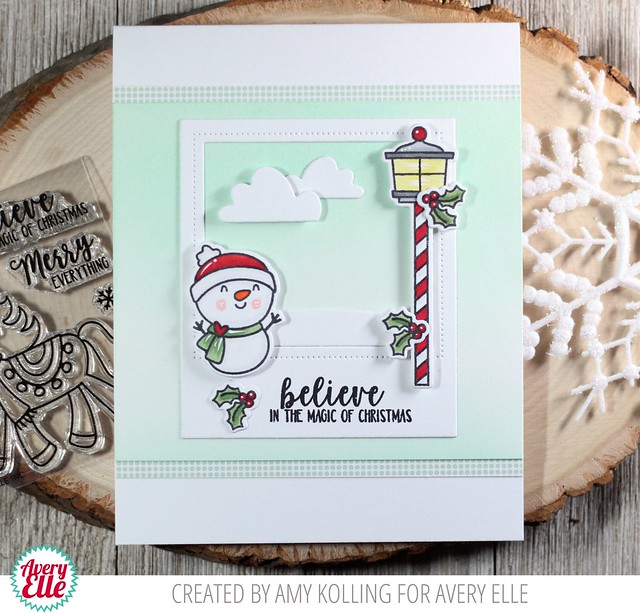
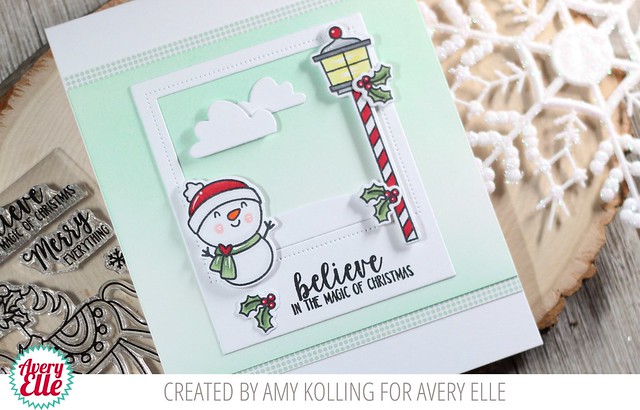
Hello!  Amy K. here today sharing a little piece of magic for Christmas.  Some of my favorite sets are these mini sets from Avery Elle.  Christmas Magic is one of those sets!  

I knew the Photo Mat Elle-ments would be perfect to create my scene.  The entire scene/frame was die cut from white cardstock to keep this clean and simple.  The frame was layered over a cardstock panel that was ink blended with Cracked Pistachio Distress Ink.  

Christmas Magic


I adore the little snowman from Christmas Magic.  I colored the snowman, holly, and light pole in traditional holiday colors with Copics.  The images were added to create my scene, some with foam adhesive.  As a final detail, white pen accents were added with a paint pen.

Christmas Magic2

Supplies:

Christmas Magic Week - Day 2

October 30, 2018


Hello!

Katie here to share a card featuring the Christmas Magic stamp set.  I love the adorable snowman and unicorn and had so much fun creating a glittery backdrop for their winter adventures.


I blended a piece of water color card stock with Distress Oxide ink and spattered it with water to lift the ink in spots.  I used a white gel pen to make some of the dots larger and more defined.


I stamped the images from the Christmas Magic stamp set and colored them with Copic markers.  I die cut the images using the coordinating Christmas Magic Elle-ments die.  I die cut the sentiment from glitter card stock and the snow drift from glitter fun foam.  Finally, I adhered the images to the card, popping up the snowman and unicorn with some foam tape.

Supplies

Thanks for stopping by!
Katie


Christmas Magic Week - Day 1

October 29, 2018


Hey there, Caryn here with a card featuring the cute-as-can-be Christmas Magic stamp set.  I've paired it with the fabulous Let It Snow dies to create a cute festive scene - with lots of Avery Elle Glitter!


I blended a background using Distress Oxide inks on to the card bas then die cut the snowy frame using lilac card.  I glued some chunky glitter onto this for a frosy effect.


Then I simply stamped and coloured the images, die cut hem and adhered them onto the card.  The longest part of making this was waiting for the glue to dry under the glitter!

Supplies:

A Merry Little Christmas Week - Day 5

October 26, 2018


Hi everyone! It's Deasy here. Today I want to share my card for Avery Elle featuring A Merry Little Christmas. I love this stamp set because it's full of adorable critters and so perfect for Holiday theme!


Avery Elle supplies that I'm using :
A Merry Little Christmas Clear Stamps for the images
A Merry Little Christmas Elle-ments to die cut the images
Polar Peek-A-Boo Pals Clear Stamps for the sentiment using white embossing powder
Wonky Scalloped Frames Elle-ments to die cut the frame for the shaker

I stamp the images, color it using Copic then die cut it. To color the background. I'm using Distress Ink Mermaid Lagoon and Spun Sugar with blending tool then splash water and white watercolor with my brush.

Thank you so much for stopping by and happy crafting!

Hugs,

Melania Deasy

A Merry Little Christmas Week - Day 4

October 25, 2018


Hey everyone! It's Heather here.

Today I'm sharing a project using the new A Merry Little Christmas stamp set. I absolutely love this set. So much. All these critters just make my heart skip a beat.

For my project, I first stamped, die cut and colored in all of the images from the A Merry Little Christmas stamp set. I had so much fun coloring each of these guys in! 

Then, I die cut a panel using the new Let It Snow die. On my card base, I inked blended a background and then stamped/heat embossed my sentiment before adhering the Let It Snow layer. Finally, I finished it off by adhering all of my animals together to make a scene! 

Thanks so much for stopping by and sharing part of your day with me! Have a great one!

A Merry Little Christmas Week - Day 3

October 24, 2018


Hello friends,

Katie here with a quick tip to share with you today to add a little dimension behind even the most intricate shapes and dies.


I wanted to add some dimension to the outside layer of the Let It Snow Elle-ments die, but all those snowflake openings would be challenging to work around with straight strips of foam tape. The solution comes from that staple of kid crafting- Fun Foam! Adhesive backed foam sheets can be found in the kid's activities area of craft stores or online. 


I die cut the Let It Snow Elle-ments dies from a piece of pink adhesive-backed fun foam.  I used some Mono Liquid Glue to adhere the glitter die cut to the non-adhesive side of the fun foam.  Using liquid glue allowed me to shift and alight the die cuts so that they stacked and aligned perfectly.


I created the scene inside the snow globe using the adorable critters and sentiment from Merry Little Christmas.  I blended an inky background with Distress Oxide inks and stamped the sentiment with black ink. I removed the adhesive backing and affixed the foam backed frame to the note card.  Inside the frame, I added the mouse, deer, gift on top of the glittery oval die-cut and snow flakes from the Let It Snow Elle-ments die. The pink fun foam also adds a pretty pink accent when viewing the card from an angle. 


Supplies:

Thanks so much for stopping by and sharing part of your day with me!  

Have a wonderful day!
Katie

A Merry Little Christmas Week - Day 2

October 23, 2018


Hello friends!

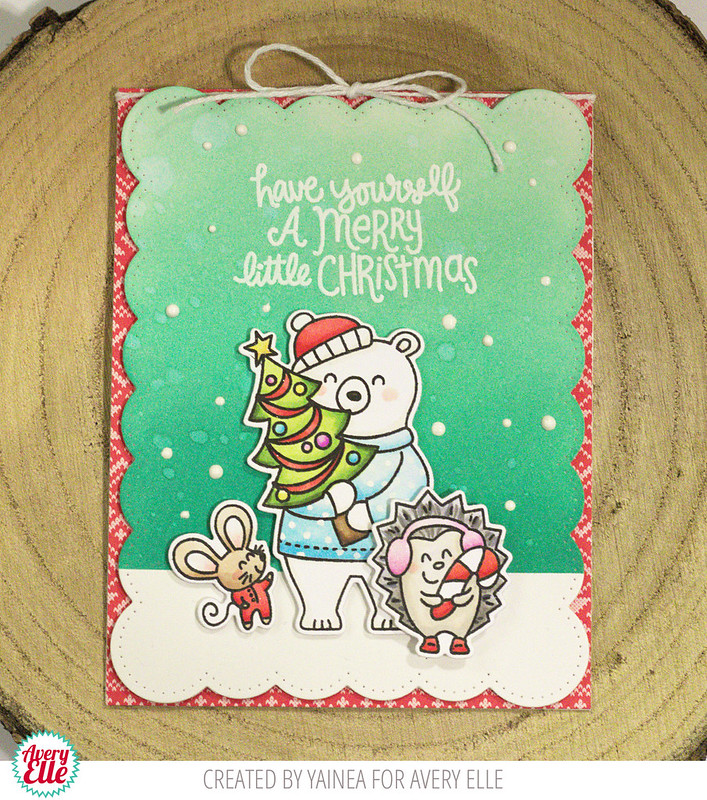
It's Yainea here today sharing a Christmas card featuring the adorable stamps from A Merry Little Christmas. I love the critters in this set! They are not only super cute but there are a prefect sized critter for any Christmas card, I've been using them on different cards lately and they are always the perfect addition :)

This time I decided to use the big bear with the Christmas tree, so as he was going to be the star of the show, I only added two smaller critters and kept my scene super simple.


I colored the critters with alcohol markers and die cut them. Then, I started creating my scene, I masked a snowy floor and inked the background with inks creating a soft gradient. I sprinkled the background with some water and, when it was dry, I die cut it using that beautiful scalloped die.


I heat embossed the sentiment using white embossing powder and arranged the critters in the scene. Finally, I used some dimensional adhesive to adhere the scene panel to a base card with some patterned paper.
I wanted to add some final touches, so I tied some white cord on top making a bow, I added some snow with white liquid enamel and last, some shine here and there with my Wink of Stella pen.

I hope you like my card for today, thanks for stopping by and have a nice day!!

Supply list:

A Merry Little Christmas Week - Day 1

October 22, 2018


Hello!

This is Nicky with you today and I'm sharing a card a made using 'A Merry Little Christmas' from the latest release in combination with elements from the new Let It Snow Die Set.


I stamped my chosen images from the stamp set onto Bristol Smooth cardstock, watercolour painted them using Kuretake Zigs  and highlighted some points with a Uniball Signo White gel pen.  They were then die cut.


A panel of Bristol Smooth cardstock was created and ink blended in Spun Sugar Distress Ink, fading away to nothing at the bottom.  The sentiment was stamped in Archival Ink.


The card was assembled by applying the panel to the card base.  The characters and their gifts were applied with dimensional foam tape.  The final touch was the application of several snowflakes which were die cut using elements from the new Let It Snow Die Set.

Thank you for stopping by to learn about this card today,  I do hope you enjoyed it!  Happy crafting!

Nicky x

A Merry Little Christmas Clear Stamps
A Merry Little Christmas Coordinating Die Set
Let It Snow Die Set

Quirky Christmas Week - Day 4

October 18, 2018


Hi Everyone! Today I'm sharing Quirky Christmas stamps and dies!

Let's check out this fun set...


To create my card I started by stamping two of the trees from the set. I love experimenting with different tree colors. Next I heat embossed the sentiment on a black piece of paper and cut out a circle with Wonky Circles Frames. 

Finally I adhered all of my pieces to a plaid background. This background was created using post-it tape and distress ink. I taped off random stripes and blended ink. 


Thanks for stopping by!

Supplies:

Quirky Christmas Week - Day 3

October 17, 2018


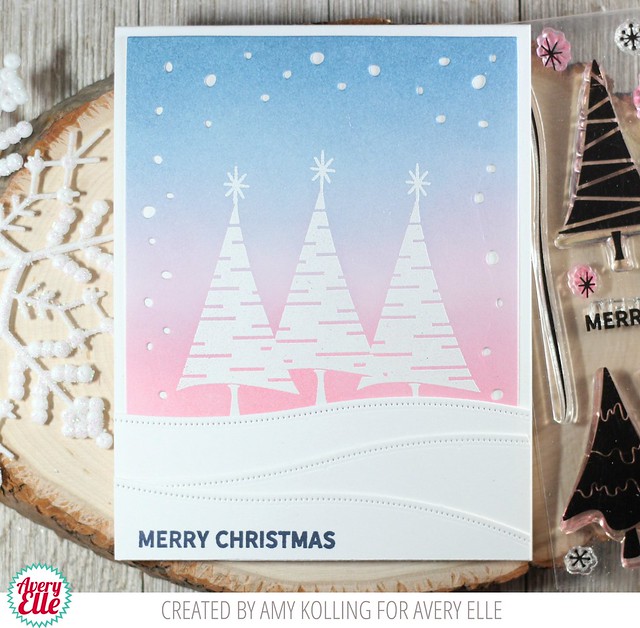
Hello!  Amy K. here sharing a card using one of my favorite stamp sets, Quirky Christmas.  You have seen me use this set a few times......HERE and HERE.  

Quirky Christmas

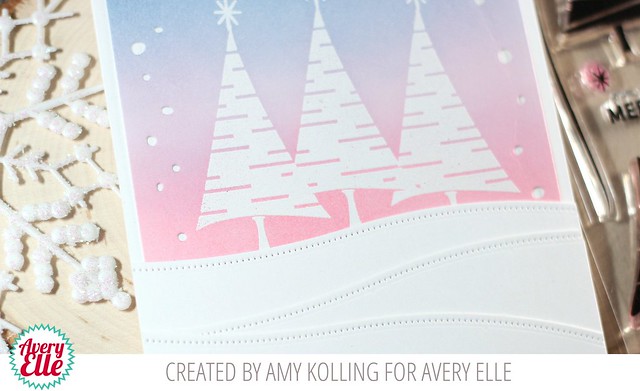
I started by white heat embossing 3 trees from Quirky Christmas onto a panel of Bristol Smooth Cardstock.  I then blended Faded Jeans and Worn Lipstick Distress Inks over my trees making them fade out toward the middle.

To add the effect of snow, I used the Let it Snow Elle-ments to trim the panel and add die cut "snow".  To finish this, I added some "snow banks" using the Picket Fence Elle-ments and stamped my sentiment in Sapphire Pigment Ink.  

Quirky Christmas2

Supplies:

Quirky Christmas Week - Day 2

October 16, 2018


I am popping in with a quick card and video today.  I had so much fun making this card.  I hope you enjoy it as well!


Supplies:

Thanks for stopping by to take a peek. Have a great day!

Quirky Christmas Week - Day 1

October 15, 2018


Hey there, Caryn here today with a collection of cards I created using a fun set called Quirky Christmas.  This set of 4 cards were whipped up in no time using just a few supplies and go to show that you can create very different looks using just one stamp set and some essential dies.  Each card starts with a 4 bar sized white base with a simple, festive colour palette and a few enamel dot embellishments to finish.  I gathered a few fabulous Avery Elle dies, Cherry Pigment Ink and New Moon Dye Ink.  I picked a fresh, green card stock from my stash to complement the red for a traditional Christmas feel.  However, ANY colour scheme would work equally well!

I laid all five of the tree stamps from the set onto my MISTI stamping tool and inked them all up together using Cherry pigment ink.  I stamped 3 times to get a good, even coverage.  I then ran them through my Gemini Junior die cutting machine and die cut them all at one - what a time saver! The supplies for each card are listed under the photos.


And here's a look at all 4 cards together.  I plan to create sets like these in different colours for my holiday cards this year - I might actually get a few sent out too!!!


 Thanks so much for stopping by x


Polar Peek-A-Boo Pals Week - Day 5

October 12, 2018


Hi Everyone! It's Ashley here, back again with my favorite set of this release Polar Peek a Boo Pals

To create my card I started by coloring a few of my favorite animals. 


Next, hand trimmed a hill and added glitter. Then I stamped the sentiment and added a little ink to the background of my card.

Finally, I assembled all of the pieces and added twine. 


I love this cute and simple card! Thanks for joining me!

Supplies

Polar Peek-A-Boo Pals Week - Day 4

October 11, 2018


Hey all!  It's Heather here with a fun card using the new Polar Peek-A-Boo Pals stamp and die set.

I don't know about you but I'm loving the Peek-A-Boo Pals series.  These little critters are just too much fun to play with!

To create my card, I stamped and die cut the critters and their coordinating hooves/paws/wings.  I also stamped and die cut some of the add on accessories.  Then, I colored everything in and on the bulbs around my moose, I added glitter and glossy accents.


To assemble, I ink blended a background and then popped that behind a snowdrift which I mounted underneath a Wonky Scalloped Frames die. Finally, placed all of the images and stamped a sentiment and mounted it onto a A2 card base. 

Thanks so much for stopping by and sharing part of your day with me! 
XOXO, Heather

Polar Peek-A-Boo Pals Week - Day 3

October 10, 2018


Katie - Polar Peek-A-Boo Pals

Hello friends,

Katie here with a card to share with you using the Polar Peek a Boo Pals stamp set and the Three Stars Elle-ments die.  The Polar Peek-A-Boo Pals set is just adorable!!  It features animals that are in their element in the colder wintery months, and it's among my favorite from the Fall Release!


For my card, I stamped and colored the animals using Copic markers and created a glitter shaker background for the Pals. I die cut the Three Star Elle-ments die from a panel of white card stock and stamped the sentiment in black ink.  Behind each star, I blended Distress Oxide ink in red, yellow and green and added a pinch of glitter before sealing up the shaker with acetate and foam tape. 


I tucked each of the Polar Peek-A-Boo Pals to each star and adhered a few flat star sequins as a finishing touch.

Supplies:


Thanks so much for stopping by and sharing part of your day with Avery Elle!

Katie

Polar Peek-A-Boo Pals Week - Day 2

October 9, 2018


Elena - Polar Peek-A-Boo Pals

Hi there!

Elena here, with the adorable moose from Polar Peek-A-Boo Pals:


I started out by stamping, die-cutting and coloring the images. That moose is my fave! I gave him a present to hold (from Brring On The Joy) and used a square die to cut into the Snow Tags snowflake.


Once I had the focal image put together, I set it aside to work on the rest of the card. I rubbed blue ink to cover a Wonky Stitches layer, and stamped the greeting (from A Merry Little Christmas) at the bottom. I love the whimsical nature of that sentiment, and I thought it worked so well with the kooky moose (all of those tangled up lights!)

I hope you like it! Thanks for stopping by!

♥.

Polar Peek-A-Boo Pals Week - Day 1

October 8, 2018


Hello!  This is Nicky back with you today sharing my latest card using the newest Avery Elle release.  This card features 'Polar Peekaboo Pals' in combination with 'Three Stars Die Set'.


To start with I took a panel of white cardstock and die cut it using the new Three Stars Die which makes 3 openings in one pass through your die cutting machine and leaves a stitched edge.   I then stamped and heat embossed the silver sentiment.   I took another panel and ink blended in grey and added the snowflakes by hand with a Uniball Signo White gel pen.  I applied the star panel over the blended panel lifted up on foam tape and then applied it to a 110lb white cardstock base.


I stamped out my images onto Bristol Smooth cardstock using Ranger Archival Ink in Jet Black.  I watercolour painted them using Kuretake Zigs and highlighted some points with the Uniball Signo White gel pen again.


I die the images and applied them tucked into the scene with dimensional foam tape.  The final embellishment was the addition of a few die cut silver glitter cardstock stars.

I do hope you enjoyed my card and I will see you next time.

Nicky x

Three Star Die Set
Polar Peekaboo Pals

Fireside Week - Day 5 & Video

October 5, 2018


Hello!  I am popping in quickly today with an easy card that I created using our new Fireside Clear Stamps and Dies.  I just love it! I created a quick video as well.  Enjoy!


Thanks for stopping by to take a peek. Have a great weekend!

Fireside Week - Day 4

October 4, 2018


Hi Everyone! Ashley here today sharing Fireside. Let's get right to the card...


I started my card by die cutting Let it Snow and backed the die with blue card stock. Next, I stamped, die cut and colored the fireplace and garland. 

I created a fun background with Distress Ink and adhered all the pieces together. I finished the card with the sentiment embossed on a banner. 


Thanks for stopping by today!

Supplies


site design by designer blogs