Peek-A-Boo Car Week - Day 4

June 28, 2019


Hi Everyone! My kids are out for summer break and we are enjoying so many adventures! Today's card features a dolphin having an adventure of his own! ;)


To create my card I started by stamping, die cutting and coloring the jeep and gift from Peek a Boo Car along with the dolphin from Peek a Boo Pals Summer. Next I die cut Summer Scene dies, inked up several pieces and then layered them in to a scene on my card. 


I finished the card with an embossed sentiment from Peek a Boo Car.

Thanks for stopping by!

Supplies:

Peek-A-Boo Car Week - Day 3

June 27, 2019


Hey all! It's Heather here and I'm back with a card and a video today!

I'm super excited about the new Peek-a-Boo Car set but must admit I was a little nervous about it. I didn't know what people would think of it - if it would make sense. I'm thrilled to hear so many of you like it!


To create my card, I created a custom background you can check out in the video.


Once my background was complete, I stamped and colored in the images and assembled my card. So stinking cute and so much fun!

Thanks for stopping by and have a great day!
Heather

Peek-A-Boo Car Week - Day 2

June 25, 2019


Hi there!

Elena here, with a fun card featuring the Peek-A-Boo Car stamp set:


I decided to throw it back to the Peek-A-Boo Pets stamp set and put a cat and dog duo into the car. Of course the cat is driving, and of course the dog has both paw through the windshield  and his whole head out.

I colored the car a bright red, and stuck the cute siren on top. I think that takes this set over-the-top with cuteness!


To create some depth to the entire scene, I placed the present in the back seat, and then backed the car in a piece of vellum. I colored that vellum using a dark grey marker so that it looked more shadowed. 

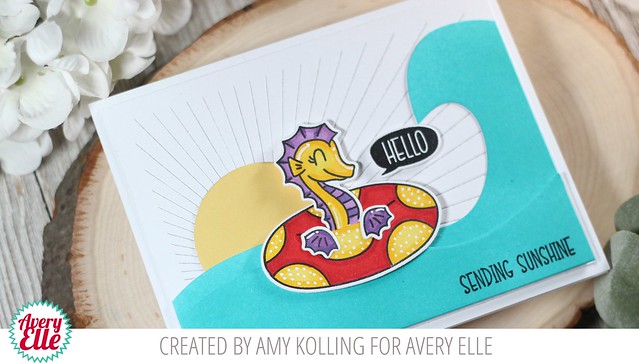
The background was created using the round sun from the Summer Scenes die set, and the polaroid-looking layer that comes with the cute clouds (Grand Photo Mat die set.)

I made sure that the background was as punchy as the bright red car! I selected a vibrant yellow and a vivid blue to make sure that everything really popped against the white polaroid layer. 

To ground the card, I adhered everything onto a kraft colored base layer.

I hope you like it! Thanks for stopping by!


Supplies:


Peek-A-Boo Car Week - Day 1

June 24, 2019


Hi friends!

Katie here with a card to share with you featuring the super fun Peek-A-Boo Car Clear Stamps.  Our Peek-A-Boo friends are all grown up and driving, but they're aren't the only furry pals who are itching to get behind the wheel...


The flashing alarm, or should I say a-llama, light that you can add to the top of the car inspired me to pull out a set released earlier this year, and I put a couple of the Llamas from the Llamazing clear stamp set behind the wheel for a little birthday fun! I stamped, colored and die cut the car, alarm, cactus, gift and llama images. I placed the llamas in the car window and trimmed off any excess of the stamped images. 


I positioned the car and the other images on a panel blended with Distress Oxide inks and anchored it with some die cuts from the Cityscape Elle-ments die (which is on SALE now) and the Dotted Frames Elle-ments set. I stamped the sentiment from the Llamazing stamp set onto black card stock and heat embossed it with white embossing powder. The Reverse Pinked Rectangles Elle-ments die (also on SALE) frames the images and die cuts and some clear sequins add a sparkly finishing touch.

Supplies:

Thanks so much for driving by today!  
Stop by each day this week for more Peek-A-Boo fun! 

Katie

Peek-A-Boo Summer Pals Week - Day 5

June 21, 2019


Hi Everyone! I'm super excited to share this fun summer card!

I LOVE the new Peek a Boo Summer Pals stamp set. I started by stamping, die cutting and coloring the three birds in the set. 


Next, I made them a fun scene to hang out in. The wave was created with the new Summer Scene wave die. I die cut a mask and then inked the wave. Next, I cut out my own palm branch from masking paper and inked it up a few times to create a tree. 

Then, I placed the birds in the scene and added a few splashes from Pool Party Finally, I stamped and die cut "hello" from Peek a Boo Summer Pals and added twine.


Thanks for stopping by!

Supplies:

Peek-A-Boo Summer Pals Week - Day 4

June 20, 2019


Hi everyone! It's Deasy here. Today I want to share my card for Avery Elle featuring Peek A Boo Summer Pals. It's full of super cute critters and they are ready for summer!


Avery Elle supplies that I'm using :
Peek A Boo Summer Pals for the sentiment and images
Peek A Boo Summer Pals Elle-ments to die cut the images

I stamp the images, color it using COPIC then die cut it. The background is from Distress Ink Squeezed Lemonade, Tumbled Glass and Mermaid Lagoon with blending tool then splash water and watercolor with a brush. I add some clear sequins and clear droplets for the embellishment. 

Thank you so much for stopping by and happy crafting!

Hugs,


Melania Deasy

Peek-A-Boo Summer Pals Week - Day 3

June 19, 2019


Hello!  Amy here sharing a summer themed card now that warm weather is here to stay!  I've used the adorable Peek-A-Boo Summer Pals.

Summer Pals

To create my scene, I started with a white die cut panel done with the Ray Die which was attached to a white side-folding notecard.  To create my wave, I used the new Summer Scene Elle-ments to die cut a panel of Peacock Feathers Distress Ink blended cardstock.  I layered the wave die over the ray background.  A die cut circle (as the sun) was tucked in behind the wave.

I Copic colored the cute seahorse and inner tube and both were die cut with the coordinating dies.  My images were positioned and added with foam adhesive.  White pigment ink accents were added as a final touch.

Summer Pals2

Supplies:


Peek-A-Boo Summer Pals Week - Day 2

June 18, 2019


Hi everyone,

Katie here. It's Peek-A-Boo Summer Pals week, and I am so excited to share a card I made using this cute stamp set.


I used the Sea Scene Elle-Ments die to create a little background for a Peek-A-Boo Summer Pal pool party.  The Summer Scene die is perfect for tucking the Pals into the waves.


I stamped, colored, and die cut the images  before adhering them onto the Sea Scene die cut.  I stamped the sentiment and speech bubble with black ink and added a yellow sun to the corner of the water scene. I die cut a yellow circle with the edge of the Sea Scene die to nest the two shapes together.

Supplies


I hope this sunshiny card brightens your day! 
Thanks for stopping by!
Katie


Hi there! It's Elena here, and I also have a card to share with you using the Summer Pals stamp set:


Katie and I had similar ideas to pair the stamp set with the Sea Scene die! I just love it so much. I die-cut it out of white cardstock and did some ink-blending over the whole thing, keeping it much lighter toward the center and darker around the edges. I then flecked on some white paint and added some white gel pen accents.

While Katie colored herself a cute lobster (or crab??) I made him into a frog, and stuffed him into the same floatie as his bff, the flamingo. Seriously, aren't they adorable?


I wanted it to look like the flamingo has her wings around the frog. This is basically me with every best friend I've ever had. I'm a short 5ft, 1inch gal, and I've never had a best friend shorter than 5ft9inches. haha.

A little tip: to get both of them to fit into the floatie together, I had to snip off a part of the flamingo's body. 

I added some spash droplets, a sunny yellow band of patterned paper to the left side of the card and a sentiment from Pool Party to finish things off. 

I hope you like it! Thanks for stopping by!

♥.


Supplies

Peek-A-Boo Summer Pals Week - Day 1

June 17, 2019


Hi!  It's Nicky and Caryn (2 for the price of 1!) with you today using the new Peek-A-Boo Summer Pals stamp set with coordinating dies together with the new Dotted Frame Die - ALL from the most recent release.


To make this card I first ink blended a panel of white cardstock with Distress Inks in Spun Sugar and Squeezed Lemonade.  To do this I used Clarity Stencil Brushes for a very soft and delicate finish.  I then spritzed this panel with Avery Elle's Clear Shimmer Spray and left it to dry for a few minutes before die cutting the A2 panel using the Dotted Frame die.


The outer and inner cuts were directly adhered to my card base and the actual dotted frame portion was backed with foam tape and then stuck down.


The next step was to stamp my images on Strathmore Bristol Smooth cardstock and using Ranger Archival Ink in Potting Soil.  The images were watercolour painted with the following Kuretake Zig colours - Haze Blue, Pale Pink, Pale Yellow, Light Pink and Gray.  The images were die cut, backed with dimensional foam tape and applied to the background.


I used two of the sentiments from the stamp set and stamped them each two or three times in my Misti using a toning pale blue ink.  They were die cut and applied also popped up on foam tape.


Finishing touches were to attach some sparkling clear sequins and add Nuvo Drops in Duck Egg Blue.


Wish you could see the gorgeous shimmer on this card from that spray - treat yourself, you'll love it!


See you next time!


Nicky x


Product Used:-


Peek-A-Boo Summer Pals

Peek-A-Boo Summer Pals coordinating dies
Dotted Frame Die

Caryn :

Like Nicky, I also paired my Summer pals with the Dotted Frame Die and the wavey bits from the Sea Scene Die.  The sentiment came from the previously released Simple Sentiments stamp set and co-ordinating dies.


I'm addicted to the new Clear Shimmer Spray too so before I added my stamped shark and floaty I gave the card a wee spritz - I think it adds to the ocean theme really well!

Supplies:


An Adorable Peek-A-Boo Summer Pals Card by Yainea

June 13, 2019


Hello!

It's Yainea here and today I have a very summery card to share with you. I've combined the shark from the Summer Pals stamp set (I love the critters from this set so much!!) with different dies from Dotted Frame to create this easy but colorful card.


I started by coloring the background, sun and water using Distress inks and a blending tool. For the water I sprinkled some water and ink on top to add texture. Then I stamped the floater and shark and colored them with alcohol markers. I also added some accents here and there with a white pen. I love using this technique on images that are supposed to be shiny or wet.

After adhering all the scene images, I added the frame on top using dimensional adhesive. I always love to adhere several die cut sentiments to end up with a word that looks like a pre-made chipboard element.


Thank you so much for stopping by, I hope you feel inspired! Have a wonderful day!

Supply list:

Modern Floral Frame Week - Day 3

June 12, 2019


Hello friends,

Katie here with a card to share with you featuring the gorgeous Modern Floral Frame stamp set. This beautiful set covers so many occasions from birthdays to babies, weddings to retirement.  It's also the perfect combination of soft florals paired with the graphic straight lines of the geometric frame.


I thought I would introduce a little softness to the frame by stamping and heat embossing the image onto vellum.  To hide the adhesive, I stamped the floral cluster onto watercolor paper. I watercolored the the florals using Avery Elle's Liquid watercolors and adhered the watercolor flowers onto the velum.


Along with a sentiment strip that I die cut using the Classic Flags Elle-ment dies, this gave me two places to hide the adhesive and secure the vellum frame to the card.


I attached the frame to an A2 note card framed with the Dotted Frame Elle-ments die, and I glued a few clear droplets to the card as a finishing touch.

Supplies:

Thanks for stopping by! 
Katie

Modern Floral Frame Week - Day 2

June 11, 2019


Hello!  I am popping in today with two pretty cards that I created using our new Modern Floral Frame Stamp & Die Set.  I just love how quick and easy these were to make and the results are just fantastic!

Supplies:
Modern Floral Frame Clear Stamps
New Moon Dye Ink


Supplies:
Modern Floral Frame Clear Stamps & Dies
New Moon Dye Ink


Thanks for stopping by to take a peek. Have a great day!

Modern Floral Frame Week - Day 1

June 10, 2019


Hey all! Heather here and I'm back with a card using the new Modern Floral Frame.


To create my card, I stamped the floral frame and heat embossed with white embossing powder on black cardstock. Then, I heat embossed the flowers on watercolor cardstock and then added watercolors to the inside of the flowers and leaves. 

Finally I assembled my card by adding a sentiment and a tiny strip of patterned paper and lastly some glass dots. 

Thanks so much for stopping by and sharing part of your day with me. 

Thanks so much!
Heather 

Rainbows Week - Day 5

June 7, 2019


Hey everyone! I'm back with a new Rainbows card.

For my card, I thought it'd be so fun to paper piece this rainbow with cardstock using the coordinating dies - making it more of a stand alone die. I simply just die cut the rainbow die a bunch of times from all of the different cardstock colors and then pieced it all back together. 

I love how you can make it a shaped card too!  SO FUN!

Thanks so much for stopping by! Have a great day!
Heather 

Rainbows Week - Day 4

June 6, 2019


Hi Everyone! I'm so excited about today card so let's dive straight in!

 Today's card is all about rainbows! Who doesn't love a great rainbow?! I have to say that I really enjoyed die cutting this card. Something about choosing my favorite card stock colors and getting a great results in a few minutes is super satisfying. 


After I pieced together the rainbow I simply stamped a sentiment in the cloud area and mounted it all on a cream card stock base. 

Thanks for stopping by!

Supplies:

Rainbows Week - Day 3

June 5, 2019


Hello!  I am sharing my most favorite stamp and die set from the Avery Elle release.......Rainbows!  As I'm sure it's no surprise, this die set flew out of here on release day.  It's fabulous and will be totally worth the wait for more to arrive!

Rainbows

I love a shaped card and the Rainbows Elle-ments comes with a die to do just that!  My card and rainbow layer are all done in white cardstock.  To adhere all the rainbow cardstock pieces, I used the new Liquid Glue Adhesive.  This glue works perfectly to get in those small spaces!  My cloud was stamped with a sentiment from Rainbows and then lightly ink blended on the edges with Broken China Distress Ink.  The cloud was added with foam adhesive and a few raindrops were added to the panel to tie in with the sentiment.  To finish this off, the whole card was spritzed with the new Clear Shimmer Spray.......I love everything about this spray.  It gives off just the right amount of shimmer and shine especially looking at it from an angle. 

Supplies:
Rainbows Clear Stamps
Clear Shimmer Spray

Rainbows2 

Rainbows Week - Day 2

June 4, 2019


Hi there!

Elena here, with a bright and happy card featuring products from the newest release. One of my favorite stamp sets is Rainbows! It makes for such a fun card:


Isn't it fun? I started out by stamping the rainbow image, and used the matching die to cut it out (the die set is great even on its own! You can cut out the stamped image, or use it with colored paper without the stamp set.) I colored the rainbow stripes with copic markers, keeping the colors lighter than a set of primary colors.

Behind the rainbow, I cut out a piece of white cardstock using the Ray background die. I used a blending brush and some soft yellow ink to add a layer of sunshine.


I wanted to do something different for the sentiment. I made the sentiment adopt the same curve as the rainbow and then just chopped it on either side. This was easy to do using the Rainbows die - the tricky curve part is already perfectly layed out.


And what's a sunshine-y day without someone to enjoy it? I have this adorable sunbather (from Pool Party) relaxing in the ocean. Honestly, my favorite thing in the world - to bring my folding chair into the ocean and just read a book with the shallow waves lapping over my legs. Heaven!

I hope you like what I made for you today! Thanks for stopping by!

♥.

Rainbows Week - Day 1

June 3, 2019


Hey there, it's Caryn here today with a card that's sure to put a happy smile on anyone's face!  I am IN LOVE with the new Rainbows dies and stamp set - what a genius creation!  The dies are so versatile.  I've created a shaped card and used Copics to colour and inlay the rainbow pieces. I've managed to create an almost water-coloured effect too using the brand new Clear Shimmer Spray.  Once I coloured each piece I gave it a good spray and then dabbed off the excess.  The effect is so pretty.


I used the Celebrate word die from the new Dotted Frame Elle-ments to create a dimensional sentiment by using double sided foam sheet and adhering the pink card before running it through the Gemini Jnr.  I added a coat of glossy accents too.


Supplies:


site design by designer blogs