Sweetest Week - Day 5

June 29, 2018


Hi Everyone! Ashley here today sharing Sweetest stamps and dies.


I started my card by stamping, die cutting and coloring two of the sweet treats from the set. These are so cute and I loving adding those adorable faces. Next I die cut Oval Burst to frame the treats.


I added the sentiment on a die cut banner then embellished with a few sequins and twine

What's your favorite treat? I can't wait to see how you colors the fun treats in this set!

Supplies

Sweetest Week - Day 4

June 28, 2018


Hey everyone!
Heather Campbell here to share a card using the new Sweetest stamp set and coordinating dies.
To create my card, I stamped, die cut and colored in the images from Sweetest.  Then, I die cut the medium size frame from Wonky Scalloped Frames.   Behind the frame, I tucked a piece of patterned paper from the Sorbet Collection of Avery Elle 6x6 paper pads.
I tied a bow using Aquamarine twine and then stapled it to my card. Then, assembled everything on top. 
Thanks so much for stopping by and sharing part of your day with me.  Have a great one!

Sweetest Week - Day 3

June 27, 2018


Hello friends,

Katie here with the sweetest birthday card to share with you today featuring the Sweetest stamp set!


First I inked a panel of watercolor card stock and spritzed it with water.  Once dry, I stamped the sentiment from Sweetest stamp set in black ink and framed it with the Oval Burst Elle-ments die.


I stamped the two ice cream cone images onto white card stock, colored them with Copic markers, stamped the adorable expressions onto the ice cream, and die cut them with coordinating Sweetest Elle-ments dies. I adhered the cones to the card and added a few clear sequins as a finishing touch. 

Supplies:

Thanks for stopping by!
Katie

Sweetest Week - Day 2

June 26, 2018


Hello!  Amy K. here with a sweet birthday treat for you today!  It is that time of year where I will occasionally enjoy some ice cream.  As a rule though, I don't eat ice cream!  (yes, I know ☺.  How can this be possible?)

Sweetest

To start, I Copic colored 2 ice cream cones from the set Sweetest and die cut using the coordinating Sweetest Elle-ments.  Broken China Distress Ink was blended onto a white panel and die cut using the Starburst Elle-ments.  This die is amazing!  

I layered a panel of white cardstock, that was die cut using the Double Pierced Circle Elle-ments, using foam adhesive over my notecard with the Starburst attached.  I wanted that Starburst in the background.  I adhered my ice cream cones with foam adhesive.  The celebrate sentiment was die cut twice for dimension and a supporting sentiment (masked off) from Sweetest was stamped in black ink on a thin cardstock strip and adhered with foam adhesive.  I added a Midnight Hemp Twine bow to the top to finish!

Sweetest2

Supplies:

Sweetest Week - Day 1

June 25, 2018


I scream, you scream, we all scream for ice cream!  Here's 'Sweetest' from the Avery Elle Summer release together with the coordinating dies.


I let my ice creams take centre stage for this card.  I kept the card background super simple and I just embossed using two of the border dies from Dotted Borders twice over to make a little background definition.  On smooth watercolour cardstock I very lightly stamped the images in distress ink then I watercolour painted them for a no-line affect.


Once painted I applied glue to certain points and dipped them into chunky glitter to pick up 'ice crystals'.  The orange/yellow/red ice pop had glue added to the top portion and it was dunked into micro-beads with the addition of more glue and chunky glitter on top of that!  These features were applied to the base with dimensional foam tape.  I felt the card needed no extra embellishment so I finished off by stamping the sentiment.


I thank you for stopping by today to see how this card was made .... I hope you 'lick' it!

Nicky x

Mod Week - Day 5

Mod Week - Day 4

June 21, 2018


Hi Everyone! Ashley here! I'm excited to share the Mod stamp set. Let's check it out...


For 
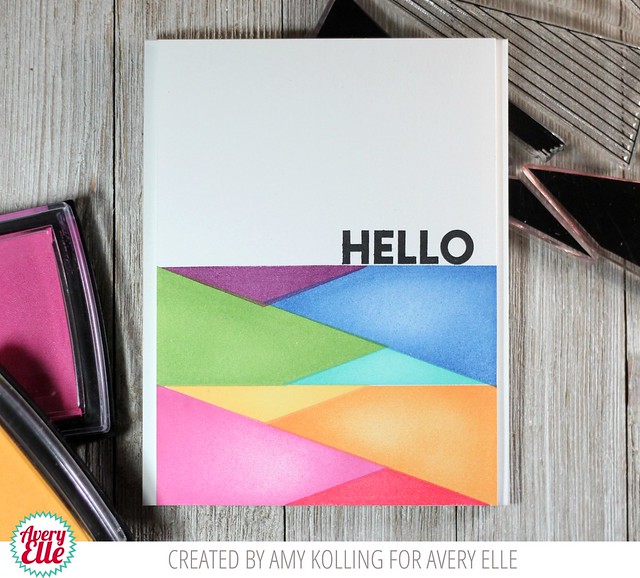
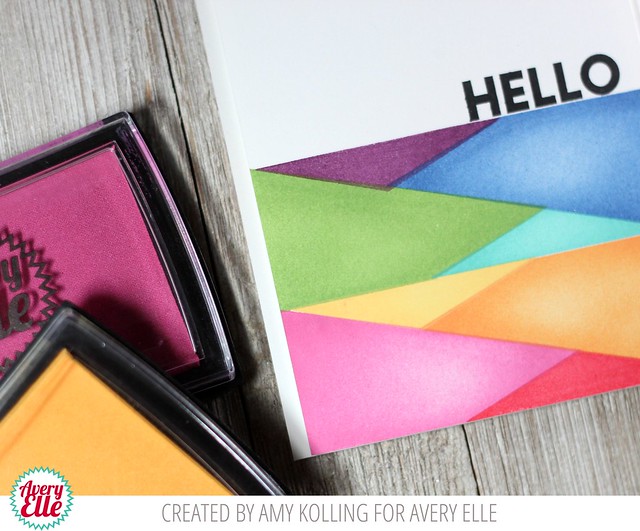
my card today I wanted to experiment with the shapes in this set. After a few tests I came up with this fun sun pattern. To create this trendy look I started by finding the middle on the left side of my card base. I stamped the two large shapes in the set on either side of the middle. Then, I continued the pattern, alternating pieces.


I finished the card with the Hello sentiment from the set and a few Thickers I had on hand. I also decided to stamp and pop the yellow ray up for extra dimension. 

Thanks for stopping by!

Supplies:

Mod Week - Day 3

June 20, 2018


Hello!  Amy Kolling here sharing my project using the stamp set called Mod.  
If you like graphic, this modern set is for you!

Mod

I created a CAS rainbow panel of color using just 2 stamps from the Mod stamp set.  I rotated them as I went with loads of color using Avery Elle Pigment Inks in  Magenta, Cherry, Fizz, Mimosa, Celery, Aquamarine, Sapphire, and Sugar Plum.  Creating this pattern required NO masking at all!  I stamped the bold HELLO in New Moon Pigment Ink.  To finish, I trimmed the sides by an 1/8 of an inch, added foam adhesive, and adhered to a white top folding notecard.

Mod2

Supplies:

Wonky Scalloped Frames Dies

June 19, 2018


Melania - Wonky Scalloped Frames Dies

Hi all! It's Deasy here. Today I want to share my card for Avery Elle featuring Wonky Scalloped Frames Dies. These dies are so versatile! It's full of fun frames and perfect for any themes! 


Avery Elle supplies that I'm using :
Wonky Scalloped Frames Elle-ments to die cut the frame on white glitter card stock and a white foam then glue them all together
Hummingbird Clear Stamps for the images
Hummingbird Elle-ments to die cut the images
Pure White Fine Embossing Powder for the sentiment
The Neutral Collection Paper Pad for the patterned paper
Fog Dye Ink Pad to stamp the images

I stamp the images, color it using Copic then die cut it. I color the background with Dye Ink and blending tool in the inside of the frame. For the embellishment, I add clear sequins.

Thank you so much for stopping by and happy crafting!

Hugs,

Melania Deasy

Mod Week - Day 1

June 18, 2018


Caryn - Mod Stamps

Hi, it's Caryn here with a very clean and simple card using the ultra-graphic Mod stamp set.  I wanted to create a lot of white space so stamped the images towards the bottom of the card front and added the sentiment and striped triangle in gold embossing. 


Supplies:

Peek-A-Boo Pals Week - Day 5

June 15, 2018


FOR THE DAILY MARKER CHALLENGE BLOG HOP - PLEASE CLICK HERE.

Hi Everyone! Ashley here today sharing Peek-a-Boo Pals!


I started my card by stamping a few of the adorable animals from Peek-a-Boo Pals. It was so nice to have the coordinating dies to cut out all of the tiny details! Next I stamped the sentiment from Big Birthday. Stamping this set with my Misty made is so easy and it turned out perfect!


I cut slits in my card to tuck the animals in to. I popped them up just a little with some foam tape. I finished the card with a scrap piece of paper I blended with Distress Oxides. 

Thanks for stopping by!

Supplies:

The Daily Marker 30 Day Coloring Challenge Blog Hop


Hello! This is Day 1. of a two day hop to celebrate the tenth 30 Day Coloring Challenge. Have you heard of “The Daily Marker’s 30 Day Coloring Challenge” hosted by our friend Kathy Racoosin? Right now it’s in the middle of the challenge and it’s a great time to take a leap, jump in and get your feet wet!  Don’t feel like you are jumping into the middle of the challenge I hope you will think of it as a new beginning.
The premise of “The Daily Marker 30 Day Coloring Challenge” is to color something everyday even if it’s for five minutes. However feel free to  jump in or out as time permits.
Any coloring medium is welcomed. Click here for DAY 1. TO UPLOAD YOUR COLORING  or here on Instagramor here on Facebook (FB is a closed group). Please remember to use the hashtag #thedailymarker30day  and tag @kathyrac . For kids & young adults #thedailymarker30daykids
If you have any questions about “The Daily Marker 30 Day Coloring Challenge” you can refer to this post.  

I stamped images from our Avery Elle Magnolia Stamp Set onto a card base and Reversed Pinked die cut. I colored them in with Marvy Uchida's ColorIn Watercolor Pencils and used their ColorIn LePlumeII Blender Pen on top to give a smooth and silky look. I adore using these products to color! They are effortless and the results look fantastic! After using our Pure White Embossing powder on the sentiment and adhering everything together the card was complete. It was so fun to sit down and color for this hop. I need to do it more often!


In honor of the hop we are having a flash sale of 10% off of all orders placed on our website,www.averyelle.com, today, June 15th, 2018. Use code "COLOR" at checkout. Code expires at midnight EST, June 15th, 2018. Not valid on wholesale orders.


You are off to Craftin Desert Divas next. Happy hopping!


Thanks for stopping by to take a peek. Have a great day!

Peek-A-Boo Pals Week - Day 4

June 14, 2018


Hey everyone!  Heather here.
Today I've got two cards for you using the new Peek-a-Boo Pals stamp set.
This stamp set is SO fun!  I loved coloring each of the images in and then die cutting them out and playing with all of the options for positioning them.  

For my first card, I used Wonky Scallops and created a frame to have my peek-a-boo pals peeping out from behind.  I love the star accents and had fun adding accents to the party hats. 

For my second card, I used the smallest Wonky Scallops to create what I envision are hanging picture frames.  
Thank you so much for stopping by and sharing part of your day with me!  Have a wonderful day!
Thanks, 
Heather

Peek-A-Boo Pals Week - Day 3

June 13, 2018


Hello friends,

Katie here with a colorful birthday shaker card to share with you today featuring the Peek-A-Boo Pals stamp set and the Focal Point Stripes Elle-ments die.


First I die cut the Focal Points Stripe die from watercolor card stock.  I removed each strip and added color using Distress Oxide inks.  I spritzed the inked stripes with water and allowed them to dry. Next I stamped the sentiments from Peek-A-Boo Pals onto two of the stripes.  The stripes coordinate perfectly with the sentiments in Peek-A-Boo Pals!


I assembled the shaker element, adding some Avery Elle Coarse Glitter and clear star sequins before sealing it closed with foam tape.  I stamped the elephant and panda from Peek-A-Boo pals and colored them with Copic markers.  I nested the animals along to bottom edge of the shaker window and adhered their paws to the card with foam tape.

Supplies

Be sure to check out the Avery Elle blog this week for even more inspiration featuring the Peek-A-Boo Pals stamp set!

Thanks for stopping by!
Katie

Peek-A-Boo Pals Week - Day 2

June 12, 2018


Elena - Peek-A-Boo Pals Stamps

Hi there!

Elena here, with a cute card featuring the Peek-A-Boo Pals stamp set.


I stamped and die-cut a trio of critters and their matching paws. Aren't they just the cutest? I colored them with copic markers, keeping the tones very light. For the hippo, I used C00, C01 and C3 to color the main body. For the bunny, I used W00, W1 and W3, and for the monkey I used E30, E31 and E34.

I then used the Oval Burst die to frame them out and set them onto a blue background.


I stamped the greeting on sentiment flags from the Wonky Stitches die set, and made them appear to be wrapping around the frame.

The entire scene was set onto a piece of soft violet paper and adhered to a card base. I added a few wooden stars as a finishing touch.

I hope you like what I've created! Thanks for stopping by!

Supplies:

Peek-A-Boo Pals Week - Day 1

June 11, 2018


Hello!

It's Yainea here with a fun birthday card featuring Peek-A-Boo Pals stamps and dies. I'm absolutely in love with this set,you can use it for a lot of different occassions, combining the little critters or using just one of them as I did for my project.


I started by stamping the background with leaves from Tropics stamp set over green cardstock and adding a bit of color with liquid watercolors. Then I stamped and colored the monkeys with my alcohol markers and used the new Oval Burst die to create a frame.


I hope you like my card for today, have a nice week!!

Supply list:

- Peek-A-Boo Pals Clear Stamps
- Peek-A-Boo Pals Elle-ments
- Oval Burst Elle-ments
- Tropics Clear Stamps
- Pure White Fine Embossing Powder
- Celery Liquid Watercolor

Painted Backdrops Week - Day 5

June 8, 2018


Hello! I am popping in quickly to share a cute card and video I made using our Painted Backdrops stamp set.   Enjoy!


Supplies:


Thanks for stopping by to take a peek.  Have a great weekend!

Painted Backdrops Week - Day 4

June 7, 2018


Hi Everyone! Ashley here today sharing Painted Backdrops. I paired it with the adorable Peek a Boo Pals. Let's take a look!


To create my card I started by inking the large circle in Painted Backdrops. By layering three colors I created a watercolor look with ink!

Next I stamped and colored the elephant from Peek A Boo Pals. I cut a slit in my panel and tucked the elephant in. 


Then I die cut the panel out with Reversed Pinked dies. I will use these dies a lot! The card was finished with a sentiment, patterned paper and some twine.

Thanks for stopping by!

Supplies:

Painted Backdrops Week - Day 3

June 6, 2018


Hello!  Amy here sharing a CAS rainbow-tastic card!  Anyone else like a clean and simple card?  Add in a rainbow?  Yes, please!

My card uses the new Painted Backdrops to create my focal point.  Using a Misti and Distress Markers in rainbow fashion, I brushed color over the stripes.  

Painted Backdrops

Tip:  Brush all the colors on the stamp, mist with water, and stamp!  No need to do one color at a time!  Easy peasy!

To finish with a sentiment, I stamped OH HAPPY DAY from Big Birthday in New Moon Pigment Ink and die cut with the Focal Point Stripes Elle-ments.  The panel was adhered  with foam adhesive and some black enamel dots were added.


Painted Backdrops2

Supplies:
 
site design by designer blogs