Pages

January 29, 2021

Sending Hugs Week - Day 5


 Hello!

It's Yainea here today sharing a card featuring the cute Sending Hugs stamps and coordinating dies. This set is just perfect to put a smile on everyone's face during this strange and hard time. The critters are totally adorable and the flowers and leaves add a beautiful pop of color. Also, you can use your favorite patterned paper on the envelope to add a super nice touch! 


To create this card I started with the watercolor background, then I stamped the envelope on white cardstock and once again on patterned paper and I colored the images with alcohol markers. For the sentiment I used the Hello die included to create this block with the negative die cut. Isn't this waving koala the cutest??? 


Thank you so much for stopping by, I hope you feel inspired to create something today!

Supply list:

January 28, 2021

Sending Hugs Week - Day 4


Hi Everyone! Ashley here sharing my favorite card of this release! Are you ready?!


I created this card with the adorable Sending Hugs stamp set. I stamped, colored and die cut several stamps from this set. I just love that happy koala! I added a few felt die cuts from Sending Flowers. I have really been enjoying adding felt to my projects lately. It's such a fun texture and these dies cut it so easily. 


I added some twine, a few drops, sequin and it's finished!


Supplies
Sending Hugs Stamps

Sending Hugs Dies

Sending Flowers Dies


January 27, 2021

Sending Hugs Week - Day 3


Hello! Heather Campbell here.

I had so much fun with the new Sending Hugs stamp set. These little critters are so cute and having them pop out of the envelope is such a fun twist. 

For my card, I first watercolored a background for my card base.


Then, I stamped, colored in and die cut all of the images. I popped everything up on dimensional foam to add layers to my card. 

Super fun and easy and I love how it turned out!

Thanks for stopping by!


January 26, 2021

Sending Hugs Week - Day 2


Hello friends, 

Katie here with a couple of cards to share with you using the absolutely adorable Sending Hugs stamp set. 


For my first card, I stamped the envelop and the koala onto white card stock and colored the images with Copic markers. 


I die cut the images with the coordinating Elle-ments dies and adhered them to the Quilted Frame Elle-ments die cut. I stamped the sentiment on the envelop image and attached the die cut frame to an A-2 notecard. 


For my second card, I die cut the XOXO elements three times on an A2 panel. Behind the die cut panel, I adhered strips of card stock cut in 1/4" strips. 


Inside the "O"s I adhered three of the cute critters from the Sending Hugs set. I stamped the images onto white card stock, colored them with Copic Markers and die cut them with the coordinating Elle-ments dies. I stamped the sentiment onto a strip of white card stock and adhered it to the card. 

Supplies:


Thanks for stopping by! Have a great day!
Katie


January 25, 2021

Sending Hugs Week - Day 1


Hi all! It's Deasy here. Today I want to share my card for Avery Elle featuring Sending Hugs. I love this stamp set because it's full of adorable critters and gorgeous floral images. You can combine it with other stamp set and dies for any themes!


Avery Elle supply that I'm using :
Sending Hugs Clear Stamps for the image
Sending Hugs Elle-ments to die cut the image
Frenchie Clear Stamps for the butterflies image
Frenchie Elle-ments to die cut the butterflies images
Wonky Scalloped Frames Elle-ments to die cut the butterflies images
The Spring Collection Paper Pad for the background


I stamp, color the images using copic then die cut it.

Thank you so much for stopping by and happy crafting!


Hugs,


Melania Deasy


Hey there, Caryn here today sharing a card using the beautiful Sending Hugs stamps and dies.  This is such a clever set, I love the cute critters popping out from the envelope!  


I started by die cutting some patterned paper from the Holiday Paper Collection using the Wonky Rectangles die set and tied some red twine around the bottom half.
I stamped the envelope image twice so I could layer up the front and have the fox peeking out.


I stamped the sentiment on the envelope and finished off with a tiny dot of glossy accents on his nose!

Supplies:

January 22, 2021

A Cake For All Seasons Week - Day 5


Hi Everyone! Ashley here today sharing A Cake for All Seasons.


First, I stamped the cake and frosting, die cut them out and colored them. Then I added a row of glitter to the bottom of the cake. Next I stamped those cut little donuts! There are so many ways to decorate the cake. 


Next, I die cut the frame and banner and stamped the sentiment. I love how this card came together! Thanks for stopping by!

Supplies:


January 21, 2021

ACake For All Seasons Week - Day 4


Hello everyone! It's Heather here. 

I'm here to play with A Cake For All Seasons today. 

I must say I had no idea these cakes were "a thing" until I saw this stamp set and oh my gosh how fun are they?! I love them! What a fun concept too, right?

OK, for my card, I decided I wanted to layer a bunch of the macarons on top of the cake. This seemed like such a fun idea. 


I added some Avery Elle twine and used a background of patterned paper. 

Thanks so much for stopping by and sharing part of my day with me. Have a great one!

XOXO, 
Heather 


January 20, 2021

A Cake For All Seasons Week - Day 3


Hello!  

Amy here with a fun colorful sugary treat (on a card) for a special little girl I know using A Cake for all Seasons.  


I started with a white panel die cut using the Double Pierced Rectangle Elle-ments.  Using Magenta Pigment Ink from Avery Elle, some of the smaller images from the set were stamped around the edges.  By stamping these images in a coordinating color (as the background paper), the main image really stands out.

The birthday cake images were Copic colored and die cut.  The sentiment was stamped on the bottom of the cake for perfect placement.  All of the images were adhered to my panel of stamped images with foam adhesive.  Once done, a shimmer pen was used to embellish parts of the cake.


Supplies:

A Cake for All Seasons

A Cake for All Seasons Elle-ments

Double Pierced Rectangles Elle-ments


January 19, 2021

A Cake For All Season Week - Day 2


Hello friends, 

Katie here with a sweet card to share featuring the A Cake for all Seasons clear stamps. 


I stamped the cake and topper onto white card stock and colored the images with Copic Markers. I die cut the images using the coordinating Elle-ments dies. 


I covered an A-2 card base with patterned paper from the Holiday Collection Paper Pad. I adhered a die cut frame from the retired Wonky Scalloped Frames set and set the stamped images inside the frame. I stamped the sentiment just below the cake stand and added a few flat sequins as a finishing touch. 

Supplies:
Die: Wonky Scalloped Frames Die- retired

Thanks for stopping by!
Katie


January 18, 2021

A Cake For All Seasons Week - Day 1


Hi there!

Elena here, with a card featuring a set from our current release, A Cake For All Seasons.


I just love the big cake image! I used the Valentine-themed cake topper, and packed as much red and pink into the card as I could. Those chocolate-covered strawberries look good enough to eat!

I colored all of the image using copic markers, including the 2 cupids (from the previously-release Cupids set). I placed the cake on a bright red stand, flanked the cake image with the cupids and framed out the whole thing with a Wonky Scalloped frame. I opted to stamp a greeting from Seasonal Simple Sentiments right onto the frame die. 


I hope you like it!

Here's what I used on this card:


Hi all! It's Deasy here. Today I want to share my card for Avery Elle featuring A Cake For All Seasons. This stamp set is very pretty because it's full of cake and fun topping images. You can decorate it as much as you like.


Avery Elle supply that I'm using : 
A Cake For All Season Clear Stamps for the images
A Cake For All Season Elle-ments to die cut the images
The Holiday Collection Paper Pad for the background

 
I stamp, color the images using copic then die cut it. The sentiment is from silver embossing powder. For the embellishment, I add some clear sequins.

Thank you so much for stopping by and happy crafting!


Hugs,


Melania Deasy


January 15, 2021

Frenchie Week - Day 5


Hi there!

Elena here, with a card featuring a set from our current release, Frenchie:


This set is so fun to play with! I stamped and die-cut all of the images for my scene. I used copic markers to color everything in. Before adhering them to the white base layer, I used a blending brush and a blue ink to add some color and interest to the background.

I added highlights to all of the images with a white gel pen, and little white bokeh dots using white enamel paint.

I hope you like it!

Here's what I used on this card:

Frenchie

Frenchie Elle-ments

January 14, 2021

Frenchie Week - Day 4


Hello everyone! It's Heather here. 

Today, I'm sharing a card using the new Frenchie stamp and die set. I must say, I love this set. Might be because I love all things dogs and these little guys are so cute. 

For my first card, I went with a little love theme. 


I stamped, die cut and colored in the images and in the background used some flowers that are meant to fit in the wagon for a scene. 


Next, I went birthday! 


I love the frenchie that's blowing on the party horn. Kills me!

Thanks for stopping by and have a great day!


January 13, 2021

Frenchie Week - Day 3


Hi!  Amy here today with a BIRTHDAY card using the stamp set, Frenchie.

I went with primary colors for a change and colored the wagon, cake, balloons, and present with Copic markers.  To create my scene, I stenciled some clouds in the background with Broken China Distress Ink and added a frame using the Oval Burst Elle-ments in red cardstock.


The sentiment was stamped selectively by masking off a portion to make it fit the scene and the oval shape.  The Copic colored images were all added with various levels of foam adhesive.

Supplies:

Frenchie 

Frenchie Elle-ments

Oval Burst Elle-ments

January 12, 2021

Frenchie Week - Day 2


Hello friends, 

Katie here with a card to share featuring the darling Frenchie stamp set and coordinating Elle-ments dies.  I love that this set is so versatile. It's perfect for Valentine's Day and for celebrating birthdays too! 


I stamped the images onto white card stock and colored them in with Copic markers. I used E50, E51, E53, E55 and E57 for the pups and R00, R01, R02, R05 and YR00, YR01, YR04 for most of the accessories. The pups' bandanas were colored with B000, B00, B01, and B02.


I adhered the colored images to a card panel blended with Distress Oxide ink in one of my favorite shades, Dried Marigold, spattered with some white ink. I stamped the sentiment with Versamark ink onto black cardstock and heat embossed it using white embossing powder. 


Supplies:

Thanks so much for stopping by! 
Katie

Hello!

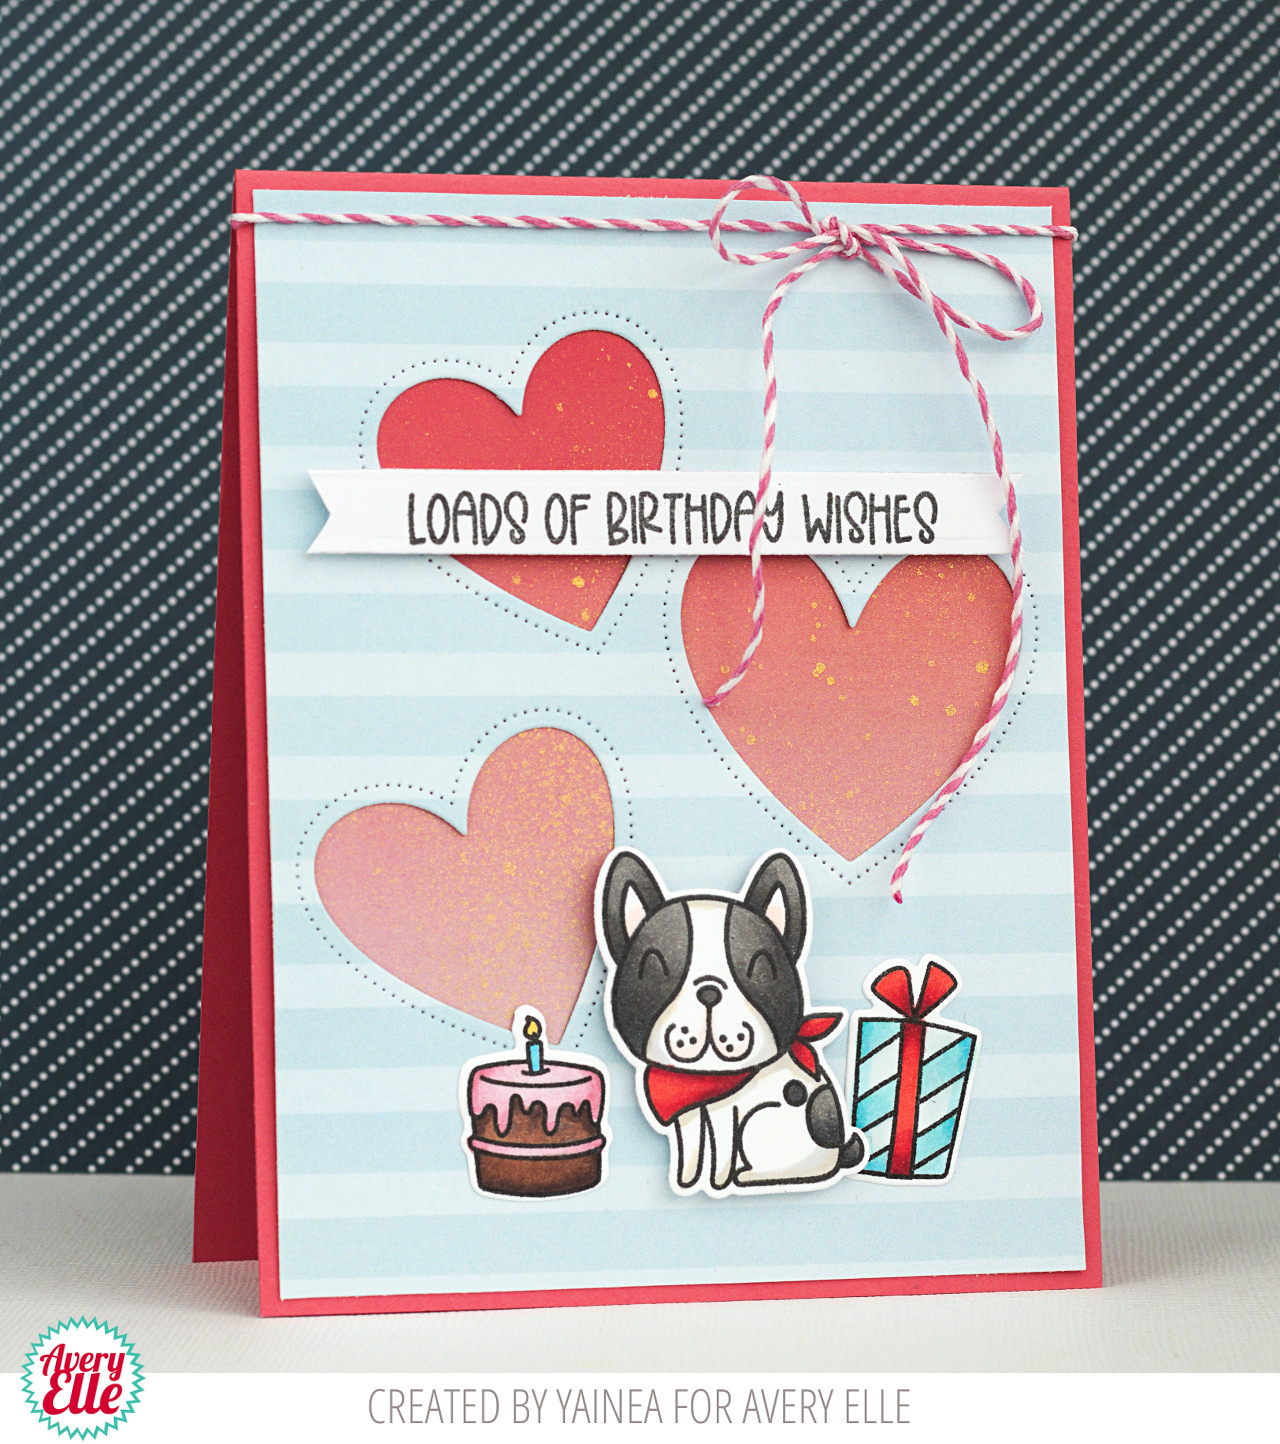
It's Yainea here today sharing a birthday card using the new Frenchie stamp set and coordinating dies. This set is just perfect to create a special card for those French Bulldog lovers, I mean, everyone :P

For the background of this card I used the Three Hearts die with some Avery Elle patterned paper. To add a little shine I sprinkled the red background with golden ink.

I colored the little images with alcohol markers and kept the design clean and simple. I just added some twine because I love twine on cards LOL.

I hope you feel inspired! Thank you so much for stopping by! Have a great day!

Supply list:


January 11, 2021

Frenchie Week -Day 1


Hello, Caryn here today with a card using the super-cute Frenchie stamp set.  Heather has such a talent for creating these doggy designs and this could be one of my favourites yet!

I love how versatile this set is too - not just for everyday cards but birthday and even Valentines - and masculine and feminine styles too!  


I started by adding a strip of patterned paper from the Holiday Paper Collection.  I stamped the images and coloured them with Copics before die cutting them and adding them to the card.


To finish I added some twine and a bit of glittery sparkle with a shimmer pen.

Supplies:


January 8, 2021

Sendiing Flowers Week - Day 5


Hi Everyone! Today I'm sharing Sending Flowers!


To create my card I heat embossed images from Sending Flowers, die cut them and used Distress Oxides to add color. I also made created several flowers and leaves that were just stamped with black ink and die cut. Next, I arranged them on my card base. Finally, I heat embossed and die cut the "thanks" sentiment. 


Thanks for stopping by!

Supplies:

January 7, 2021

Sending Flowers Week - Day 4


Hello everyone and HAPPY 2021! Can you believe it?!?! I'm excited for the possibilities! Bring it on! 

OK, to the card. Today, I'm playing with Sending Flowers


For my card, I started with a piece of very simple patterned paper from this pad. Then, I stamped, die cut and colored in the flowers from Sending Flowers. Finally, I die cut the XOXO three times from card stock and stamped and heat embossed a sentiment from Sending Flowers that I thought paired nicely with the XOXO.


I assembled it all with dimensional foam and then added some very small sequins behind it all. 

Super pretty! I love how it turned out. 

Well, that's it from me today! I hope you have a wonderful day! 
XOXO, Heather 


January 6, 2021

Sending Flowers Week - Day 3


Hello!  
Amy K here with some inspiration using a tiny but mighty stamp set called Sending Flowers.

Sending Flowers

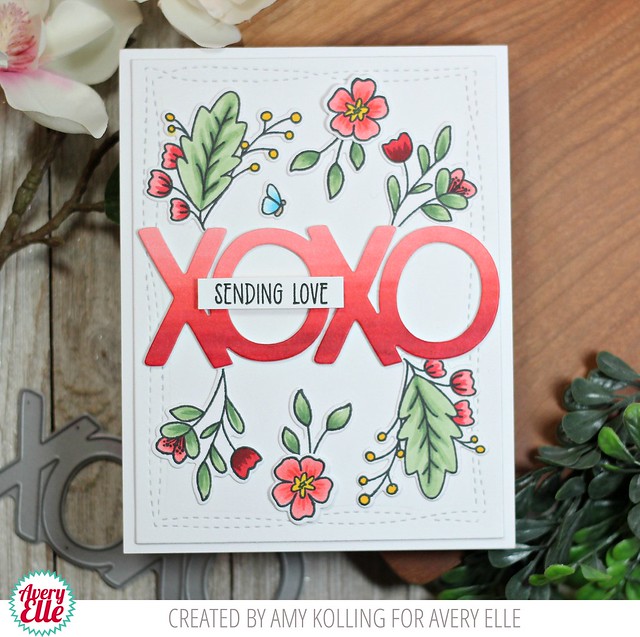
I stamped and colored lots of blooms from Sending Flowers because I just wasn't sure how I was going to lay them out.  I decided on layering them around the XOXO Elle-ments.  The XOXO was colored in ombre fashion with Copics and then layered four times for dimension.  

I added the XOXO to the center of a Wonky Stitches Elle-ments.  Around the sentiment, the florals were added.  To finish, a supporting sentiment strip was added with foam adhesive.

Sending Flowers2

Supplies:

January 5, 2021

Sending Flowers Week - Day 2


Hi there!

Elena here, with a card using a set from our current release, Sending Flowers.


I used the big envelope image from Sending Hugs, mixed it in with flowers from Sending Flowers, and added a sprig from an older set, Fall Foliage.


I used Copic markers to color all of the leaves in various greens, and the flowers and berries in deep reds and purples. I added some light blue shading to the white envelope and placed it, off-centered, onto a Burst Elle-ments frame.

Behind the sunburst background die, I added a piece of burgundy cardstock, and then onto a white card base. The greeting was heat-embossed onto a pink sentiment banner.


I hope you like it! 

Here's what I used on my card:


January 4, 2021

Sending Flowers Week - Day 1


Happy New Year everyone!  Caryn here with my first creation of 2021 using the gorgeous Sending Flowers stamp set.  I pulled out an oldie but goodie product, the Three Hearts die.


I started with some pool coloured card as a mat for my card front and die cut the hearts from it.  Next I stamped the sentiment onto a strip of white card and adhered it to the front of the card.
I stamped and coloured (Copics) the various flower images from the Sending Flowers stamp set and then die cut them and arranged them tucked into the hearts.


For a final touch I added some tiny white dots with a white gel pen and a little heart shaped enamel dot to the sentiment.

Supplies:

Sending Flowers Clear Stamps

Sending Flowers Elle-ments

Three Hearts Elle-ments